OIN'KYOo Contents AV Receiver _iiiiiiiii HT-R590 Instruction Manual Thank you for purchasing an Onkyo AV Receiver. Please read this manual thoroughly before making connections and plugging in the unit. Following the instructions in this manual will enable you to obtain optimum performance and listening enjoyment from your new AV Receiver. Please retain this manual for future reference.
WARNING: TO REDUCE THE RISK OF FIRE OR ELECTRIC SHOCK, DO NOT EXPOSE THIS APPARATUS TO RAIN OR MOISTURE. CAUTION: 51 i Important 1° 2. 3. 4. 5. 6. 7. 8° 9° 10. 11. 12. 13. 14. ED 2 flash with arrowhead symbol, within an equilateral triangle, is intended to alert the user to the presence of uninsulated "dangerous voltage" within TO REDUCE THE RISK OF ELECTRIC SHOCK, DO NOT REMOVE COVER (OR BACK). NO USER-SERVICEABLE PARTS INSIDE. REFER SERVICING TO QUALIFIED SERVICE PERSONNEL.
Precautions 1. 2. 3. 4. Recording Copyright--Unless it's for personal use only, recording copyrighted material is illegal without the permission of the copyright holder. AC Fuse--The AC fuse inside the unit is not user- For U.S. models serviceable. If you cannot turn on the unit, contact your Onkyo dealer. Care--Occasionally you should dust the unit all over with a soft cloth. For stubborn stains, use a soft cloth dampened with a weak solution of mild detergent and water.
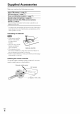
Supplied Accessories Make sure you have the following accessories: Indoor FM antenna (_ page 17) AM loop antenna (_ page 17) Power cord (Brazilian models)(_ Speaker setup microphone 5_ 51 page 17) (_ page 24) Remote controller (RC-799M) and two batteries (AA/R6) (_ page 4) (Note for China: The battery for the remote controller is not supplied for this unit.) i * Ill catalogs name and on packaging, indicates the color.
Contents Introduction Important Safety Instructions ......................................... Precautions ....................................................................... Supplied Accessories ...................................................... Features ............................................................................ Front & Rear Panels ......................................................... Front Panel ..................................................................... Display ....
Features Amplifier "1 "x.v.Color" • 130 Watts/Channel @ 6 ohms • 130 Watts/Channel @ 6 ohms (IEC) Manufactured • 160 Watts/Channel @ 6 ohms (JEITA) 5,956,674; • Optimum 51 Gain Volume • H CPS (High Current Power Transformer i is a trademark of So W Corporation.
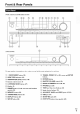
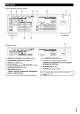
Front & Rear Panels [i_';ltIi _ (North American m© (Asian and Brazilian i models) u ,_, models) O:NKYO i T i Y i f T i 7 i The page numbers in parentheses show where you can find the main explanation for each item.
® /[ I ', PCM HEiMiMOpt I.__ '" /i []D+ []PL_xzEX TrueHD Neo:6 , ® ® ® dhL_-uD MSTR ES 96124 Exp, ,FM STEREO, ,yAudy sse y D nammEQVol " AUTO ® _ SLEEP I I_TUNED4 ' MUTING I_ models) (22) i For detailed information, see the pages in parentheses.
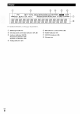
(North American and Asian models) _GA_E_ 2 tTW CO_ J.® > ® ®® 2 s_r_ ,9®1®1®!@ ®1® nE_0,E ® .........
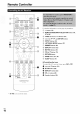
Remote Controller iii i ___@ For detailed information, see the pages in parentheses. @ _) button (18) _) REMOTE MODE/INPUT SELECTOR buttons(19, 47 to 48) (_) TONE and Tone Level buttons (43) @ Arrow &/¥/m/_ and ENTER buttons (_ SETUP button (34) (_ LISTENING MODE buttons (27) (_ DIMMER button (32) (_) DISPLAY button (32) ,_,_ (_ MUTING button (33) O VOL A/V button (19) _) RETURN button _......
Connecting the AV Receiver Connecting the Speaker Cables The following surround illustration back speaker, shows connect which speaker should be connected it to the SURROUND Surround back/ Surround back/ front high right front high left BACK to each pair of terminals. or FRONT Surround rli ht HIGH If you're using only one k terminals. Surround left Center CENTER 7.
Speaker Configuration The following table indicates depending on the number No matter how many subwoofer bass. is recommended the channels of speakers speakers (_ page settings 24) or manually (_ use that you have. ® you use, a powered for a really powerful To get the best from your surround need to set the speaker you should • Don't connect more than one cable to each speaker terminal. Doing so may damage the AV receiver. • Don't connect one speaker to several terminals.
r,_!,'l';/l'RE !L_ [_/'a'/';I';Y_';i'I_ Connected image with AV components HDMI : Video & Audio cable Other cables _ : Video ..........: Audio L I . AV receiver - Blu-ray TV, projector, etc. DVD AV receiver _- Disc/ Blu-ray player Game console TV, projector, etc, Disc/ Game DVD player console • Before making any AV connections, read the manuals supplied with your AV components. • Don't connect the power cord until you've completed and double-checked all AV connections.
VCR or DVD recorder/Digital Video Recorder 1I Game console Satellite/cable Connect TV, projector, set-top box, etc, your components Blu-ray to the appropriate jacks. The default input assignments _: Jack Disc/DVD are shown Assignment player below. can be changed Components [nput Output etc, (_ page 35).
i 2 ,,d Jo®® @ i <:!ili:_ i Connect your components to the appropriate jacks. The default input a ic assignments are shown _,/: Assignment No. Jack [] AUX ]_ INPUT [] USB, AUX [] USB _2 [] DIGITAL INPUT IN VIDEO*I (video iPod/iPhone, MP3 OPTICAL 1 (GAME) Game 2 (TV/CD) TV, CD player 1 (BD/DVD) Blu-ray 2 (CBL/SAT) Satellite/cable set-top set-top etc. TV, projector, etc.
1 Make sure that each Onkyo connected with an analog [] in the hookup 2 Make 3 If you're change With using (3 is cable (connection page 15). (see the illustration). an RI Dock or cassette the Input 1-41 (Remote special examples) the R I connection component audio Display Interactive), (3 page tape deck, 32).
This section explains how to connect the supplied indoor FM antenna and AM loop antenna. The AV receiver won't pick up any radio signals without any antenna connected, so you must connect the antenna to use the tuner. North • Be careful that you don't injure yourself when using thumbtacks. Insert wire, Assembling antenna American Brazilian Asian models and models FM75_ FM75£_ ¢ Insert the plug fully into the jack. Insert the plug fully into the jack.
Turning On/Off the AV Receiver OON/STANDBY ii ...................... ii.......... , ........ ......... :,i!i, I........ii!!!iil;,ii;_ ,5 @ 1 Press O ON/STANDBY on the front panel. or Press RECEIVER The AV receiver followed by O on the remote comes on, the display controller. lights. [o//j 1 Press O ON/STANDBY on the front panel.
Playback See "Controlling operation Other Onkyo of other components Components" (3 page about the 47). first,USB Press l'_ozLr--r_i [hT'J[_ N Operating with the remote controller 1 2 Press RECEIVER SELECTOR.
@ _ll,-I This button selects the next song. @ This button fast-forwards the current song. @ This button stops playback. @ MODE You call switch between Standard Mode and Extended Mode during iPod/iPhone playback. @ This section iPod/iPhone. explains Compatible iPod/iPhone Made how to play music files on the models for: RANDOM iPod touch ( 1sL 2nd, 3rd and 4th generation), This button performs random playback. All of the songs ill the current folder will be played ill random order.
Extended Mode control The content information is displayed on-screen, and you can control at the screen. Top screen Playlists, Shuffle (lists are displayed) the content while looking list: Artists, Songs, Albums, Genres, Songs, Using the Tuner Composers, Now Playing With the built-in tuner you can enjoy AM and FM radio stations. You can store your favorite stations as presets for quick selection. You can change the frequency steps (_ page 41 ).
m Manual tuning mode In manual tuning mode, FM stations win be in mono. m Selecting 1 1 Press TUNING MODE so that the AUTO indicator goes off on the display. 2 Press and hold TUNING i/¥. To select a preset, use PRESET 4/*- on the AV receiver, or the remote controller's CH +/-. • You call also use the remote controller's The frequency stops changing when you release the button. Press the buttons repeatedly to change the frequency one step at a time. number buttons to select a preset directly.
m Displaying Radio Text (RT) Press RT/PTY/TP The RT information RDS program once. scrolls across Type the display. Display None None News • The message "Waiting" may appear while the AV receiver waits for the RT information. • [f the message "No Text Data" appears on the display, no RT information is available. m Finding Stations by Type (PTY) You can search for radio stations by type. 1 Press RT/PTY/TP twice. The current program type appears on the display.
Using Basic Functions Measurement procedure With the supplied calibrated microphone, Audyssey 2EQ® automatically determines the number of speakers connected, their size for purposes of bass management, optimum crossover frequencies to the subwoofer (if present), and distances from the primary listening position. Audyssey 2EQ then removes the distortion caused by room acoustics by capturing room acoustical problems over the listening area in both the frequency and time domain.
Turn on the AV receiver and the connected TV. 8 On the TV, select the input to which the AV receiver is connected. 2 Use &/¥ to select ENTER. an option, and then press 2EQ: Auto Setup Set the speaker setup microphone at the Main Listening Position @, and connect it to the SETUP MIC jack.
Error Messages While Audyssey Setup Using a Powered Subwoofer 2EQ® Room Correction is in progress, and Speaker one of the error messages below may appear. If you're using a powered low-frequency detected sound subwoofer and it outputs at a low volume by Audyssey very level, it may not be 2EQ Room Correction and Speaker Setup. If the "Subwoofer" Configuration" q volume f'_;,;_,;;;,i'_;ig;;i;'o'_,i_;'i@ -- Error message The options Cancel: Cancel Audyssey Speaker Setup.
Selecting Listening Modes See "Listening Modes" for detailed information about the listening modes (_ page 28). m Listening Mode Buttons I RECEIVER Press first, MOVIEFrV, MUSIC, GAME t'7 MUSIC-MOVIE/TV --GAME i --STEREO 4;;) MOVIE/TV button GAME button This button selects the listening modes intended for use with movies and TV. MUSIC button This button selects the listening modes intended for use with video games.
Input Source The following I g-lR'o_ audio formats by the listening mode. This is mono (monophonic) sound. This is stereo (stereophonic) sound. Two independent audio signal channels are reproduced through two speakers. This sound. is 5. l-channel chauuel I N_'oal are supported This (called surround the poiut-oue is 7.l-channel speakers surround that provide This is Dolby sound. greater This is DTS-ES surrouud existing DTS 5.
m Listening Modes Listening Mode Direct Description Input Source [n this mode, audio from the input source is output without surround-sound processing. The speaker configuration (presence of speakers) and speaker distance settings is disabled. "Advanced are enabled, but much of the processing set via Home A/V Sync does not have effect on the analog Setup" for more details (_ page 34). audio. Speaker Layout 12.1113.1II5.1I menu See |HI.
Listening Speaker Description Mode Layout Dolby Dolby [n this mode, Digital processing. The speaker configuration (presence of speakers), crossover fi'equency, speaker distance, A/V Sync and much of the processing set via Home menu are enabled. See "Advanced Setup" for more details Plus*6 page (÷ Dolby Ni1NN[_il Digital audio fi'om the input source is output without surround-sound Ni1NN[_il [NillNi11_-l*2 34).
The Home menu provides used menus without you quick having access to go through standard menu. This menu enables and view the current information. to frequently the long you to change With the sleep timer, you can set the AV receiver to turn off automatically alter a specified period. settings 1 Press RECEIVER to select by SLEEP followed the required repeatedly sleep time.
NINIb'I NN!R You can adjust the brightness of the AV receiver's display. When you connect 1 properly. must configure Press RECEIVER followed by DIMMER repeatedly to select: dim, dimmer, or normal This setting brightness. 1 • (North American and Brazilian models) Alternatively, you call use the AV receiver's DIMMER. 2 Onkyo component, you so that R I can work can be done only from the front panel. Press TV/CD, GAME or VCR/DVR. "TV/CD", "GAME" or "VCR/DVR" appears on the display.
Recording Separate AV Sources You can temporarily mute the output of the AV receiver. 1 Press RECEIVER followed by MUTING. The output is muted and the MUTING indicator flashes on the display. • To tmmute, press MUTING again o1"adjust the volume. • The mute is cancelled when the AV receiver is set to Here you can record audio and video from completely separate sources, allowing you to overdub audio onto your video recordings.
Advanced Setup (_) Hardware (_ page 41) @ HDMI Setup (_ page 42) RemotelD AM/FM Freq Step Auto Standby • The on-screen setup menus are displayed when: - There is no video input, o1" -The video input is 480p, 576p, 720p, 1080i, o1"1080p. HDMIThrough Audio TV Out Audio Return Ch LIpSync U I Remote indicator RECEIVER SetupMenu iii _ i H_[I_! --- 2. 3. Component DigitalAudio 4. SpConfig -- 5. LevelCal SpDistance 6. --- 7. 8. AudioAdjust SourceSetup @-- -- 10. 9.
If youconnect avideo component toanHDMIinput, you must assign thatinput toaninputselector. Forexample, if youconnect yourBlu-ray Disc/DVD player toNDMI IN 2, you must assign "HDMI2" selector. m BD/DVD, VCR/DVR, CBL/SAT, GAME, AUX, TV/CD _IN1, IN2: Select a corresponding component video input that the video component has been connected. ,: Select if you're not using the COMPONENT VIDEO OUT. to the "BD/DVD" input Here are the default assignments.
I Surround Back Ch lch: Select if only one surround back speaker is connected. 2ch: by Audyssey 2EQ® Room Correction and Speaker I Setup ome of settings (3 the page 24). in this section are set automatically Here you can check the settings made by Audyssey 2EQ Room Correction and Speaker Setup, or set them manually, which is useful if you change one of the connected speakers after using Audyssey 2EQ Room Correction and Speaker Setup.
"1 For the center by using I This setting Room Correction is set and automatically Speaker Here you can specify listening position Setup by Audyssey (3 page 2EQ0¢ 24). the distance from each speaker 1 • If you're speaker using a haudheld each speaker measured the level settings here as the default sound level meter, adjust the level of so that it reads 75 dB SPL at the listening with C-weighting made settings. position, and slow' reading.
I Dolby EX Dolby Settings m PLIIx These Music (2ch Input) settings If you're settings IIx. apply to only 2-channel not using any surround stereo This setting these Plus and Dolby Pro Logic only. back speakers, Dolby on to broaden the width You can select -3 to 0 to +3 With this setting, backward you can move the sound field forward when using the Dolby listening mode. backward. Higher Lower settings settings surround sound, the balance.
I Reference Audyssey Level Dynamic EQ Reference Level Offset _0 dB: It should be used when listening to movies. _5 dB: Select this setting Preparation Press the input selector to select an input source. 1 buttons dynamic range, for content that has a very wide such as classical music.
About Audyssey Dynamic EQ® Audyssey Dynamic EQ solves the problem of deteriorating sound quality as volume is decreased by taking into account human perception and room acoustics. Dynamic EQ selects the correct frequency response and surround levels moment-by-moment at any user-selected volume setting. The result is bass response, tonal balance, and surround impression that remain constant despite changes in volume.
Changing the remote controller's Setting the Incoming Digital Signal (Fixed Mode) 1 m Fixed While holding down SETUP Mode (about Off: The format is detected automatically. input signal is present, If no digital the corresponding 2 Only 2-channel input signals is not PCM, the PCM I AM/FM "COAXIAL" in the "Audio tkwmat input signals or "OPTICAL" Selector" setting, the signal type in "Fixed Mode". Normally, the AV receiver automatically.
! • Only the input source "HDMI Input" • The power m HDMI Ctrl (RIHD) _off consumption during the HDM[ cases, the power during setting on to allow components connected AV (_ receiver f-qlHD-compatible via HDMI page to be controlled by the 57).
Speaker Levels m LipSync Off m Subwoofer On This function allows the AV receiver Level*l -15 dB to 0 dB to +12 dB in 1 dB steps to automatically correct any delay between the video and the audio, based on the data from the connected monitor. m Center Level -12 dB to 0 dB to +12 dB in 1 dB steps You can adjust the volume • This function works only if your HDMl-compatible HDM[ Lip Sync.
Late Night Function CinemaFILTER m Late Night For Dolby Digital and Dolby Digital Plus sources, the options are: }Off Low: Small reduction in dynamic range. High: Large reduction in dynamic range. I Cinema Filter _Off _On For Dolby TrueHD Auto: Turn this setting on to soften overly [)right movie soundtracks, which are typically mixed for reproduction in a movie theater.
iPod/iPhone Playback via Onkyo Dock iPod/iPhone Alarm It you use the Alarm function on your iPod/iPhone to start playback, the AV receiver will turn on at the specified time and select your iPod/iPhone as the input source automatically. • Linked alarm operations do not work with video playback or when the is set to play a sound. • If you use your iPod/iPhone iPod/iPhone playback with ally other accessories, detection may not work.
_: Available buttons MODE first, I REMOTE Press the appropriate o o Ooc @ (_'1 ® ® TOP ,/ ENTER ,/ 4/=.- ,/ PLAYLIST ® ® ® ® ® ® @ @ P.-, ,/ MENU*2 AITI41_, I I, II, <<, _, I-<<, ,/ _=.
Controlling Other Onkyo Components You can use the AV receiver's remote controller to control your other Onkyo AV components. This section explains how to enter the remote control code (with the default underlined) for a component that you want to control: DVD, CD, etc. The following REMOTE MODE are preprogrammed with remote control codes for controlling the components listed. You do not need to enter a remote control code to control these components.
You can reset a REMOTE MODE to its default remote control code. 1 While holding down REMOTE MODE that you want to reset, press and hold down HOME until the remote indicator lights (about 3 seconds). 2 Within 30 seconds, press REMOTE MODE again. The remote indicator flashes twice, indicating that the button has been reset. Each of REMOTE MODE is preprogrammed with a remote control code. When a button is reset, its preprogrammed code is restored.
_: Available buttons REMOTE MODE first, 1 Press the appropriate }- I._ = ,_'u ;,y. a _> Buttons \ l_ X _3 Irn_ v' (b TOP ® @ ® SETUP ® SEARCH A/_D
Troubleshooting If you have any trouble using the AV receiver, solution If you can't yourself, in this section. contact your Onkyo resolve look for a the issue dealer. N When the power is restored after a power interruption, "CHECK SP WIRE" appears on the display The protection If you can't resolve the issue yourself, AV receiver before contacting try resetting your Onkyo the dealer.
m Only the front speakers produce sound Wheu the Stereo o1"Mouo listeuiug mode is selected, ouly the front speakers and subwoofer produce souud. m The speaker volume cannot be set as required 29 Check to see if a maximum volume has beeu set.
If the video source is connected to all HDMI input, you must assign that input to all input selector, and your TV must be connected to the HDMI OUT. 14, 35 N Can't control other components [f it's all Onkyo component, make sure that the f"41 cable and analog audio cable are connected properly. Connecting N There's no picture from a source connected to an HDMI IN Reliable operation with an HDMI-to-DVI not guaranteed.
m How do I change the language of a multiplex source Use the "Input Adjust" menu Ch (Mux)" setting on the "Audio to select "Main" or "Sub". 37 m The R I functions don't work To use 1"-41, you umst make an analog component connected all 1"-41connection audio connection (RCA) between the and AV receiver, even if they are digitally. and 16 N The following settings can be made for the composite video inputs You must use the buttons on the unit to make these settings.
Connection Tips and Video Signal Path The AV receiver supports several connection formats for compatibility with a wide range of AV equipment. The format you choose will depend on the formats supported by your components. Use the following sections as a guide. • The on-screen setup menus are displayed when: - There is no video input, o1" -The video input is 480p, 576p, 720p, 1080i, o1"1080p.
USB Features • USB mass storage device class (but not always guaranteed). • FATI6 or FAT32 file system • Each folder may contain format. up to 255 music files and folders, and folders may be nested up to 8 levels deep. • USB hubs and USB devices with hub functions are not supported. For and playback from a USB device, supports the following Variable bit-rate may not display N MP3 (.mp3 music the AV receiver file formats. (VBR) files are supported. (Playing times correctly.) or .
About HDMI Designed to meet the increased demands of digital TV, HDMI (High Definition Multimedia Interface) is a new digital interface standard for connecting TVs, projectors, Blu-ray Disc/DVD players, set-top boxes, and other video components. Until now, several separate video and audio cables have been required to connect AV components.
Using an RIHD-compatible TV, Player, or Recorder 1-41I-IlD, which stands for Remote Interactive over HDMI, is the name of the system control function found on Onkyo components. The AV receiver can be used with CEC (Consumer Electronics Control), which allows system control over HDMI and is part of the HDMI standard. CEC provides interoperability between various components, however, operation with components other than 1-41l-llD-compatible components cannot be guaranteed.
3 m How to connect and setup 1 Confirm 1. the connecting Connect and setting. the HDMI OUT jack to the HDMI Confirm the settings. 1. Turn on the power 2. input the power jack of the TV. of the connected off automatically Blu-ray Oisc/OVO player, etc. 3. for all connected components. Turn off the power of the TV, and confirm components that is turned with the link operation. Turn on the power of the Blu-ray Disc/DVD player/recorder. 4.
Specifications Amplifier Section General Rated Output Power All channels: Power Supply (North American and Brazilian) AC 120 V, 60 Hz (Asian) AC 220 - 240 V, 50 Hz Power Consumption (North American (Others) 480 W (North American) 80 watts minimum continuous power per channel, 8 ohm loads, 2 channels driven from 20 Hz to 20 kHz, with a maximum total harmonic distortion of 0.
ONKYO SOUND & VISION CORPORATION 2-1, Nisshin-cho, Neyagawa-shi, OSAKA 572-8540, Tel: 072-831-8023 Fax: 072-831-8163 JAPAN ONKYO U.S.A.