HT-S6100_En.book Page 1 Tuesday, July 1, 2008 4:58 PM Contents Introduction ..................................... 2 7.1ch Home Theater System HT-S6100 AV Receiver (HT-R667) Speaker Package (HTP-750X) Connection .................................... 20 Turning On & First Time Setup.....
HT-S6100_En.book Page 2 Tuesday, July 1, 2008 4:58 PM WARNING: TO REDUCE THE RISK OF FIRE OR ELECTRIC SHOCK, DO NOT EXPOSE THIS APPARATUS TO RAIN OR MOISTURE. CAUTION: TO REDUCE THE RISK OF ELECTRIC SHOCK, DO NOT REMOVE COVER (OR BACK). NO USER-SERVICEABLE PARTS INSIDE. REFER SERVICING TO QUALIFIED SERVICE PERSONNEL.
HT-S6100_En.book Page 3 Tuesday, July 1, 2008 4:58 PM Precautions 1. Recording Copyright—Unless it’s for personal use only, recording copyrighted material is illegal without the permission of the copyright holder. 2. AC Fuse—The AC fuse inside the unit is not userserviceable. If you cannot turn on the unit, contact your Onkyo dealer. 3. Care—Occasionally you should dust the unit all over with a soft cloth. For stubborn stains, use a soft cloth dampened with a weak solution of mild detergent and water.
HT-S6100_En.book Page 4 Tuesday, July 1, 2008 4:58 PM Precautions—Continued Speaker Precautions For British models Placement Replacement and mounting of an AC plug on the power supply cord of this unit should be performed only by qualified service personnel.
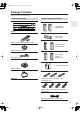
HT-S6100_En.book Page 5 Tuesday, July 1, 2008 4:58 PM Package Contents Make sure you have the following items: AV Receiver HT-R667 Speaker Package HTP-750X Front speakers (SKF-750XF L/R) HT-R667 Center speaker (SKC-750XC) Remote controller and two batteries (AA/R6) Surround speakers (SKM-750XS L/R) Speaker setup microphone Surround back speakers (SKB-750X L/R) Indoor FM antenna Subwoofer (SKW-750X) AM loop antenna (Red) HDMI cable (White) (Green) Speaker cable for front speakers 11 ft.
HT-S6100_En.book Page 6 Tuesday, July 1, 2008 4:58 PM Package Contents—Continued 4 floor pads for the subwoofer Rubber spacers [28] (For the speakers) Base for horizontal mounting (For the center speaker) Dock for iPod DS-A1L * 6 In catalogs and on packaging, the letter at the end of the product name indicates the color. Specifications and operation are the same regardless of color.
HT-S6100_En.book Page 7 Tuesday, July 1, 2008 4:58 PM Using Two Sets of Speakers Speaker Sets A and B You can use two sets of speakers with the AV receiver: speaker set A and speaker set B. Speaker set A should be used in your main listening room for up to 7.1-channel playback. *While speaker set B is on, speaker set A is reduced to 5.1-channel playback. Speaker set B can be used in another room and offers 2-channel stereo playback. *Only analog input sources are output by speaker set B.
HT-S6100_En.
HT-S6100_En.book Page 9 Tuesday, July 1, 2008 4:58 PM Features—Continued *5 RIHD is a trademark of Onkyo Corporation. *6 Manufactured under license from Audyssey Laboratories. U.S. and foreign patents pending. Audyssey 2EQ and Dynamic EQ are trademarks of Audyssey Laboratories. *7 Theater-Dimensional is a trademark of Onkyo Corporation. * iPod is a trademark of Apple Inc., registered in the U.S. and other countries. * “x.v.Color” is a trademark of Sony Corporation.
HT-S6100_En.book Page 10 Tuesday, July 1, 2008 4:58 PM Contents Important Safety Instructions .......................... 2 Precautions ....................................................... 3 Speaker Precautions ........................................ 4 Package Contents ............................................ 5 AV Receiver HT-R667 ........................................... 5 Speaker Package HTP-750X .................................. 5 Dock for iPod DS-A1L ..........................................
HT-S6100_En.book Page 11 Tuesday, July 1, 2008 4:58 PM Contents—Continued Controlling Other Components ..................... 84 Preprogrammed Remote Control Codes ...............84 Entering Remote Control Codes ...........................84 Resetting the Remote Controller ...........................85 Controlling a DVD Player, or DVD Recorder ......86 Controlling a VCR, or PVR ..................................87 Controlling a Satellite Receiver or Cable Receiver ...........................................
HT-S6100_En.
HT-S6100_En.book Page 13 Tuesday, July 1, 2008 4:58 PM Getting to Know the AV Receiver—Continued T TUNING MODE button (54) V AUX INPUT (37, 68) Selects the Auto or Manual tuning mode for AM and FM radio. U SETUP MIC (42) Used to connect a camcorder, game console, and so on. There are input jacks for composite video and analog audio. The automatic speaker setup microphone connects here. Display 1 2 5 6 3 7 4 8 For detailed information, see the pages in parentheses.
HT-S6100_En.
HT-S6100_En.book Page 15 Tuesday, July 1, 2008 4:58 PM Getting to Know the AV Receiver—Continued M CBL/SAT IN A cable or satellite receiver can be connected here. There are S-Video and composite video input jacks for connecting the video signal, and there are analog audio input jacks for connecting the audio signal. N VCR/DVR IN/OUT A video component, such as a VCR or DVR, can be connected here for recording and playback.
HT-S6100_En.book Page 16 Tuesday, July 1, 2008 4:58 PM Speaker Package Subwoofer (SKW-750X) For detailed information, see the pages in parentheses. A STANDBY/ON indicator ■ Front Red: Blue: Subwoofer in standby mode Subwoofer on With the Auto Standby function, the SKW-750X automatically turns on when an input signal is detected in Standby mode. When there’s no input signal for a while, the SKW-750X automatically enters Standby mode.
HT-S6100_En.book Page 17 Tuesday, July 1, 2008 4:58 PM Remote Controller Installing the Batteries 1 To open the battery compartment, press the small lever and remove the cover. Using the Remote Controller When using the remote controller, point it toward the AV receiver’s remote control sensor, as shown below. Remote control sensor STANDBY indicator AV receiver 30˚ 2 3 Insert the two supplied batteries (AA/R6) in accordance with the polarity diagram inside the battery compartment.
HT-S6100_En.book Page 18 Tuesday, July 1, 2008 4:58 PM Remote Controller—Continued Controlling the AV Receiver ■ Controlling the receiver C MULTI CH button (50) Selects the multichannel DVD input. To control the AV receiver, press the [RECEIVER] REMOTE MODE button to select Receiver mode first. You can also use the remote controller to control your DVD player, CD player, and other components. See page 84 for more details. D SP A/B button (50) Used to turn speaker set A or B on or off.
HT-S6100_En.book Page 19 Tuesday, July 1, 2008 4:58 PM Remote Controller—Continued Controlling a Dock DS-A1L To control your iPod when it’s seated in the supplied DS-A1L Dock, which is connected to the HT-R667’s DOCK jack, press the [DOCK] REMOTE MODE button. See page 37 for details on connecting the DS-A1L Dock. To control an RI Dock other than the DS-A1L, see “Controlling Other Components” on page 84. C Previous [ ] button Restarts the current song. Press it twice to select the previous song.
HT-S6100_En.book Page 20 Tuesday, July 1, 2008 4:58 PM Connecting Your Speakers Enjoying Home Theater Thanks to the AV receiver’s superb capabilities, you can enjoy surround sound with a real sense of movement in your own home—just like being in a movie theater or concert hall. You can enjoy DVDs featuring Dolby Digital or DTS. With analog or digital TV, you can enjoy Dolby Pro Logic IIx, DTS Neo:6, or Onkyo’s original DSP listening modes.
HT-S6100_En.book Page 21 Tuesday, July 1, 2008 4:58 PM Connecting Your Speakers—Continued Speaker Configuration Speaker Connection Precautions For 7.1-channel surround-sound playback, you need seven speakers and a powered subwoofer. Read the following before connecting your speakers: The following table shows which channels you should use based on the number of speakers you have.
HT-S6100_En.book Page 22 Tuesday, July 1, 2008 4:58 PM Connecting Your Speakers—Continued Connecting Speaker Set A Connecting Speaker Set B 1 Strip 5/8" of insulation from the ends of the speaker cables, and twist the bare wires tightly, as shown. 2 Unscrew the terminal. Fully insert the bare wire, making sure that it’s touching the threaded shaft in the center. Screw the terminal tight. 5/8" 1 Strip 3/8" of insulation from the ends of the speaker cables, and twist the bare wires tightly, as shown.
HT-S6100_En.book Page 23 Tuesday, July 1, 2008 4:58 PM Connecting Your Speakers—Continued Center Speaker Base Wall Mounting The center speaker base is for mounting the center speaker horizontally. If you put it on a TV stand or AV stand, aim it toward the listening position. The center speaker should sit securely on the base. If it’s loose, try resetting it. The cradle surface of the base features two stoppers to prevent the speaker from moving.
HT-S6100_En.book Page 24 Tuesday, July 1, 2008 4:58 PM Connecting Antennas This section explains how to connect the supplied indoor FM antenna and AM loop antenna, and how to connect commercially available outdoor FM and AM antennas. The AV receiver won’t pick up any radio signals without any antenna connected, so you must connect the antenna to use the tuner. AM antenna push terminals Connecting the AM Loop Antenna The supplied indoor AM loop antenna is for indoor use only.
HT-S6100_En.book Page 25 Tuesday, July 1, 2008 4:58 PM Connecting Antennas—Continued Connecting an Outdoor FM Antenna Connecting an Outdoor AM Antenna If you cannot achieve good reception with the supplied indoor FM antenna, try a commercially available outdoor FM antenna instead. If good reception cannot be achieved using the supplied AM loop antenna, an outdoor AM antenna can be used in addition to the loop antenna, as shown.
HT-S6100_En.book Page 26 Tuesday, July 1, 2008 4:58 PM Connecting Your Components AV Connection Color Coding About AV Connections RCA-type AV connections are usually color coded: red, white, and yellow. Use red plugs to connect rightchannel audio inputs and outputs (typically labeled “R”). Use white plugs to connect left-channel audio inputs and outputs (typically labeled “L”). And use yellow plugs to connect composite video inputs and outputs.
HT-S6100_En.book Page 27 Tuesday, July 1, 2008 4:58 PM Connecting Your Components—Continued Connecting Audio and Video Signals to the AV Receiver By connecting both the audio and video outputs of your DVD player and other AV components to the AV receiver, you can switch the audio and video signals simultaneously simply by changing the input source on the AV receiver. : Signal Flow Video Video Audio Audio TV, projector, etc. DVD player, etc.
HT-S6100_En.book Page 28 Tuesday, July 1, 2008 4:58 PM Connecting Your Components—Continued Video Connection Formats Video equipment can be connected to the AV receiver by using any one of the following video connection formats: composite video, S-Video, component video, or HDMI, the latter offering the best picture quality. Video input signals flow through the AV receiver as shown, with composite video, SVideo, and component video sources all being upconverted for the HDMI output.
HT-S6100_En.book Page 29 Tuesday, July 1, 2008 4:58 PM Connecting Your Components—Continued Connecting a TV or Projector Step 1: Video Connection Choose a video connection that matches your TV ( A , B , or C ), and then make the connection. Step 2: Audio Connection Choose an audio connection that matches your TV ( a , b , or c ), and then make the connection. The onscreen setup menus appear only on a TV that is connected to the HDMI OUT.
HT-S6100_En.book Page 30 Tuesday, July 1, 2008 4:58 PM Connecting Your Components—Continued Connecting a DVD player Step 1: Video Connection Choose a video connection that matches your DVD player ( A , B , or C ), and then make the connection. You must connect the AV receiver to your TV with the same type of connection. Step 2: Audio Connection Choose an audio connection that matches your DVD player ( a , b , or c ), and then make the connection. • To enjoy Dolby Digital and DTS, use connection b or c .
HT-S6100_En.book Page 31 Tuesday, July 1, 2008 4:58 PM Connecting Your Components—Continued Hooking Up the Multichannel Input If your DVD player supports multichannel audio formats such as DVD-Audio and SACD, and it has a multichannel analog audio output, you can connect it to the AV receiver’s multichannel input. Use a multichannel analog audio cable, or several normal audio cables, to connect the AV receiver’s DVD IN FRONT L/R, CENTER, SURR L/R, SURR BACK L/R, and SUBWOOFER jacks to the 7.
HT-S6100_En.book Page 32 Tuesday, July 1, 2008 4:58 PM Connecting Your Components—Continued Connecting a VCR or DVR for Playback With this hookup, you can use the tuner in your VCR or DVR to listen to your favorite TV programs via the AV receiver, which is useful if your TV has no audio outputs. Hint! Step 1: Video Connection Choose a video connection that matches your VCR or DVR ( A , B , or C ), and then make the connection. You must connect the AV receiver to your TV with the same type of connection.
HT-S6100_En.book Page 33 Tuesday, July 1, 2008 4:58 PM Connecting Your Components—Continued Connecting a VCR or DVR for Recording Step 1: Video Connection Choose a video connection that matches your VCR or DVR ( A or B ), and then make the connection. The video source to be recorded must be connected to the AV receiver via the same type of connection. Step 2: Audio Connection Make the audio connection a .
HT-S6100_En.book Page 34 Tuesday, July 1, 2008 4:58 PM Connecting Your Components—Continued Connecting a Satellite, Cable, or Terrestrial Set-top box or Other Video Source With this hookup, you can use your satellite or cable receiver to listen to your favorite TV programs via the AV receiver, which is useful if your TV has no audio outputs. Hint! Step 1: Video Connection Choose a video connection that matches the video source ( A , B , or C ), and then make the connection.
HT-S6100_En.book Page 35 Tuesday, July 1, 2008 4:58 PM Connecting Your Components—Continued Connecting Components with HDMI About HDMI Designed to meet the increased demands of digital TV, HDMI (High Definition Multimedia Interface) is a new digital interface standard for connecting TVs, projectors, DVD players, set-top boxes, and other video components. Until now, several separate video and audio cables have been required to connect AV components.
HT-S6100_En.book Page 36 Tuesday, July 1, 2008 4:58 PM Connecting Your Components—Continued Making HDMI Connections Step 1: Use HDMI cables to connect the AV receiver’s HDMI jacks to your HDMI-compatible DVD player, TV, projector, and so on. Step 2: Assign each HDMI IN to an input selector in the HDMI Input Setup (see page 46). ■ Video Signals Digital video signals received by the HDMI IN jacks are normally output by the HDMI OUT for display on your TV.
HT-S6100_En.book Page 37 Tuesday, July 1, 2008 4:58 PM Connecting Your Components—Continued Connecting a Camcorder, Game Console, or Other Device Step 1: Make the video connection A . Step 2: Make the audio connection a . a MASTER VOLUME TUNING PRESET AUX INPUT L AUDIO R ENTER SETUP L AUDIO R OUT RETURN AUX INPUT SETUP MIC L VIDEO AUDIO A R AUX INPUT VIDEO VIDEO OUT Camcorder, game console, etc.
HT-S6100_En.book Page 38 Tuesday, July 1, 2008 4:58 PM Connecting Your Components—Continued Connecting a CD Player or Turntable ■ CD Player or Turntable (MM) with Built-in Phono Preamp Step 1: Choose a connection that matches your CD player ( a , b , or c ). Use connection a for a turntable with a built-in phono preamp.
HT-S6100_En.book Page 39 Tuesday, July 1, 2008 4:58 PM Connecting Your Components—Continued Connecting a Cassette, CDR, MiniDisc, or DAT Recorder Step 1: Choose a connection that matches your recorder ( a , b , or c ), and then make the connection.
HT-S6100_En.book Page 40 Tuesday, July 1, 2008 4:58 PM Connecting Your Components—Continued Connecting Onkyo Components Step 1: Make sure that each Onkyo component is connected to the AV receiver with an analog audio cable (RCA). Step 2: Make the necessary connections (see illustration below). Step 3: If you’re using an MD or CDR component, change the Input Display (see page 48).
HT-S6100_En.
HT-S6100_En.book Page 42 Tuesday, July 1, 2008 4:58 PM First Time Setup This section explains the settings that you need to make before using the AV receiver for the very first time. Using Audyssey 2EQ® Automatic Speaker Setup With the supplied calibrated microphone, Audyssey 2EQ® automatically determines the number of speakers connected, their size for purposes of bass management, optimum crossover frequencies to the subwoofer (if present), and distances from the primary listening position.
HT-S6100_En.book Page 43 Tuesday, July 1, 2008 4:58 PM First Time Setup—Continued 2 SETUP MIC Put the speaker setup microphone at measurement point 1 (page 42), and connect it to the SETUP MIC jack. Auto Speaker Setup 3 Press [ENTER]. The automatic speaker setup starts. Auto Speaker Setup AUDYSSEY Do not unplug microphone. AUDYSSEY Please keep quiet. Please place microphone at center Now Measuring. . . of listening area at ear height.
HT-S6100_En.book Page 44 Tuesday, July 1, 2008 4:58 PM First Time Setup—Continued 6 When the measurements are complete, the following screen appears. Auto Speaker Setup AUDYSSEY Error Messages While the automatic speaker setup is in progress, one of the following error messages may appear: ❏ Ambient noise is too high Auto Speaker Setup AUDYSSEY Calculating... Ambient noise is too high. Retry Cancel 7 When the calculations are complete, the following screen appears.
HT-S6100_En.book Page 45 Tuesday, July 1, 2008 4:58 PM First Time Setup—Continued Auto Speaker Setup AUDYSSEY To Retry the Automatic Speaker Setup - - - - - Speaker Detect Error - - - - FL SL SBL C : : : : Yes --No Yes FR SR SBR SW : : : : Press the [ENTER] button. Make sure speakers that cannot be detected are connected properly. Yes Yes Yes --- Retry Cancel The right surround back speaker has been detected but the left surround back speaker hasn’t.
HT-S6100_En.book Page 46 Tuesday, July 1, 2008 4:58 PM First Time Setup—Continued HDMI Input Setup 4 Use the Up and Down [ ]/[ ] buttons to select an input selector, and use the Left and Right [ ]/[ ] buttons to select: HDMI1: Select if the video component is connected to HDMI IN 1. HDMI2: Select if the video component is connected to HDMI IN 2. HDMI3: Select if the video component is connected to HDMI IN 3. HDMI4: Select if the video component is connected to HDMI IN 4.
HT-S6100_En.book Page 47 Tuesday, July 1, 2008 4:58 PM First Time Setup—Continued Component Video Input Setup 4 Use the Up and Down [ ]/[ ] buttons to select an input selector, and use the Left and Right [ ]/[ ] buttons to select: IN1: Select if the video component is connected to COMPONENT VIDEO IN 1. IN2: Select if the video component is connected to COMPONENT VIDEO IN 2. - - - - -: Select if you’re not using the COMPONENT VIDEO OUT. 5 Press the [SETUP] button. Setup closes.
HT-S6100_En.book Page 48 Tuesday, July 1, 2008 4:58 PM First Time Setup—Continued 2 Use the Up and Down [ ]/[ buttons to select “1. Input Assign,” and then press [ENTER]. ] the“Automatic Audio Input Selection Setup” on page 49 to the same input (e.g., COAX1 (Auto) or COAX2 (Auto)). • This procedure can also be performed on the AV receiver by using its [SETUP], [ENTER], and arrow buttons. Changing the Input Display 3 Use the Up and Down [ ]/[ ] buttons to select “3.
HT-S6100_En.
HT-S6100_En.
HT-S6100_En.book Page 51 Tuesday, July 1, 2008 4:58 PM Common Functions This section explains functions that can be used with any input source. Muting the AV Receiver You can temporarily mute the output of the AV receiver. DISPLAY Press [RECEIVER] first MUTING Press the [RECEIVER] REMOTE MODE button, and then press the remote controller’s [MUTING] button. The output is muted and the MUTING indicator flashes on the display.
HT-S6100_En.book Page 52 Tuesday, July 1, 2008 4:58 PM Common Functions—Continued 7Using Headphones Displaying Source Information For private listening, you can connect a pair of stereo headphones (1/4-inch phone plug) to the AV receiver’s PHONES jack. ON/STANDBY STANDBY DOCK MULTI CH You can display various information about the current input source as follows. Press the [RECEIVER] REMOTE MODE button, and then press the [DISPLAY] button repeatedly to cycle through the available information.
HT-S6100_En.book Page 53 Tuesday, July 1, 2008 4:58 PM Common Functions—Continued Specifying the Digital Signal Format The following table shows the display indicator for each digital signal format. Format Display Dolby Digital DTS PCM PCM Normally, the AV receiver detects the format of digital input signals automatically. However, if you experience either of the following issues when playing PCM or DTS sources, you can specify the signal format manually.
HT-S6100_En.book Page 54 Tuesday, July 1, 2008 4:58 PM Listening to the Radio ■ Manual Tuning Mode Listening to AM/FM Stations 1 TUNING TUNER TUNING MODE Press the [TUNING MODE] button so that the AUTO indicator disappears from the display.
HT-S6100_En.book Page 55 Tuesday, July 1, 2008 4:58 PM Listening to the Radio—Continued ■ Tuning into Stations by Frequency You can tune into AM and FM stations directly by entering the appropriate frequency.
HT-S6100_En.
HT-S6100_En.book Page 57 Tuesday, July 1, 2008 4:58 PM DS-A1L Dock for the iPod About the DS-A1L Dock With the supplied DS-A1L Onkyo Dock, you can easily play the music stored on your Apple iPod through the AV receiver and enjoy great sound. You can use the AV receiver’s remote controller to operate your iPod. ■ Adjusting the iPod Adapter The iPod adapter needs to be adjusted to match your particular iPod.
HT-S6100_En.book Page 58 Tuesday, July 1, 2008 4:58 PM DS-A1L Dock for the iPod—Continued Operating Notes: • Before selecting a different input source, stop iPod playback to prevent the AV receiver from selecting the iPod input source by mistake. • If any accessories are connected to your iPod, the AV receiver may not be able to select the input source properly. • While your iPod is in the Dock, its volume control has no effect.
HT-S6100_En.book Page 59 Tuesday, July 1, 2008 4:58 PM Using the Listening Modes Selecting with the Remote Controller Selecting the Listening Modes For a description of each listening mode, see “About the Listening Modes” on page 66. • The Dolby Digital and DTS listening modes can only be selected if your DVD player is connected to the AV receiver with a digital audio connection (coaxial, optical, or HDMI).
HT-S6100_En.book Page 60 Tuesday, July 1, 2008 4:58 PM Using the Listening Modes—Continued Listening Modes Available for Each Source Format Analog and PCM Sources PCM Source format Media Button Listening Mode Mono Multichannel 176.
HT-S6100_En.book Page 61 Tuesday, July 1, 2008 4:58 PM Using the Listening Modes—Continued Dolby Digital and Dolby Digital Plus Sources Dolby Digital Source format Multichannel Media Button Listening Mode Mono DolbyDigital 2ch Mono/ Multiplex DVD, DTV, etc.
HT-S6100_En.book Page 62 Tuesday, July 1, 2008 4:58 PM Using the Listening Modes—Continued DTS Sources DTS, DTS 96/24 Source format Multichannel Media Button ✔ ✔ DTS, DTS 96/24 Mono DVD, CD, etc. Listening Mode Mono 2ch ✔ DVD, CD, etc.
HT-S6100_En.
HT-S6100_En.
HT-S6100_En.
HT-S6100_En.book Page 66 Tuesday, July 1, 2008 4:58 PM Using the Listening Modes—Continued About the Listening Modes Dolby Digital The AV receiver’s listening modes can transform your listening room into a movie theater or concert hall, with high fidelity and stunning surround sound. The illustration shows which speakers are active in each listening mode with 7.1 channel speaker system.
HT-S6100_En.book Page 67 Tuesday, July 1, 2008 4:58 PM Using the Listening Modes—Continued DTS-ES Discrete This mode is for use with DTS-ES Discrete soundtracks, that use a discrete surround back channel for true 6.1/7.1-channel playback. The seven totally separate audio channels provide better spatial imaging and 360degree sound localization, perfect for sounds that pan across the surround channels. Use it with DVDs that bear the DTS-ES logo, especially those with a DTS-ES Discrete soundtrack.
HT-S6100_En.book Page 68 Tuesday, July 1, 2008 4:58 PM Recording This section explains how to record the input source and how to record audio and video from separate sources. Notes: • The surround sound and DSP listening modes cannot be recorded. • Copy-protected DVDs cannot be recorded. • Sources connected to the multichannel DVD input cannot be recorded. • Sources connected to a digital input cannot be recorded. Only analog inputs can be recorded.
HT-S6100_En.book Page 69 Tuesday, July 1, 2008 4:58 PM Adjusting the Listening Modes Using the Audio Adjust Settings With the Audio Adjust functions and settings, you can adjust the sound and listening modes as you like. The Audio Adjust settings are explained below. Multiplex/Mono Settings Multiplex 1 2 Press the [RECEIVER] REMOTE MODE button, followed by the [SETUP] button. The main menu appears onscreen.
HT-S6100_En.book Page 70 Tuesday, July 1, 2008 4:58 PM Adjusting the Listening Modes—Continued ■ Center Width With this setting, you can adjust the width of the sound from the center speaker when using the Dolby Pro Logic IIx Music listening mode. Normally, if you’re using a center speaker, the center channel sound is output by only the center speaker. (If you’re not using a center speaker, the center channel sound will be distributed to the front left and right speakers to create a phantom center).
HT-S6100_En.book Page 71 Tuesday, July 1, 2008 4:58 PM Adjusting the Listening Modes—Continued Using the Audio Settings You can change various audio settings by pressing the [AUDIO] button. Note: • When the Audio TV Out setting is set to On (page 82), the [AUDIO] button is disabled. 1 Press the [RECEIVER] button followed by the [AUDIO] button. 2 Use the Up and Down [ ]/[ ] buttons to select an item. 3 Use the Left and Right [ ]/[ ] buttons to change the setting.
HT-S6100_En.book Page 72 Tuesday, July 1, 2008 4:58 PM Adjusting the Listening Modes—Continued Audyssey Dynamic EQ® Speaker Levels ■ DynamicEQ With Audyssey Dynamic EQ, you can enjoy great sound even when listening at low volume levels. You can adjust the volume of each speaker while listening to an input source. These temporary adjustments are cancelled when the AV receiver is set to Standby.
HT-S6100_En.book Page 73 Tuesday, July 1, 2008 4:58 PM Adjusting the Listening Modes—Continued Listening Mode Presets 4 On the Listening Mode Preset menu, you can specify a default listening mode for each of the audio formats supported by each input selector. The AV receiver will then select the listening mode automatically depending on the format of the input signal.
HT-S6100_En.book Page 74 Tuesday, July 1, 2008 4:58 PM Advanced Setup Speaker Setup 3 Use the Up and Down [ ]/[ ] buttons to select “1. Speaker Configuration,” and then press the [ENTER] button. 4 While the “Subwoofer” setting is selected, use the Left and Right [ ]/[ ] buttons to select Yes or No. Yes: Select if a subwoofer is connected. No: Select if no subwoofer is connected. 5 Use the Down [ ] button to select “Front,” and then use the Left and Right [ ]/[ ] buttons to select Small or Large.
HT-S6100_En.book Page 75 Tuesday, July 1, 2008 4:58 PM Advanced Setup—Continued 7 Use the Down [ ] button to select “Surround,” and then use the Left and Right [ ]/[ ] buttons to select Small, Large, or None. Small: Select if the surround speakers are small. Large: Select if the surround speakers are large. None: Select if no surround speakers are connected. Note: • If the Front setting in step 5 is set to Small, the Large option cannot be selected.
HT-S6100_En.book Page 76 Tuesday, July 1, 2008 4:58 PM Advanced Setup—Continued Double Bass 2 Press the [RECEIVER] REMOTE MODE button, followed by the [SETUP] button. The main menu appears onscreen. If the main menu doesn’t appear, make sure the appropriate external input is selected on your TV. 3 Use the Up and Down [ ]/[ ] buttons to select “2. Speaker Setup,” and then press the [ENTER] button. 4 Use the Up and Down [ ]/[ ] buttons to select “2. Speaker Distance,” and then press [ENTER].
HT-S6100_En.book Page 77 Tuesday, July 1, 2008 4:58 PM Advanced Setup—Continued 8 Press the [SETUP] button. Setup closes. Notes: • The Center and Subwoofer distances can be set up to 5 ft. (1.5 m) more or less than the Left distance. For example, if the Left distance is set to 20 ft. (6 m), the Center and Subwoofer distances can be set between 15 and 25 ft. (4.5 and 7.5 m). • The Surround and Surround Back distances can be set up to 5 ft. (1.5 m) more or 15 ft. (4.5 m) less than the Left distance.
HT-S6100_En.book Page 78 Tuesday, July 1, 2008 4:58 PM Advanced Setup—Continued Equalizer Settings 5 These settings are set automatically by the Automatic Speaker Setup function (see page 42). Here you can adjust the tone of individual speakers. To set the volume of individual speakers, see page 77. 1 2 Press the [RECEIVER] REMOTE MODE button, followed by the [SETUP] button. The main menu appears onscreen.
HT-S6100_En.book Page 79 Tuesday, July 1, 2008 4:58 PM Advanced Setup—Continued Source Setup 6 This section explains items on the Source Setup menu. Items can be set individually for each input selector. 1 Press the input selector buttons to select an input source, and then press the [RECEIVER] REMOTE MODE button. When you’ve finished, press the [SETUP] button. Setup closes. IntelliVolume With IntelliVolume, you can set the input level for each input selector individually.
HT-S6100_En.book Page 80 Tuesday, July 1, 2008 4:58 PM Advanced Setup—Continued Miscellaneous Setup This section explains items on the Miscellaneous menu. 1 2 Press the [RECEIVER] REMOTE MODE button, followed by the [SETUP] button. The main menu appears onscreen. If the main menu doesn’t appear, make sure the appropriate external input is selected on your TV. Use the Up and Down [ ]/[ ] buttons to select “6. Miscellaneous,” and then press [ENTER].
HT-S6100_En.book Page 81 Tuesday, July 1, 2008 4:58 PM Advanced Setup—Continued Hardware Setup 4 Use the Up and Down [ ]/[ ] buttons to select an item, and use the Left and Right [ ]/[ ] buttons to change it. The items are explained below. 5 When you’ve finished, press the [SETUP] button. Setup closes. This section explains items on the Hardware menu. Remote indicator RECEIVER Note: • This procedure can also be performed on the AV receiver by using its [SETUP], [ENTER], and arrow buttons.
HT-S6100_En.book Page 82 Tuesday, July 1, 2008 4:58 PM Advanced Setup—Continued HDMI ■ Output Resolution You can specify the output resolution for the HDMI outputs and have the AV receiver upconvert the picture resolution as necessary to match the resolution supported by your TV. See the “Video Resolution Chart” on page 98 to see how the AV receiver handles video input at different resolutions. Through: Select this to pass video through the AV receiver at the same resolution and with no conversion.
HT-S6100_En.book Page 83 Tuesday, July 1, 2008 4:58 PM Advanced Setup—Continued Notes: • RIHD, which stands for Remote Interactive over HDMI, is the name of the system control function found on Onkyo components. The AV receiver can be used with CEC (Consumer Electronics Control), which allows system control over HDMI and is part of the HDMI standard.
HT-S6100_En.book Page 84 Tuesday, July 1, 2008 4:58 PM Controlling Other Components You can control your DVD player, CD player, and other components with the AV receiver’s remote controller. To control another component, you must first enter that component’s remote control code to a REMOTE MODE button. This section explains how to enter remote control codes and how to control your other components. 1 Look up the component’s remote control code in the separate Remote Control Codes list.
HT-S6100_En.book Page 85 Tuesday, July 1, 2008 4:58 PM Controlling Other Components—Continued Remote Control Codes for Onkyo Components Connected via Resetting the REMOTE MODE Buttons Onkyo components that are connected via are controlled by pointing the remote controller at the AV receiver, not the component. This allows you to control components that are out of view, in a rack, for example. 1 Make sure the Onkyo component is connected with an cable and an analog audio cable (RCA).
HT-S6100_En.book Page 86 Tuesday, July 1, 2008 4:58 PM Controlling Other Components—Continued Controlling a DVD Player, or DVD Recorder By pressing the REMOTE MODE button that’s been programmed with the remote control code for your DVD player (HD DVD, Blu-ray, or TV/DVD combination), you can control your player with the following buttons. A ON/STANDBY button The [DVD] REMOTE MODE button is preprogrammed with the remote control code for controlling an Onkyo DVD player.
HT-S6100_En.book Page 87 Tuesday, July 1, 2008 4:58 PM Controlling Other Components—Continued T PLAY MODE button Selects play modes on components with selectable play modes. U CLR button Cancels functions and clears entered numbers. Note: • If you enter the remote control code for a HD DVD or Blu-ray player that has A, B, C, and D or colored buttons, the [SEARCH], [REPEAT], [RANDOM], and [PLAY MODE] buttons will work as colored or A, B, C, D buttons.
HT-S6100_En.book Page 88 Tuesday, July 1, 2008 4:58 PM Controlling Other Components—Continued Controlling a Satellite Receiver or Cable Receiver By pressing the REMOTE MODE button that’s been programmed with the remote control code for your satellite receiver, cable receiver, or DVD recorder (DBS/PVR combination or cable/PVR combination), you can control your player with the following buttons. For details on entering a remote control code for a different component, see page 84.
HT-S6100_En.book Page 89 Tuesday, July 1, 2008 4:58 PM Controlling Other Components—Continued Controlling a CD Player, CD Recorder, or MD Player By pressing the REMOTE MODE button that’s been programmed with the remote control code for your CD player, CD recorder, or MD player, you can control your player with the following buttons. A ON/STANDBY button The [CD] REMOTE MODE button is preprogrammed with the remote control code for controlling an Onkyo CD player.
HT-S6100_En.book Page 90 Tuesday, July 1, 2008 4:58 PM Controlling Other Components—Continued Controlling a Cassette Recorder By pressing the REMOTE MODE button that’s been programmed with the remote control code for your cassette recorder, you can control your cassette recorder with the following buttons. The [TAPE] REMOTE MODE button is preprogrammed with the remote control code for controlling an Onkyo cassette recorder when used with an connection.
HT-S6100_En.book Page 91 Tuesday, July 1, 2008 4:58 PM Controlling Other Components—Continued Controlling a TV By pressing the [TV] REMOTE MODE button that’s been programmed with the remote control code for your TV (TV/DVD combination or TV/VCR combination), you can control your TV with the following buttons. A ON/STANDBY, TV [ For details on entering a remote control code for a different component, see page 84.
HT-S6100_En.book Page 92 Tuesday, July 1, 2008 4:58 PM Troubleshooting If you have any trouble using the AV receiver, look for a solution in this section. If you can’t resolve the issue yourself, contact your Onkyo dealer. If you can’t resolve the issue yourself, try resetting the AV receiver before contacting your Onkyo dealer. To reset the AV receiver to its factory defaults, turn it on and, while holding down the [VCR/DVR] button, press the [ON/STANDBY] button.
HT-S6100_En.book Page 93 Tuesday, July 1, 2008 4:58 PM Troubleshooting—Continued The surround back speakers produce no sound • The surround back speakers are not used with all listening modes. Try another listening mode (page 59). • Not much sound may be produced by the surround back speakers with some sources. • Check the Speaker Configuration (page 74). • While speaker set B is on, speaker set A is reduced to 5.1-channels and the surround back speakers produce no sound (page 7).
HT-S6100_En.book Page 94 Tuesday, July 1, 2008 4:58 PM Troubleshooting—Continued Tuner Reception is noisy, stereo FM reception suffers from hiss, or the FM STEREO indicator doesn’t light up • Relocate your antenna. • Move the AV receiver away from your TV or computer. • When listening to an AM station, operating the remote controller may cause noise. • Passing cars and airplanes can cause interference. • Concrete walls weaken radio signals. • If nothing improves the reception, install an outdoor antenna.
HT-S6100_En.book Page 95 Tuesday, July 1, 2008 4:58 PM Troubleshooting—Continued Important Note Regarding Video Playback The AV receiver can upscale component video, S-Video, and composite video sources for display on a TV connected to the HDMI OUT. However, if the picture quality of the source is poor, upscaling may make the picture worse or disappear altogether. In this case, try setting the HDMI Output Resolution setting (page 82) to 480p or 720p.
HT-S6100_En.book Page 96 Tuesday, July 1, 2008 4:58 PM Specifications HT-R667 Amplifier Section General Rated Output Power North American: 130 watts minimum continuous power per channel, 8 ohm loads, 1 channel driven at 1 kHz, with a maximum total harmonic distortion of 1% (FTC) Dynamic Power 210 W (3Ω, Front) 190 W (4Ω, Front) 130 W (8Ω, Front) THD (Total Harmonic Distortion) 0.
HT-S6100_En.book Page 97 Tuesday, July 1, 2008 4:58 PM Specifications—Continued Speaker Package HTP-750X ■ Powered Subwoofer (SKW-750X) Type: Bass-reflex Input sensitivity/ Impedance: 140 mV/20 kΩ Maximum output power: 290 W Frequency response: 25 Hz–150 Hz Cabinet capacity: 1.3 cubic feet Dimensions (W × H × D): 10-13/16" × 19-15/16" × 16-3/16" (incl. grille and projection) Weight: 25.6 lbs.
HT-S6100_En.book Page 98 Tuesday, July 1, 2008 4:58 PM Video Resolution Chart The following tables show how video signals at different resolutions are output by the AV receiver.
HT-S6100_En.book Page 99 Tuesday, July 1, 2008 4:58 PM Onscreen Setup Menu Map The onscreen setup menus appear on the connected TV and provide a convenient way to change the AV receiver’s various settings. Settings are organized into eight categories on the main menu, most containing a submenu. Menu 1. Input Assign 2. Speaker Setup 3. Audio Adjust 4. Source Setup 5. Listening Mode Preset 6. Miscellaneous 7. Hardware Setup 8.
Sales & Product Planning Div. : 2-1, Nisshin-cho, Neyagawa-shi, OSAKA 572-8540, JAPAN Tel: 072-831-8023 Fax: 072-831-8163 ONKYO U.S.A. CORPORATION 18 Park Way, Upper Saddle River, N.J. 07458, U.S.A. Tel: 201-785-2600 Fax: 201-785-2650 http://www.us.onkyo.com/ ONKYO EUROPE ELECTRONICS GmbH Liegnitzerstrasse 6, 82194 Groebenzell, GERMANY Tel: +49-8142-4401-0 Fax: +49-8142-4401-555 http://www.eu.onkyo.