
User Manual


5
> Specifications > Settings > Listening Modes > Playback Function > Basic Manual
Troubleshooting | Appendix
Setup Menu
The unit allows you to configure advanced settings to provide you with an even better
experience.
Operation:
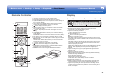
Use the on-screen displays (OSD) that appear on the TV to make the settings.
Press
on the remote controller to display the Setup menu.
Setup
1. Input/Output Assign
2. Speaker
3. Audio Adjust
4. Source
5. Hardware
6. Multi Zone
7. Miscellaneous
1. TV Out / OSD
2. HDMI Input
3. Video Input
4. Digital Audio Input
5. Analog Audio Input
Select the item with the cursor / buttons of the remote controller and press ENTER to
confirm your selection.
Use the cursors / to change the default values.
•
To return to the previous screen, press .
•
To exit the settings, press .
1� Input/Output Assign
Make settings related to output to the TV, change the settings for jack allocations to the
various input selectors, and set the feature for displaying operations on the TV (OSD), etc.
■ 1� TV Out / OSD
Setting Item Default Value Setting Details
HDMI Out MAIN Select the HDMI jack to be connected with the TV.
"MAIN": When connecting the TV to the HDMI OUT
MAIN jack
"SUB": When connecting the TV to the HDMI OUT
SUB jack
"MAIN+SUB": When connecting to both the MAIN
and SUB jacks
1080p -> 4K
Upscaling
Off When using a TV that supports 4K, video signals
input at 1080p can be automatically upscaled to 4K
for output.
"Off": Do not use this function
"Auto": Use this function
•
Select "Off" if your TV does not support 4K.
Super Resolution (2) When you have set "1080p -> 4K Upscaling" to
"Auto", you can select the degree of video signal
correction from "Off" and between "1" (weak) and
"3" (strong).
OSD Language English Select the on-screen display language from the
following.
(North American models) English, German, French,
Spanish, Italian, Dutch, Swedish
(European, Australian and Asian models) English,
German, French, Spanish, Italian, Dutch, Swedish,
Russian, Chinese