YONKS, Contents Introduction... Digital Surround System HT X-22HDX Instruction Manual Playing Your AV Components ing the Listening Modes... Thank you for purchaser this You product, Please Troubleshooting. red this manual thoroughly before making any cons or plugging in your new Yonks product.
WARNING: «0 REDUCE THE RISK OF FIRE OK ELECTRIC SHOCK, DO NOT E APPARATUS TRAIN OR MOOS CAUTION: TO REDUCE THE RISK OF ELECTRIC SHOCK. BG NOT REMOVE COVER 10R BACK: NO USES VICE ABLE PARTS inkling SERVICING TO QUALIFIED PERSONNEL WARNING [| Avis] A \ EEE far Tha fighting ich with arn sol. wit wo quilts easel.
Precautions Ln w Sinless if Recording Copyright for personal use only. recanting copyrighted material is illegal without the permission of the copyright holder AC Fussbudget AC fuse inside Hie mit is not users serviceable. IF you cannot tum on the vit, contact your Honky dealer Occasionally you should dust the wit all over with 1 soft cloth. For suborn stains. te 2 soft cloth dampened with o wei isolation of mild detergent and water, Dry the newt immediately Care afterwards with a clean lath.
Precautions—Continued Package Contents ATTENTION: POUR EVILER LES CHOCS ELECTRIFIER. INTRODUCE LA LAME LA JS LARGE DE LA FICHE SAND LA BORNE CORRESPOND ANTE DE LA PRIES ET SPOUSE FUSSY AL FOND.
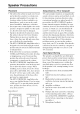
Speaker Precautions Placement Using Close Computer + The sub woofer cabinet is made out of wood and bs therefore sensitive to extreme feat apertures and humidity. Do nof put it in Ovations subject to direct sunlight or in henna places. such as near an air conditioner, humidifier. bathroom, or kitchen. Do pot put water or other liquids close to the speakers. If liquid is spilled ver the speakers. the drive nits may be damaged. rs should wanly be placed on sturdy, aces tut wie free from vibration.
Contents portent Safety Instructions Precautions. Package Contents, Speaker Precautions. Features... Getting to Know the HTX.22HD! Top Panel and Front. Dispirit re Rear Panel Remote Controller. Installing the Batteries Aiming the Re mole Controlling Using the Re mole Controller Connecting the Speakers Enjoying Home Theater Affixing the Rubber Feet Speaker Connection Precautions Making the Connections... Connecting only the Front Speakers Connecting 5.
Features HT X-22HDXPAW: Amp/Subwoofer power amplifier with built-in sub woofer 25 WINCH (FL, FR, C, SL. SR). 662 1 kHz (European and North American models) 50°W (SB), 302 100 Hz (European model} 47 W (SE), 3 100 Hz (North American mode!) 3 HDMI inputs. | output (HDMI Version 1.4. with 31) Over HDMI and Audio Return Chan nel. plus support for up to 1080p. Deep Color. x.v.Color. Lip Sync, D TS-HD Master Audio”, D TS-HD High Resolution Audio, Dolby Trued. Dolby Digital Plus, SCAD.
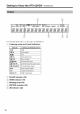
Getting to Know the HT X-22HDX [Top Panel and Front. Top panel For detailed information. see the pages in parentheses.
Getting to Know the HT X-22HDX— Continued For detailed information, see the 1} Listening mode and format indicators sin parentheses.
Getting to Know the HT X-22HDX Continued Rear Panel ages in parentheses.
Remote Controller [installing the Batteries Notes: © Hf the remote controller doesn’t work reliably, try replacing the batteries Don’t mix new and old ent types of batteries Coteries of differ H you intend not to use the remote controller for 3 long time, remove the batteries to prevent damage from leakage or corrosion peered batteries should be removed ss nous as possible to prevent leakage or corrosion.
Remote Controller—Continued Using the Remote Controlling | | These buttons are used to control the HTX -22HDX For detailed information, see the pages in parentheses, [Tm T SLEEP button (29) W [om te ON/STANDBY button (27) SETUP button (38) pee | CH SEL button (36) ® Arrow and ENTER buttons (38) (6) VOLUME buttons (28) # LISTENING MODE buttons 32) 5 DIMMER button (29) TEST TONE bunion (36) DISPLAY button (30) L NIGHT button (38) ) MUTING button (29) RETURN button (38) {@ INPUT SELECTOR buttons (28) Buttons t
Connecting the Speakers [Enjoying Hope Theater . | Th auks to the HEX-22HDX's superb capabilities. you can enjoy surround sound with a real sense of movement in our own home—just like being in a movie theater or concert hall. You can enjoy DVDs featuring Daley Digital or YTS. With analog or digital TV, yor vai enjoy Dolby Pro Logic 11, DTS, or Honky's original DSP fs ending modes, Speaker positions for a system are shown below.
Connecting the Speakers— Continued Affixing the Rubber Feet | You can improve the sound quality by affixing the included rubber feet to raise the speakers off the mounting surface thereby reducing the contact area. The feet also nuke the speakers sf wid prevent then from moving around : W Rubber Feet for the Troubleshooter HT X-22HOXPAW Note: « When you pick up the Ampy/Subwoofer 10 affix the rubber feel.
Connecting the Speakers— Continued 16 Speaker Connection Practitioners Read the following before competing your speakers: Disconnect the power cord from the wall outlet before making any connections. Connect oily speakers with in impedance af 6 ohms or higher. Read the instructions supplied with your speakers. Puy close attention to speaker wiring potpourri connect positive terminals to only positive terminals, and negative terminals to only negative terminals, If you get them the wrong round.
Connecting the Speakers— Continued Consoling only the Front Speakers The following hookup diagram shows how fo connect the included front speakers for operation Front right speaker Ret ling Hed terminal Red fir Front lat speaker White terminal Foot ge] Qi B Supplied speaker | i Supplied speaker cable So ~ cable Connecting 5.1 Speakers With additional speakers, such as the optional Yonks S KS-22X speaker package, you ein enjoy 3. 1-chatline surround sound.
Connecting AV Components “About AV Connections Before making any AY connections. read the nam nets applied with your other AY compo Don't conned the power cord until you've completed aud double-checked all AV connections. Optical Digital Jacks The HIX-22HDX 5 optical digital joc ix inserted and close she it’s removed, Push plug 0 prevent shutter damage, hold the optical plies straight when inserting and removing.
Connecting AV Risking HOW Connections You can connect components with HDMI outputs to the H -22HDXs HDMI LAIN 2, and INS inputs snd comet your HDMI TV to the HT-22HDXs HDMI OUT. You need HDMI cables 10 make HDMI connections, When vou connect 3 component to an HDMI jack, the HDMI indicator on the display lights up. ™ Video Signals .
Connecting AV Components—Continued 20 To listen to mi HDMI source component through the HT X-22HDX, you must configure your stent so that video from the HDMI source component ci be displayed on your TV 6 your TV, select the HDMI fut that’s connected to the HT-22HDXs HDMI OUT) necessary because i component identification check has fo be performed on your TV before un HDMI source component can obi put any signals, If your TV is off or set 1 a different input source, the HT X-22HDX may produce no sound or the
Connecting AV [Congesting Encampments With Digital Outputs | You can connect components with digital audio outputs to the HT-22HDXs DIGITAL COASTAL IN LL OPTICAL IN 2, and OPTICAL IN 3 inputs. Choose a digital input {coaxial or optical} that matches the digital audio output on your source component.
Connecting AV Components—Continued Connecting Components with Analysands Duties HEX 22HDXs LINE | and Land Honky's original You can connect components with analog audio outputs to the puts and enjoy surround sound with Dolby Pro Logic IF, | nine modes nested 10 the HT X-22HDX via HDMI my slogan audio connection from your TV to the HTX -22HDX is not necessary (see pig 49), + When listening to compressed music files, such as MP3, you cau use the Music Optimizer function to enhance the sound quality (see page
Connecting AV Connecting Yonks Fl Components Connecting an Yonks Collapsible component or Yonks Dock with iPod fo the HT X-22HDX with an R1 cable and RCA audio cable will allow vou to use the following system control functions.
Connecting AV Components—Continued Notes: « Tf you connect both sn Yonks ND-S 1 Digital Media Transport and Rl Bock tw the HT X-22HDX. since only one input at a time can be set to the "DOCK input display. connect the ND-$1 to an OPTICAL DIGITAL input. snd set that input to the “DOCK” input display. and connect the RI Dock fo a LINE input, and set that Pit to the “TAPE “MD.
Connecting AV Controlling Other Components The following buttons can be used to control You components player! PR recorder. MD recorder. DICED-R player, ._ Component | 2 |2|E es tee) connected with RE. See page 23 for ™ 35 hookup and setting fornication. Button 1551888 i |E|g 8 ~ TOP MENU J 5 Arrow [AAYYI
Connecting AV Components—Continued Controlling an Yonks Dock (iPod) The following buttons can be used to control Play [wl] button an Yonks Dock with iPod that's connected Works as o Play/Pause button. See page 23 for hookup and setting with ad See page 23 for hookup and setting Pause [11] button information. Pauses playback pry 6) Next [wm] button ‘ : Selects the next song. > Previous [I<] button Restarts the current song. Press it twice to select the previous song.
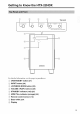
Turning On the HT X-22HDX [Contrasting the Power God To wall outlet Supped power card Before connecting the power cord, connect all of your speakers and other components. f Connect the supplied power cord to the HT-22HDX's AC INLET. Plug the other end of the power cord into a suitable wall outlet. The STANDBY indicator lights up. No « Turning on the HT X-22HDX may cause i momentary power surge that might interfere with other electrical equipment on the same circuit.
Playing Your Components 1 Press the HT-22HDX's [INPUT] button repeatedly io select an input source. To select an input source with the remote controller, use its [INPUT SELECTOR] buttons. The input source will change 1 second after you release the [INPUT] or INPUT pd TOR] button. 2 start playback on the source component. To watch a video source that's connected to sn HDMI IN on your TV. select the video input that's connected tw the HT-22HDXs HDMI OUT.
Playing Your Compartmentalization SLEEP DIMMER MUTING [Sating the Display Brightness You can adjust the brig fitness of the display. Press the remote controller's [DIMMER] but ton repeatedly fo select dim, dimmer, or normal brightness, Muting the HT X-22HDX You can temporarily mute the output of the HEX-22HDX, Press the remote controller's [MUTING] button, The output is muted and the MUTING indicator flashes on the dispel. To mute the HT X-22HDX.
Playing Your Components—Continued JE SATISFY : Displaying Source malformation Vou can display various information about the current input ounce as follows. Press the remote controller's [DISPLAY] button repeatedly to cycle through the available information, The fallowing information can typically be displayed: Input source & volume Signal format*! or sampling frequency 1 Input source & listening mode I #1 the input signal is analog, no format information is displayed. If the input sig nal is POM.
Playing Your Compartmentalization LIBEL (DUD LIME FET) LINED (TAPES LINED LINER STY Notes: » To listen to the TVs audio by using the ARC {Audio Return Chinchilla, in HDMI Setup, HDMI Control must be set to On and ARC must be set 10 Auto see pug 44), + DIGITAL IN 1 (DIG), DIG {DIC DIG LIN 3 (DIG) cannot be set the same. Likewise for LINE | and LINE 2.
Using the Listening Modes Selecting fhe Listening Sodas | For a description of cache listening mode, see “About the Listening Modes” on page 33 « The Dolby Digital and DTS listening modes can only be selected if your multilayered is connected to the HT X-22HDX with a digital audio connection (coaxial. optical, or HDMI). + The listening modes that you can select depends on the format of the input signal. To check the format, see “Displaying Source Information” on page 30.
Using the Listening Modes—Continued About the Listening Modes The HT-22HDXs listening modes can rainstorm you listening room into 4 novice theater or H. with high fidelity and stunning surround sound. concert ha @) Sub woofer input Sources The following audio formats are supported by the listening modes. TELEX | ris is mono monophonic) sound. GEE | 1 stereo (Stereophonic) send. Twa independent audio signal char els are produced through two speakers.
Using the Listening Modes—Continued Listening Modes Listening input | Speaker Mode Description Source | Layout Th is more, AUTHOR (OM 8 Mp BEC 5 Gusto Without sure [OCT Fat] round-sound processing, The Bp Con fig and Sp Distance sere tings are active, but much of the processing set via Audio Adjust Direct is disabled, Sea “Sat” on page 7 far more totals. [5.cch | Note: + When you play source material that contains no information in the LFE {Low Frequency Effects) Chanel, the submitter wil produce no sound.
Using the Listening Modes—Continued Listening input | Speaker Mode Description Source | Layout This MoE SPENGLER Ty 2-CHANCRE! SHOELACE 1-Channel playback. It uses Siva fLlkbagchicth channels of ati decoding for matrix-encoded material, providing a very natural and seamless surround sound experience that fully envelops the lis: pS Neo | Neo: Cinema Usa this mode with steerage movies TY, DVD, VHS) + Neo Music Use this mode with stereo music sources CD, radio, cas state, TV, VHS, IND).
Using the Listening Modes—Continued eee (3H SEL NIGHT i iE Late Night Function With the Late Night function, you can reduce the dynamic range of Dolby Digital material so hit you can still bear quiet parts even when listening at low volume levels—ideal for winching movies Intel at might when vou don’t want fo disturb anyone, Press the remote controller's [L NIGHT] but.
The setup menus appear ot: the display and provide a convenient way to change singsongs. Fran the main menu, settings wre organized into eight sub menus. Wai mer Sandman Wom Page T. Freebooter Wo, ves 30 % Front Sal, Large 5 3 Cont Tina, Sal, Lge £3 . Conch 1.8p Contiguity 7. Surround Hons, Sra, Lge 35 3. Crossover 100, 120. 180, 200 He 35 6. Double Bass Unit deters, lit 40 in 0.3 m steps Sett {1-30 Tt In 1-100! steps) “ 6-80 min 0.3 m steps 3 Enter {1-30 Tt In 1-f00t steps) “® 03-9.0 mn 0.3 m steps 2.
Setup Continued On-screen Setup Menus The nonsense setup menus appear on the TV. connected to the HDMI OUT. Note: + The onscreen setup meets vin be displayed only when the video input signal is 4850p. 3706p, 720p. 10301, or 1080p, or when no vied signal present Vein Sep pe — [Changing Settings SETUP ENTER RETURN Use the following procedure to ¢ settings explained below. age the o Press the [SETUP] button.
Setup Continued 8p Con fig (Speaker Configuration} With the Speaker Configuration. you can specify how may speakers you're using. Note: + Before you change this setting. tm down the volume. ® Sub woofer » Yes: Select if >No: Select if no sub woofer is nosed. w sub woofer is used (default). o Front » Small: Select if the fro speakers are small defamation. » Lars Select if the front speakers ure Age. Notes + If the Sub woofer sifting is set to No. this setting is fixed at Large and does not appear.
Setup Continued 8p Distance {Speaker Distance} With the Speaker Distance settings, vou can specify the distances from fhe speakers to your listening pos Distances can be set in feet. Range: | to 30 feat in 1-foot seeps. » meters: Distances can be set in meters. Range: 0.3 0 9 meters in steps. On North American models, the default setting is feet. On wither models.
Setup Continued W Panorama With this setting, you can broaden the width of the front stereo image when using the Dolby Pro Logic 11 listening mode. » On: Anticipation function on. w Off: Panorama function off (default) ® Dimension With this setting. you can move the sound field fer wind or backward when using the Dolby Pro Logic I listening mode.
Setup Continued ® Front With this vetting, you can specify how your five surround speakers (front L/R. center, and surround LAR) are syringed two get the best effect from the Theater-Dimensional listening node.
Setup Continued Volume Setup s section explains items an the Yoh Sot menu. » Max Volume With this setting, vou can limit the maximum volume. The Maximum Volume range is Off, 79 to 30. The default value is Off W Pon Vol {Power on Volume) This setting determines what the volume will be each time the HT X-22HDX is warned ou The rigger is Last, Min, 110 79. Max.
Setup Continued “Search, . = “(name)” > “RAID On” 1 the HT X-22HDX cannot receive the name of a component, it will be displayed as “Player” or “Recorder™”. fc ("will be a number when theirs two or mare components Select Off if a connected component is incompatible or your not she about its compatibility. Tf operation is unreliable when set to On, select Off instead. When the Audi TV Out setting is set Control is set to On, and you're listening through your TV's speakers (sce page 193.
Setup Continued Notes: Select Of if your TV is incompatible or you're not sure about its compatibility. Specifying the Digital Signal | Formal « The TV Control setting can he set nly when the above Control and Power Control en oe settings are both set serwp——<) OO) wringing the Control, Power Conn sett i SUCH ig EL rol, or 0 Control sen [ or © ave 5 © BES turn afl of your components off aud then ENTER GOO | back on again. Refer to the instruction i hd | manuals for your either components.
Troubleshooting ou have any frontal using the -22HDX. look for a solution i this section, 1 you caries resolve the issue yourself, contact your Yonks dealer. Before you conch your Yonks dealer, try resetting the HT X-22HDX, as follows: To reset the HT X-22HDX to its factory defaults, tum it on and, while holding dawn the [LISTENING MODE] button, press the [ON/STANDBY] button. “Clear” will appear on the display and the HT X-22HDX will enter Standby mode.
Troubleshooting—Continued The sub woofer produces no sound + Teh LFE channel. the sub woofer produces no sound, + Check the Speaker Configuration page 390, source material contains no audio in the There's no sound with a certain signal format » Check the digital audio output setting on the source component. On 50me game consoles. such as those that can play DVDs, the default setting is off With stone DVD-Video discs.
Troubleshooting—Continued The HT X-22HDX contains a microcomputer for signal processing and control functions, in very tare situations, severe interference, noise from an external source. of static elev ti city may cause it to lockup, In the unlikely event that this happens, unplug the power cord from the wall outlet, wait at least 5 secants.
HDMI (High-Definition Multimedia Interface) About HOM! ed to meet the inc is anew digital interface standard for connecting TVs. project ed defendants of digital TV, ED MI (High Definition Multimedia separate video single cable can anneal POM. cored, set-top boxes, and other video components. Until now. sever and audio cables have been required to connect AV components. With HDMI, / control signals, d o. and up fo cit channels of digital radio (2-¢ multichannel digital aud 13.
HDMI (High-Definition Multimedia Notes: 50 he HDMI video stream is compatible with DVI (Digital Visual interface. su TVs and displays with a DV input can be connected by using an HDMI-to-DVD adapter cable. (Note that DVI connections only carry view. su you'll need to make a separate connection for audio.) However. reliable operation with site an adapter is not guaranteed. In addition. video signals from a PC are tot supported.
Specifications Sub woofer System with Built-in Amplifier (HT X-22ZHDXPAW) x with built-in amplifier LYRICIST) ohms, 1 kHz. 1eh driver 100 Hz, Ich driven, THD kHz, IT driven, THD 1% 1ch (SW) ohms, 1600 Hz, Ich driven. THD 1 S Ha-200 Hz FLA: 1015-100 Kite (Direct mode) Type: Rated Output Pow T {F THD CECA, Sub woofer Frequency Respond Arp Frequency Response 0 Ho— 130 Ha +1 dB-3 Db (Crossover wm 150 Hed Input Sensitivity and Impedance: 130 ;V/ 47 kG FL FR) Signal to Noise Ratio: 103 dB (LINEAGE Direct mode.
Specifications—Continued Front Speaker (HT X-22HDXST) po: Full range assembler Kaput Sensifivity/fnpedance: 60 Maximum Input Power 41 Ww Pratt Sound Pres sore Lived, RO Alabama Frequency Response 760 Hz kHz, Cabinet Capacity: 1 L {0436 cubic feet) Dimensions (W X FOX Dj: 1013 161 X 111 mos tine. grille and project 4X FEDEX AV Wight: V8 ku 1.
Using an RIGID-compatible TV, Player, or Recorder FRED. which stands for Remote Interactive over HDMI, is the name of the system control function found on Yonks components, astronomic Control), which allows provides interoperability between he HTX stem control over HE * {Consumer DMI standard. HDX can be used with CE DMI and is part of the HE riots components. however.
Using an RAID-compatibie TV, Player, or Recorder— Continued ® Connections and Set Up Blu-ray DVD piayerirecorder, etc. LJ HDMI connection HT X-22HDX vf DIGITALIS HOME connection connection (OPTICAL) TV. projector. etc. 71 Connective HOMIEST jack to the HOME input jack of the TV. 2 Connect the audio output from the TV to the DIGITAL OPTICAL IN 3 jack of the HT X-22HDX using an optical digital cable.
Using an afraid-compatible TV, Player, or Even i you set to output audio ou the TV speakers, audio will be output from fhe speakers connected 10 the HT X-22HDX when you adjust the volume or switch the umpteen the HT X-22HDX, To output audio from the TV speakers. re-do the operations on the TV. Do not connect the (21 cube when connecting to the FIDO-capable comps Rents. When you select anything other than the HDMI jack where the HT X-22HDX is connected as the input on the TV.