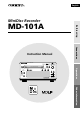
English MiniDisc Recorder Before using MD-101A Connections Instruction Manual MINIDISC RECORDER MULTI JOG EDIT / NO YES DISC LOADIING MECHANISM CD REC MODE DUBBING REC PUSH TO ENTER STANDBY / ON STANDBY DISPLAY MD -101A Operations INPUT Other Information
Before using Thank you for purchasing ... Thank you for purchasing the ONKYO MD-101A MD Recorder. Please read this manual thoroughly before making connections and plugging in the unit. Following the instructions in this manual will enable you to obtain the optimum performance and listening enjoyment from your new MD-101A. Please retain this manual for future reference.
Important Safeguards 1. Read Instructions – All the safety and operating instructions should be read before the appliance is operated. 2. Retain Instructions – The safety and operating instructions should be retained for future reference. Heed Warnings – All warnings on the appliance and in the operating instructions should be adhered to. 4. Follow Instructions – All operating and use instructions should be followed. 5.
Precautions 1. Recording Copyright Recording of copyrighted material for other than personal use is illegal without permission of the copyright holder. 2. Power WARNING BEFORE PLUGGING IN THE UNIT FOR THE FIRST TIME, READ THE FOLLOWING SECTION CAREFULLY. The voltage of the available power supply differs according to country or region. Be sure that the power supply voltage of the area where this unit will be used meets the required voltage (e.g., AC 230 V, 50 Hz or AC 120 V, 60 Hz) written on the rear panel.
Precautions(continued) For U.S. model FCC INFORMATION FOR USER CAUTION: The user changes or modifications not expressly approved by the party responsible for compliance could void the user’s authority to operate the equipment. NOTE: THIS CLASS B DIGITAL APPARATUS COMPLIES WITH CANADIAN ICES-003. For models having a power cord with a polarized plug: CAUTION: TO PREVENT ELECTRIC SHOCK, MATCH WIDE BLADE OF PLUG TO WIDE SLOT, FULLY INSERT.
Precautions(continued) For European model This unit contains a semiconductor laser system and is classified as a “CLASS 1 LASER PRODUCT”. So, to use this model properly, read this Instruction Manual carefully. In case of any trouble, please contact the store where you purchased the unit. To prevent being exposed to the laser beam, do not try to open the enclosure. “CLASS 1 LASER PRODUCT” This label on the right hand panel states that: 1.
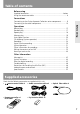
Table of contents Before using Supplied accessories ....................................................................... below Using the remote controller ................................................................... 8 Connections Connecting to the Onkyo Separate Collection series components .......... 9 Connecting to the other components .................................................. 10 Other Information Supplied accessories Operations Message list ........................................
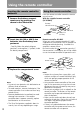
Using the remote controller Inserting the remote controller batteries 1 Remove the battery compartment cover by opening it as shown in the illustration. Using the remote controller Point the remote controller toward the remote control sensor. With the supplied remote controller (RC-475MD) Remote control sensor 30° 30° RC-475MD 2 Insert two AA (R6 or UM-3)-size batteries into the battery compartment.
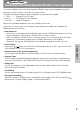
Connections Connecting to the Onkyo Separate Collection series components This section introduces you to the other Separate Collection Series system components and their convenient system functions. Connection instructions follow. The following Separate Collection series components are commercially available: • C-701A ........... Compact Disc (CD) Player • R-801A ............ FM Stereo/AM Tuner Amplifier • CDR-201A ....... Audio CD Recorder Note that the available components may vary according to the area.
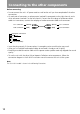
Connecting to the other components Before connecting • Do not connect the unit's AC power cord to a wall outlet until you have completed all the other connections. • On each pair of connectors, a red connector (marked R) corresponds to the right channel, and a white connector (marked L) to the left channel. Connect the white plugs of audio connection cables to L connectors; connect the red plugs of audio connection cables to R connectors.
Connecting to the other components (continued) • This unit uses heat-sensitive parts. Do not place this unit on the Amplifier or Receiver. Connections MINIDISC RECORDER MODEL NO. MD-101A ANALOG INPUT OUTPUT REMOTE CONTROL AC OUTLET AC 220 -230 V 50 / 60 Hz UNSWITCHED 100 W MAX.
Connecting to the other components (continued) Connecting the ( ) controller If you are using other ONKYO components equipped with connectors, you can control these components using the amplifier's remote controller. Connecting the AC power cord (mains lead) Insert the AC power cord into a wall outlet. The STANDBY indicator lights. Before connecting • The amplifier must be connected to the system hookups for control operation. • Each component has two connectors.
Operations Normal play RC-475MD MINIDISC RECORDER MULTI JOG EDIT / NO YES STANDBY/ ON EJECT DISC LOADIING MECHANISM (supplied) RC-466S (supplied with R-801A) STANDBY/ STANDBY/ ON ACOUSTIC PRESENCE STANDBY/ON ON EJECT CDR/PC TAPE CD/ DVD MD INPUT SELECTOR FM AM VOLUME PLAY MODE CONTINUE RANDOM MEMORY A B UP TAPE REW C D TAPE FF E MUTING 1 CD REC MODE DUBBING INPUT F 2 3 G 4 H 5 I J 9 10 DOWN REC 6 PUSH TO ENTER L M N O 12 13 14 15 P Q R S T 16 STANDBY /
Normal play (continued) RC-475MD MINIDISC RECORDER (supplied) RC-466S (supplied with R-801A) STANDBY/ ON ACOUSTIC PRESENCE MULTI JOG CDR/PC TAPE CD/ DVD MD INPUT SELECTOR EDIT / NO YES STANDBY/ON EJECT FM AM DISC LOADIING MECHANISM VOLUME CD REC MODE DUBBING INPUT PLAY MODE CONTINUE RANDOM MEMORY REC PUSH TO ENTER UP TAPE REW A B C D E 1 2 3 4 5 TAPE FF MUTING F G H I J 9 10 DOWN 6 STANDBY / ON STANDBY 8 7 K L M N O 11 12 13 14 15 P Q R S T 16 17
Normal play (continued) MULTI JOG RC-475MD , (supplied) RC-466S STANDBY/ ON ACOUSTIC PRESENCE CDR/PC TAPE CD/ DVD MD (supplied with R-801A) INPUT SELECTOR MINIDISC RECORDER STANDBY/ON EJECT MULTI JOG PLAY MODE CONTINUE RANDOM MEMORY DISC LOADIING MECHANISM A B UP TAPE REW AM C D TAPE FF , E MUTING 1 CD REC MODE DUBBING INPUT FM VOLUME EDIT / NO YES F 2 3 G 4 H 5 I J 9 10 DOWN 6 REC PUSH TO ENTER STANDBY / ON 8 7 K L M N O 11 12 13 14 15 P Q R S T
Normal play (continued) RC-475MD (supplied) RC-466S STANDBY/ ON ACOUSTIC PRESENCE CDR/PC TAPE CD/ DVD MD INPUT SELECTOR MINIDISC RECORDER STANDBY/ON EJECT MULTI JOG FM AM VOLUME EDIT / NO YES PLAY MODE CONTINUE RANDOM MEMORY DISC LOADIING MECHANISM A B UP TAPE REW C D TAPE FF E MUTING 1 INPUT (supplied with R-801A) CD REC MODE DUBBING REC PUSH TO ENTER , F 3 4 H 8 7 5 I J 9 10 L M N O 12 13 14 15 P Q R S T 16 STANDBY / ON 2 G DOWN 6 K 11 18 17 19
Random play RC-475MD (supplied) RC-466S STANDBY/ ON ACOUSTIC PRESENCE TAPE CD/ DVD MD (supplied with R-801A) INPUT SELECTOR MINIDISC RECORDER STANDBY/ON MULTI JOG EDIT / NO YES CONTINUE DISC LOADIING MECHANISM INPUT CDR/PC EJECT FM AM VOLUME PLAY MODE CONTINUE RANDOM MEMORY A B UP TAPE REW C D TAPE FF E MUTING CD REC MODE DUBBING REC PUSH TO ENTER RANDOM 1 2 F 4 H 5 I J 9 10 DOWN 8 7 L M N O 12 13 14 15 P Q R S T 16 STANDBY / ON 3 G 6 K 11 18 17 19
Repeat play RC-475MD RC-466S (supplied) (supplied with R-801A) STANDBY/ ON ACOUSTIC PRESENCE CDR/PC TAPE CD/ DVD MD INPUT SELECTOR STANDBY/ON EJECT FM AM VOLUME PLAY MODE CONTINUE RANDOM MEMORY UP TAPE REW A B C D E 1 2 3 4 5 TAPE FF MUTING F G 6 REPEAT A-B H 8 7 I J 9 10 DOWN K L M N O 11 12 13 14 15 P Q R S T 16 17 18 19 20 U V W X Y 21 22 23 24 25 . , A-B A.SPACE M.
Memory play MULTI JOG , RC-475MD (supplied) STANDBY/ ON ACOUSTIC PRESENCE CDR/PC TAPE CD/ DVD MD (supplied with R-801A) INPUT SELECTOR MINIDISC RECORDER STANDBY/ON EJECT MEMORY MULTI JOG EDIT / NO YES PLAY MODE CONTINUE RANDOM MEMORY DISC LOADIING MECHANISM INPUT RC-466S FM A B C D E 1 2 3 4 5 AM VOLUME UP TAPE REW TAPE FF MUTING CD REC MODE DUBBING F G H I J 9 10 DOWN REC 6 PUSH TO ENTER STANDBY / ON 8 7 K L M N O 11 12 13 14 15 SLEEP P Q R S T
Memory play (continued) / Auto Space function RC-475MD (supplied) RC-466S STANDBY/ ON ACOUSTIC PRESENCE TAPE CD/ DVD MD (supplied with R-801A) INPUT SELECTOR MINIDISC RECORDER STANDBY/ON EJECT MULTI JOG EDIT / NO YES PLAY MODE CONTINUE RANDOM MEMORY DISC LOADIING MECHANISM INPUT CDR/PC CD REC MODE DUBBING A B C D E 1 2 3 4 5 F REC 6 PUSH TO ENTER STANDBY / ON G H 8 7 I J 9 10 K L M N O 11 12 13 14 15 P Q R S T 16 17 18 19 20 U V W X Y 21 22 23
CD-dubbing (System operation) CD-dubbing (System operation) 101A. MINIDISC RECORDER MULTI JOG EDIT / NO YES DISC LOADIING MECHANISM INPUT CD REC MODE DUBBING REC PUSH TO ENTER STANDBY / ON STANDBY DISPLAY MD -101A Number of recorded tracks on MD Insert an MD with the label side up, in the direction of the arrow. Total recorded time To check the time remaining for recording... When the MD recorder is stopped, pressing the DISPLAY button changes the display as follows.
CD-dubbing (System operation) EDIT/NO MINIDISC RECORDER MULTI JOG EDIT / NO YES MULTI JOG DISC LOADIING MECHANISM INPUT CD REC MODE DUBBING REC , PUSH TO ENTER STANDBY / ON STANDBY DISPLAY MD -101A DISPLAY INPUT 3 Select “Digital In 1.” Press the INPUT button repeatedly until “Digital In 1” appears. REC MODE Check the available recording time on the MD. If the display does not indicate the available recording time, press the DISPLAY button repeatedly.
CD-dubbing (System operation) CD DUBBING MINIDISC RECORDER MULTI JOG EDIT / NO YES DISC LOADIING MECHANISM INPUT CD REC MODE DUBBING REC PUSH TO ENTER STANDBY / ON STANDBY DISPLAY 6 Press the CD DUBBING button on the MD-101A. CD DUBBING Tip: You can check the currently-selected CD dubbing mode by pressing the CD DUBBING button during the dubbing operation. Play your desired track. C-701A 2 Press the CD DUBBING button. The CD player automatically searches for the track's peak level.
Recording MINIDISC RECORDER MULTI JOG EDIT / NO YES DISC LOADIING MECHANISM INPUT CD REC MODE DUBBING REC PUSH TO ENTER STANDBY / ON STANDBY/ON STANDBY DISPLAY MD -101A INPUT Analog recording Recording analog data (data input via the connected audio pin cable) 1 Press the STANDBY/ON button. The STANDBY indicator goes out. STANDBY / ON STANDBY 2 Load a recordable MD.
Recording (continued) EDIT/NO MINIDISC RECORDER MULTI JOG EDIT / NO YES MULTI JOG DISC LOADIING MECHANISM INPUT CD REC MODE DUBBING REC , PUSH TO ENTER STANDBY / ON STANDBY DISPLAY MD -101A 6 Press the REC button. The MD recorder is now in recording standby mode. . REC 7 Using the MULTI JOG knob, adjust the recording level. Adjust the recording level. 7-2 Turn the MULTI JOG knob to adjust the recording level.
Recording (continued) MINIDISC RECORDER MULTI JOG EDIT / NO YES DISC LOADIING MECHANISM INPUT CD REC MODE DUBBING REC PUSH TO ENTER REC STANDBY / ON STANDBY DISPLAY MD -101A 8 Press the button and then start playing the recording source immediately. The TOC indicator appears as recording starts. The MD recorder will automatically stop when recordable time on the disc expires. The tracks are automatically numbered. (Level Sync function) To stop recording temporarily...
Recording (continued) MINIDISC RECORDER MULTI JOG EDIT / NO YES DISC LOADIING MECHANISM INPUT CD REC MODE DUBBING REC PUSH TO ENTER STANDBY / ON STANDBY/ON STANDBY DISPLAY MD -101A Digital recording REC MODE 3 Press the INPUT button In digital recording, an optical digital cable is used to input signals from the recording source. repeatedly until “Digital In 1” or “Digital In 2” appears.
Recording (continued) EDIT/NO MINIDISC RECORDER MULTI JOG EDIT / NO YES INPUT CD REC MODE DUBBING REC MULTI JOG , DISC LOADIING MECHANISM PUSH TO ENTER REC STANDBY / ON STANDBY DISPLAY MD -101A 6 Press the REC button. The MD recorder is now in recording standby mode. REC To stop recording temporarily Press the button (or the button on the remote control). To resume recording, press the button again (or press the button on the remote control). To stop recording Press the button.
Recording (continued) Using the Level Sync function The Level Sync function enables you to automatically number the tracks by detecting the rise of the signal level at the beginning of each track. (The Level Sync function is turned on by the default setting.) 3 Press the MULTI JOG knob. The display indicates “Level Sync Off” and the tracks being recorded will not be numbered. • To cancel this setting, press the EDIT/NO button.
Signal Synchro recording MINIDISC RECORDER MULTI JOG EDIT / NO YES DISC LOADIING MECHANISM INPUT CD REC MODE DUBBING REC PUSH TO ENTER STANDBY / ON STANDBY DISPLAY MD -101A INPUT REC Even if your recording source is not Onkyo -compatible, you can perform synchronized recording. You can also make signal synchro recording from a connected CDR-201A. 1 Press the INPUT button repeatedly until “Digital In 1,” “Digital In 2,” or “Analog In” appears.
System operation MINIDISC RECORDER MULTI JOG EDIT / NO YES DISC LOADIING MECHANISM INPUT CD REC MODE DUBBING REC PUSH TO ENTER STANDBY / ON STANDBY DISPLAY MD -101A CD-synchro recording When your MD recorder is configured into a system with Onkyo Separate Collection series components (R-801A and C-701A), the operation of the MD recorder can be synchronized with that of the CD player. standby mode. Press the play button on the C-701A after the time indicator lights up on the recorder’s display.
System operation (continued) MINIDISC RECORDER MULTI JOG EDIT / NO YES DISC LOADIING MECHANISM INPUT CD REC MODE DUBBING REC PUSH TO ENTER STANDBY / ON STANDBY DISPLAY MD -101A INPUT Synchro-recording from or CD recorder to MD When your MD-101A is configured into a system with Onkyo Separate Collection series components (R-801A and CDR-201A), synchronized recording from the MD recorder is possible. 1 Press the INPUT button repeatedly until “Analog In” appears.
System operation (continued) MINIDISC RECORDER MULTI JOG EDIT / NO YES DISC LOADIING MECHANISM INPUT CD REC MODE DUBBING REC PUSH TO ENTER STANDBY / ON STANDBY DISPLAY MD -101A 2 Press the INPUT button Timer operation 1 Insert an MD. You can both play and record. repeatedly until “Analog In” appears. INPUT ANALOG IN 3 Select a recording mode. Refer to Step 4 on page 22.
Other information for recording Checking the contents of recording • Stop recording and press the button to play the tracks that were just recorded. • To play from the beginning of the MD, stop recording, press the button again, then press the button or the button on the remote controller.
Editing the contents of an MD EDIT/NO MINIDISC RECORDER MULTI JOG EDIT / NO YES MULTI JOG DISC LOADIING MECHANISM INPUT CD REC MODE DUBBING REC , PUSH TO ENTER STANDBY / ON STANDBY DISPLAY MD -101A The following operation is possible when the unit is stopped or paused. 1 Turn the MULTI JOG knob until The selected track is erased. When the erasing is complete, “Complete” appears in the display. Before Using 3 Press the MULTI JOG knob.
Editing the contents of an MD (continued) EDIT/NO MINIDISC RECORDER MULTI JOG EDIT / NO YES MULTI JOG DISC LOADIING MECHANISM INPUT CD REC MODE DUBBING REC PUSH TO ENTER , STANDBY / ON STANDBY DISPLAY MD -101A To erase all tracks of an MD 1 Press the 3 Press the MULTI JOG knob. button. 2 Press the EDIT/NO button and turn the MULTI JOG knob to select “All Erase ?” To cancel, press the EDIT/NO button or press the button. 3 Press the MULTI JOG knob. “All Erase??” is displayed for confirmation.
Editing the contents of an MD (continued) 5 Divide the track. MULTI JOG • The Combine function enables you to combine two adjacent tracks into one. You cannot, however, combine a digital track and an analog track. You cannot combine two tracks that were recorded in different recording modes, either. For example, you cannot combine a track recorded in MONO mode and a track recorded in LP2 mode. • This function is available while the recorder is stopped, paused, or playing.
Editing the contents of an MD (continued) EDIT/NO MINIDISC RECORDER MULTI JOG EDIT / NO YES MULTI JOG DISC LOADIING MECHANISM INPUT CD REC MODE DUBBING REC , PUSH TO ENTER STANDBY / ON STANDBY DISPLAY MD -101A 3 Press the MULTI JOG knob. The display indicates the numbers of two tracks to be combined. MULTI JOG 5 When the combining operation is completed, “Complete” appears on the display. Tip: The numbers of the tracks following the combined tracks will be decreased by one.
Editing the contents of an MD (continued) 4 Press the MULTI JOG knob to Moving a track move the selected track. The following operation is possible when the unit is stopped or paused. 1 Turn the MULTI JOG knob until When the moving of the track is complete, “Complete” appears in the display. MULTI JOG Before Using the track number you want to move is displayed.
Naming a track or disc RC-475MD EDIT/NO YES MINIDISC RECORDER STANDBY/ON EJECT MULTI JOG EDIT / NO YES MULTI JOG DISC LOADIING MECHANISM CD REC MODE DUBBING INPUT REC , PUSH TO ENTER PLAY MODE CONTINUE RANDOM MEMORY A 1 F 6 STANDBY / ON C 2 D 3 G 4 H 8 7 E 5 I J 9 10 K L M N O 11 12 13 14 15 P Q R S T 16 17 18 19 20 U , STANDBY B 21 V W X Y 22 23 24 . , REPEAT A-B A.SPACE M.
Naming a track or disc (Continued) (RC-475MD) 4 Select the character input mode PLAY MODE CONTINUE RANDOM MEMORY using the DISPLAY button. A MULTI JOG DISPLAY D E 2 3 4 5 F G B H I J 6 7 8 9 10 K L M N O 11 12 13 14 15 P Q R S T 16 17 18 19 20 U V W X Y 21 22 23 24 . , REPEAT A-B A.SPACE M.SCAN ? ! ( ) Z 25 >25 / using the MULTI JOG knob.
Naming a track or disc (Continued) 6 Press the YES button. With the supplied remote controller (RC475MD), press the NAME button. YES (RC-475MD) NAME Erasing the disc name and all track names at one time The MD recorder must be stopped. 1 Press the STOP button. 2 Press the EDIT/NO button and TOC Lights when completed Note If, after pressing the EJECT or STANDBY/ON button, the TOC indicator is flashing, it indicates that the MD recorder is writing the recorded contents onto the MD.
Other Information Message list The following table explains the various messages that appear in the display. This message appears during the track intervals when A. Space is turned on. Blank Disc A new recordable MD or a recordable MD without disc or track names is inserted. Cannot Copy An attempt was made to record copyright-protected material. An attempt was made to make a second copy from a digitally dubbed MD (see “Rules for Digital Recording” on page 45).
System limitations The MD recording system in the unit is significantly different from those used in cassette and DAT decks and is characterized by the limitations described below. Note, however, that these limitations are due to the inherent nature of the MD recording system itself and not to mechanical causes.
Rules for digital recording Guide to the serial copy management system Operations Rule 2 You can record the digital input signal of a digital satellite broadcast onto a recordable MD via the digital input terminals on an MD recorder that is capable of handling a sampling frequency of 32 kHz or 48 kHz. You can then record the contents of this recorded MD (first-generation) onto another recordable MD via digital input terminals on the MD recorder to create a second-generation digital copy.
Troubleshooting 46 Symptom Cause Remedy STANDBY/ON button is pressed, but power does not come on. • Power cord plug is not properly connected to AC outlet. • Insert the plug firmly. The unit does not operate or operates poorly. • The disc may be damaged (“Disc Error” appears). • Take the disc out and insert it again. If “Disk Error” remains, replace the disc. (See “Precautions for handling the MiniDisc (MD)” on page 48.) The unit does not play. • Moisture has formed inside the unit.
Troubleshooting (Continued) Cause Remedy The disc name or track name cannot be entered. • The disc is record-protected (“Protected” appears). • Close the record-protect tab. (See page 34.) • A premastered (read-only) disc is inserted (“Cannot Rec” appears). • Replace it with a recordable disc. • The system functions cannot be used. • Check all cable connections. The system functions cannot be used even if remote control ( ) cables are connected. Also connect the components using audio cables.
Precautions for handling the MiniDisc (MD) The MD is housed in a cartridge, so you can handle it without worrying about dust and fingerprints. Even so, a dirty or warped cartridge may cause malfunction. Remember the following precautions so you can enjoy high-quality sound for a long time. Do not touch the disc in the cartridge directly with your fingers. Do not open the shutter by hand. Doing so may damage the disc.
Indexed to parts and controls Front panel Ventilation holes CD DUBBING button [23] Disc slot REC MODE button [22] EDIT/NO button [22, 25, 35] REC button ( STANDBY/ON button [13] REC) [25, 26, 28, 31, 32] YES button [42] Eject button ( ) [13] MINIDISC RECORDER MULTI JOG knob ( , ) [15, 19, 22, 29, 35] MULTI JOG EDIT / NO YES DISC LOADIING MECHANISM CD REC MODE DUBBING INPUT REC PUSH TO ENTER FF/FR button , ) ( [16, 41] STANDBY / ON STANDBY MD -101A DISPLAY button [14, 41] Display Stop butt
Indexed to parts and controls (continued) Remote controller RC-475MD (supplied) STANDBY/ON button [13] STANDBY/ON EJECT EJECT button [13] A-B repeat button [18] PLAY MODE CONTINUE RANDOM MEMORY PLAY MODE buttons CONTINUE buttons [17, 20] RANDOM button [17] MEMORY button [19] Number buttons [15, 19, 41] REPEAT button [18] A B C D E 1 2 3 4 5 F G H I J 10 6 7 8 9 K L M N O 11 12 13 14 15 P Q R S T 16 17 18 19 20 U V W X Y 21 22 23 24 25 .
Indexed to parts and controls (continued) RC-466S (supplied with the R-801A) ACOUSTIC PRESENCE CDR/PC TAPE CD/ DVD MD INPUT SELECTOR FM AM , [15, 41] VOLUME UP TAPE REW button Before Using STANDBY/ ON TAPE FF MUTING Connections DOWN SLEEP CLOCK TIMER MODE TAPE REPEAT CD/DVD CLEAR MD SCROLL CDR/PC ENTER , [16, 41] button Mode button (MODE) [17, 19] Repeat button (REPEAT) [18] Clear button (CLEAR) [20, 41] Stop button ( ) [13] Pause button ( Play button ( Number buttons [15,
Specifications System MiniDisc digital audio system Number of channels 2 (stereo) Recording system Magnetic field modulation overwrite system Frequency response 10 Hz - 20 kHz (±0.5 dB) Signal read out system Optical non-contact Recording time Stereo : Max. 80 min. (when using MDW-80) Mono : Max. 160 min. (when using MDW-80) Number of revolutions About 400 - 900 rpm (constant linear velocity) Error correction system Advanced Cross Interleave Reed-solomon code Sampling frequency 44.