Seven Channel Amplifier RDA-7.
WARNING: TO REDUCE THE RISK OF FIRE OR ELECTRIC SHOCK, DO NOT EXPOSE THIS APPARATUS TO RAIN OR MOISTURE. WARNING AVIS RISK OF ELECTRIC SHOCK DO NOT OPEN RISQUE DE CHOC ELECTRIQUE NE PAS OUVRIR The lightning flash with arrowhead symbol, within an equilateral triangle, is intended to alert the user to the presence of uninsulated “dangerous voltage” within the product’s enclosure that may be of sufficient magnitude to constitute a risk of electric shock to persons.
Features Contents ■ RDA-7.1 was designed by Balanced Audio Technology in USA. They are known for producing superbly engineered, meticulously crafted products that recreate music with unmatched fidelity and accuracy. Important Safety Instructions ......................... 2 ■ THX® Ultra2 Certified Contents .............................................................. 3 ■ THX Surround EX™ Capable (7 Channels) Precautions .........................................................
Precautions CAUTION: RISK OF FIRE-REPLACE FUSE AS MARKED ATTENTION: _A _V T10A L 250V RISK DE D'INCEDIEREMPLASER PAR UN FUSIBLE INDIQUE The wire which is coloured blue must be connected to the terminal which is marked with the letter N or coloured black. The wire which is coloured brown must be connected to the terminal which is marked with the letter L or coloured red.
Precautions Before using the RDA-7.1 power amplifier, be sure to read the page above entitled Important Safety Instructions and this page of precautions. Power cord The RDA-7.1 comes with a three-pronged power cord that contains a grounding wire. To help prevent electrical shocks, always insert all three prongs when plugging in the power cord. If the plug of the power cord is not properly plugged in all the way, it may lead to an electrical shock.
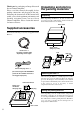
Thank you for purchasing an Integra Research Seven Channel Amplifier. Please read this manual thoroughly before making connections and plugging in the unit. Following the instructions in this manual will enable you to obtain optimum performance and listening enjoyment from your new Seven Channel Amplifier. Please retain this manual for future reference. Unpacking and storing the packing materials Unpacking When unpacking the RDA-7.
Installation Preventing excessive rise in the internal temperature of the RDA-7.1 is vital to the long operational life of the equipment. This will also help prevent trouble at the RDA-7.1 from damaging other connected components. Therefore, it is important to choose a location with excellent ventilation for installation. Ventilation During normal household use of the RDA-7.1, only its internal heatsink becomes warm.
Quick operation guide Here is a quick guide for those who want to listen to music or view their favorite movies as soon as possible. Connections and operations are explained briefly here for the purpose of just getting you started. For those of you who want to operate the RDA-7.1 right away, follow the guide below. However, this instruction manual contains a great deal of other information that you should know for the proper operation of the RDA-7.1 and for a more pleasurable experience with the RDA-7.1.
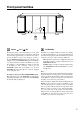
Front panel facilities On Power On Of f Standby Seven Channel Amplifier Power On / Off Pressing this switch connects the RDA-7.1 to the main Power outlet and the On indicator lights blue. Sound will be heard after approximately 9 seconds. If you want to operate the RDA-7.1 using a 12-volt trigger, connect to the 12V TRIGGER OUT terminal of AV controller or pre amplifier to the 12V TRIGGER IN terminal of the RDA7.1, and leave the Power switch of the RDA-7.1 set to On.
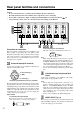
Rear panel facilities and connections Caution • Do not connect the Power cord until you have finished all other connections. • Read the instructions that came with the other components you are connecting. • Do not make connections to input or output jacks while the RDA-7.1 is turned on (Power • Always turn the volume of the AV controller down before turning on the RDA-7.1.
Rear panel facilities and connections Note: • Do not change the INPUT SELECT switch setting when the RDA-7.1 is turned on. • Make sure that connections have been made only to the inputs selected with the INPUT SELECT switches and nothing is connected to the other ones. + OUTPUT – (Speaker output) (Binding post) The RDA-7.1 is equipped with high-current binding posts for use at output terminals to the speaker system. To obtain the best in sound quality from the RDA-7.
Connecting speakers Before connecting the speakers, place them correctly by consulting the instruction manuals that came with them. Also, read on page 11. For surround playback, the configuration and placement of your speakers are very important. Phasing your speaker system Speaker ratings If the speakers are not correctly connected, the phasing may be reversed. The result is an audio output with a strange feeling and indistinct positioning of the sound source.
Connecting to the RDC-7.1 Since many users will purchase the RDA-7.1 together with the RDC-7.1, here is an explanation of how to connect the RDA-7.1 to the RDC-7.1. Balanced input/output connection Note: When using the balanced inputs, do not connect anything to the RCA inputs. RDC-7.1 ( ASSIGNABLE) ( ASSIGNABLE) ) XLR type SUBWOOFER SURR BACK R SURR R FRONT R CENTER FRONT L SURR L Balanced cable SURR BACK L ( SINGLE) PRE OUT A At the RDC-7.
Cautions regarding humming noise If humming is heard even when the volume is turned down or the RDA-7.1 is turned off, then a “ground loop” may be occurring. A ground loop is a potential difference in the grounding of two or more electrically connected components. This potential difference creates multiple current routes when there should only be one. This potential difference results in a hum noise and at times it can be just a low level noise.
Troubleshooting guide If the RDA-7.1 fails to function normally, first check the following points before contacting your Integra Research dealer. If the problem is not solved after going through the following list, unplug the power cord and contact your Integra/Onkyo authorized service center. POWER No power. • Power cord is not correctly plugged into AC outlet/ Inlet. ➞ Plug the power cord into the AC outlet/Inlet properly. • Power switch is not set to ON position. ➞ Set the power switch to ON.
Integra Research Division of Sales & Product Planning Div. : 2-1, Nisshin-cho, Neyagawa-shi, OSAKA 572-8540, JAPAN Tel: 072-831-8023 Fax: 072-831-8124 http://www.onkyo.com/jp/ Integra Research Division of ONKYO U.S.A. CORPORATION 18 Park Way, Upper Saddle River, N.J. 07458, U.S.A. Tel: 201-785-2600 Fax: 201-785-2650 http://www.integraresearch.com ONKYO EUROPE ELECTRONICS GmbH Liegnitzerstrasse 6, 82194 Groebenzell, GERMANY Tel: +49-8142-4401-0 Fax: +49-8142-4401-555 http://www.onkyo.