Thank YOU for your purchase of the Yonks T-411 Tuner. Please read this manual thoroughly before making connections and turning power on. Following the instructions in this manual will enable you to obtain optimum performance and listening enjoyment from your new T-411 Please retain this manual for future reference. Features M RDS (Radio Data System — T-411RDS only) RDS gives you stain and programming data for expanded twiner functionality.
important safeguards 1. Read Instructions — All the safety and operating instructions should be read before the appliance is operated. 2. Retain Instructions The safety and operating instructions should e retained for future reference. 3. Heed Warnings All warnings on the appliance 2nd in the operating instructions should bo adhered to. 4. Follow Instructions Alf operating and use instructions should be followed. 5.
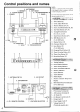
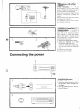
Control positions and names 4, AUTOMATON 3. MEMORY 2. CLOCK ADJUST 1. POWER 5. KEY MODE 6. TUNING/PRESET 7. BAND RDS 9. DISPLAY 10. CHARACTER 11. SCAN 1. ANTENNA FM 75Q 2. ANTENNA AN 15, REC 14. ONCE 13. EVERY DAY 12. PROGRAMMATIC 3. AC OUTLET REMOTE CONTROL 5. OUTPUT 7. VOLTAGE SELECTOR 6 NOTE: I there is a protective film on the surface of the display, which is making it difficult @ read the display, remove it For mare information about bunions, aura 1o 1. Power Button [7] 2. Clock Adjust Button [8} 3.
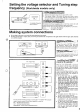
Setting the voltage selector and Tuning step frequency (Worldwide models only) 1. Determine the proper voltage for your area: 220V or 120V, 2. If the preset voltage is not correct for your area. insert a screwdriver into the groove in the switch, Slide the switch all the way w the right { OVID) or to the left whichever is appropriate. aeronautics e Turing Step Frequency switch (Boeotia) World; model: are equipped with a switch that controls the AM (Sakha 10k Ha) and FM (S0KHz/200kHz) bands tuning steps.
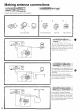
Making antenna connections 100 "macadam AL e Assembler the loop amen ma as shown in the illustration, Insert info the hole. Press down the lever. insert wire. F Return the lever, e s s Connection the AM loop antenna : The AM clop antenna is for indoor use only. Set it 1o the direction where you can receive the clearest sound.
:;;Connection an M outdoor Zan the reception is not very clear with the attached T-shaped FM antenna, the use of an external antenna is recommendation. Please make sure that you comply with the following considerations regarding the location. Keep the antenna away from noise sources (neon signs, busy roads ee.) It is dangerous 1o put it close w power lines, so keep it wile away. when connecting & 73/300 whom antenna adapter.
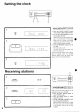
Setting the clock o e Melting the.clack 4 1. Press the CLOCK ADJUST button twice quickly within a naif of second, 'se the < TUNING/PRESET » but. tons to adjust the time. Adjust the tme by pressing these buttons. If vou hold one of them down longer than (.5 seconds. the display changes quickly, Press the bullion once again 1o stop the display changing. 3. Press the MEMORY button to set the new time. The clock starts 10 work. You can set the Ume accurately from the TV o radio news.
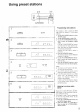
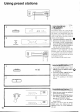
Using preset stations scrawny Programming radio stations For example, @ enter a station at 98.00 MHz {FM} into number 3 in the Preset Memory 1. Use the KEY MODE bitten to enter TUNING mode. Use the BAND button fo select FM. . Use the « TUNING/PRESET » buttons o select the frequency (98.00 MHz). if the « TUNING/PRESET » buttons are held down for more than 0.5 sec. nods, when they are released scanning will continue automatically. Scamming will stop when a satin is tuned into. 4. Press the MEMORY button.
Using preset stations Hold down sE— ey £ ERASE— SH O ANGRY AUTOMATON. ! using Auto Memory only) e This function allows you to store the frequencies into memory aromatically. without having to go through and sere each frequency manually. i the Auto Memory 18 used, all FM mastodons previously stored in memory will be replaced. 1. Use the BAND button to select FM. 2. Hold down the memory button for a few seconds. "AUTO™ will start flashing on the display.
Entering characters The following 54 characters can be used. the station you are currently listening 1o on the T-411 RDS is an RDS station, the program service name has priority over other information. Therefore you will not be able to enter characters for the station bane, 1. Select the station you wish to name {see previous sections). . Press the CHARACTER button to enter character input mode. 3. Use the « TUNING / PRESET » buttons to select a character. 4. Press the MEMORY button to store the character.
Receiving RDS RDS reception is only available on the T-411 RDS model, and only PS: Programmer Service Name in areas where RDS broadcasts are available. When a1 RDS station broadcasting PS information is What is RDS? received, the name of the clarion will be displayed intrinsic of Many FM stations now transmit RDS signals which give additional the frequency. Programmer Type information.
RDS reception is only available on the T-411RIS model. 1. Press the RDS button, and the programmer type of the currently selected station will be shown on the display {for example, “SPORT"). If the station vou are receiving is not broadcasting RDS. “NOT RDS” (this is not an RDS satin) will be shown on the display. 2, Use the 4« TUNING/PRESET w buttons to select another programmer type (PTY) (for example, “ROCK M), See the PTY description below 3. Press the SCAN button to start searching for the chosen PTY.
Connecting Yonks Liverpool Separate Collection Series I this unit, a compact disc player or an auto-reverse cassette deck from the Yonks Liverpool Separate Collection series is connected o an amplifier from the same series, the following functions are possible, A A s Mfil Hg:flordmg from acl CD player Using One-Touch Recording to record from CD ro cassette, the following operations will be performed with the pressing of just ane burn: & The revel will be adjusted » The cassette will be wanderer to the beginni
(or recording) ata’ * A The illustration on the left is an example of suing the l mer to start playing the CD at 7:00 AM and 1o stop playing a §:30 AM every day. . Press the PROGRAM/CHECK button to enter the timer program mode, “PGM" is shown on the display . Select your desired mode pressing any of the following buttons. EVERYDAY: When you want 1o start placing (or recording) at certain tme every day. ONCE:When you want to start and stop playback only one, REC:. When. you want to.swrt.and. stop. recording.