Contents AM/FM Tuner Introduction .................................... 2 T-4355 Instruction Manual Connections ................................. 10 Enjoying Audio Sources.............. 14 Thank you for purchasing an Onkyo AM/FM Tuner. Please read this manual thoroughly before making connections and plugging in the unit. Following the instructions in this manual will enable you to obtain optimum performance and listening enjoyment from your new Tuner. Please retain this manual for future reference.
WARNING: TO REDUCE THE RISK OF FIRE OR ELECTRIC SHOCK, DO NOT EXPOSE THIS APPARATUS TO RAIN OR MOISTURE. CAUTION: TO REDUCE THE RISK OF ELECTRIC SHOCK, DO NOT REMOVE COVER (OR BACK). NO USER-SERVICEABLE PARTS INSIDE. REFER SERVICING TO QUALIFIED SERVICE PERSONNEL.
Precautions 1. Recording Copyright—Unless it’s for personal use only, recording copyrighted material is illegal without the permission of the copyright holder. 2. AC Fuse—The AC fuse inside the unit is not userserviceable. If you cannot turn on the unit, contact your Onkyo dealer. 3. Care—Occasionally you should dust the unit all over with a soft cloth. For stubborn stains, use a soft cloth dampened with a weak solution of mild detergent and water. Dry the unit immediately afterwards with a clean cloth.
Features Before Using this Unit ❑ ❑ ❑ ❑ ❑ ❑ ❑ ❑ • Turn off the power before changing the switch settings. • On changing the switch settings, T-4355 is initialized to its factory defaults. Radio presets and other settings are deleted.
Table of Contents Introduction Important Safety Instructions.....................................................................................2 Precautions..................................................................................................................3 Features .......................................................................................................................4 Supplied Accessories .......................................................................................
Front & Rear Panels Front Panel For detailed information, refer to the pages in parentheses. POWER switch (14) This switch is used to turn on/off the T-4355. DISPLAY button (18) This button is used to view various information on the display. TUNING [ ]/[ ] buttons (14) These buttons are used to tune into radio stations. They’re also used when setting the naming presets. MEMORY button (14) This button is used to store and delete presets.
Front & Rear Panels—Continued Display MEM (Memory) indicator RDS indicator (European models only) This indicator lights up when storing radio presets. AUTO indicator This indicator lights up when the FM mode is Auto Stereo. /FM ST indicators These indicators show the status of the radio reception. This indicator lights up when tuned to an FM station that supports RDS.
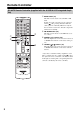
Remote Controller RC-627S Remote Controller (supplied with the A-9355/A-9155 Integrated Amplifier) BAND button (14) This button can be used to select the FM or AM band. If the T-4355 and A-9355/A-9155 are connected with an cable, pressing this button while the entire system is on Standby will turn on only the T-4355 and A-9355/A-9155. All other components will remain on Standby. FM MODE button (18) This button can be used to set the FM mode to stereo or mono.
Remote Controller—Continued Using the Remote Controller The T-4355 doesn’t have its own remote controller, but it can be controlled by using the RC-627S remote controller that’s supplied with the Onkyo A-9355/A-9155 Integrated Amplifier. The T-4355 and A-9355/A-9155 must be connected with an cable and an audio cable for this to work. When controlling the T-4355 with the A-9355/A-9155’s remote controller, point the controller at the A-9355/A-9155’s remote control sensor, as shown.
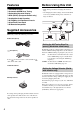
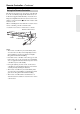
Connecting the T-4355 Before Making Any Connections RCA Audio Connection Color Coding • Refer to the instructions that came with the component you are connecting. • Do not plug in the power cord until all other connections are complete. • Do not bind audio cables with power cords and speaker cables. Doing so may adversely affect the sound quality. • To prevent interference, keep power cords and speaker cables as far away as possible from the tuner’s antennas.
Connecting the T-4355—Continued About the System Functions If you connect the T-4355 to another Onkyo -capable component with the supplied cable and audio cable, you can use the following system functions. cables are special cables solely for use with Onkyo products. Direct Change When you select a radio preset or change the band (AM, FM), your Onkyo amplifier will automatically select the T-4355 as the input source.
Connecting Antennas This section explains how to connect the supplied indoor FM antenna and AM loop antenna and how to connect commercially available outdoor FM and AM antennas. AM antenna push terminals Connecting the AM Loop Antenna The supplied indoor AM loop antenna is for indoor use only. 1 Assemble the AM loop antenna, inserting the tabs into the base, as shown. 2 Connect both wires of the AM loop antenna to the AM push terminals, as shown. The antenna connection is polarity sensitive.
Connecting Antennas—Continued Connecting an Outdoor FM Antenna Connecting an Outdoor AM Antenna If you cannot achieve good reception with the supplied indoor FM antenna, try using a commercially available outdoor FM antenna instead. If good reception cannot be achieved using the supplied AM loop antenna, an outdoor AM antenna can be used in addition to the loop antenna, as shown.
Turning On the T-4355 Listening to the Radio Tuning into Radio Stations Manually POWER TUNING 1 Plug the power cord into a suitable wall outlet (or the AC OUTLET on the A-9355/A-9155’s rear panel). 2 Press the T-4355’s [POWER] switch. The T-4355 turns on. To turn off the T-4355, press the [POWER] switch.
Listening to the Radio—Continued You can store up to 30 of your favorite radio stations as presets for quick selection. Stations can be preset automatically using the Auto Preset function or manually. Notes: • You can preset up to 30 AM/FM stations. If you try to store more than this, the message “FULL” will appear on the display. • Using the remote controller while listening to an AM radio station may cause interference.
Listening to the Radio—Continued 3 Press the [MEMORY] button. MEM indicator The MEM indicator appears and the preset number flashes. If you don’t complete the next step within 8 seconds, the T-4355 will return to the previous condition and the MEM indicator will disappear. Note: Be careful not to press the [MEMORY] button for too long because “AUTO PRESET” will flash on the display and the Auto Preset function will begin, replacing all of your previously stored presets.
Listening to the Radio—Continued Correcting Characters Naming Presets Radio presets can be named for easy identification, and names may contain up to 8 characters from the following selection. If Name Edit mode is not selected, follow steps 1 and 2 in the left column. DISPLAY TUNING _ABCDEFGHIJKLMNOPQRSTUVW XYZ abcdefghijklmnopqrstuvwxyz "'&()[]*+,-./=?0123456789 PRESET The underscore (_) character is actually a space. DISPLAY MEMORY 1 Use the TUNING [ ]/[ ] buttons to select the character to edit.
Listening to the Radio—Continued Deleting Presets Individual presets can be deleted as follows. 1 Select the preset that you want to delete. See page 16 for selecting presets. 2 While holding down the [MEMORY] button, press the [FM MODE] button. The preset number on the display disappears and the preset is deleted. MEMORY FM MODE CLEAR FM Mode In places where the signal strength is weak or reception is noisy, press the [FM MODE] button to listen in mono (AUTO indicator off).
Listening to the Radio—Continued Using RDS (European models only) RDS stands for Radio Data System and is a method of transmitting data in FM radio signals. Many FM stations use it these days. The T-4355 supports the following types of RDS data: PS: Program Service Name When tuned to an RDS station that’s broadcasting PS information, the station’s name appears on the display. RT: Radio Text When tuned to an RDS station that’s broadcasting RT text information, the text scrolls across the display.
Troubleshooting If you have any trouble using the T-4355, look for a solution here. If you can’t resolve the issue yourself, contact your Onkyo dealer. Power Can’t turn on the T-4355. • Make sure that the power cord is properly plugged into the wall outlet (page 14). • Unplug the power cord from the wall outlet, wait five seconds or more, then plug it in again. Audio There’s no sound. • The T-4355 is not connected properly. Check all connections and correct as necessary.
Specifications FM Tuning frequency range: Usable sensitivity: SN ratio: THD (total harmonic distortion): Frequency response: Stereo separation: AM Tuning frequency range: Usable sensitivity: SN ratio: THD (total harmonic distortion): General Power supply: Power consumption: Dimensions (W u H u D): Weight: 87.50–108.00 MHz Stereo: 17.2 dBf 2.0 µV (75: IHF) Mono: 11.2 dBf 1.0 µV (75: IHF) Stereo: 70 dB (IHF-A) Mono: 76 dB (IHF-A) Stereo: 0.3% (1 kHz) Mono: 0.2% (1 kHz) 20 Hz–15 kHz / ±1.
Memo 22
Memo 23
Sales & Product Planning Div. : 2-1, Nisshin-cho, Neyagawa-shi, OSAKA 572-8540, JAPAN Tel: 072-831-8023 Fax: 072-831-8124 ONKYO U.S.A. CORPORATION 18 Park Way, Upper Saddle River, N.J. 07458, U.S.A. Tel: 201-785-2600 Fax: 201-785-2650 http://www.us.onkyo.com/ ONKYO EUROPE ELECTRONICS GmbH Liegnitzerstrasse 6, 82194 Groebenzell, GERMANY Tel: +49-8142-4401-0 Fax: +49-8142-4401-555 http://www.eu.onkyo.