T-4711 FM Stereo / AM Tuner FM Stereo Tuner All models except European models (FM Stereo / AM Tuner) European model (FM Stereo Tuner) T-4711 Instruction Manual CONTENTS Features..............................................................................................................................................2 Important safeguards .........................................................................................................................3 Precautions................................
Thank you for your purchase of the Onkyo T-4711 Tuner. Please read this manual thoroughly before making connections and turning power on. Following the instructions in this manual will enable you to obtain optimum performance and listening enjoyment from your new Tuner. Please retain this manual for future reference.
Important safeguards 1. Read Instructions – All the safety and operating instructions should be read before the appliance is operated. 2. Retain Instructions – The safety and operating instructions should be retained for future reference. 3. Heed Warnings – All warnings on the appliance and in the operating instructions should be adhered to. 4. Follow Instructions – All operating and use instructions should be followed. 5.
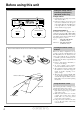
Before using this unit Setting the voltage selector and Tuning step frequency (Worldwide models only) Voltage selector OUTPUT ANTENNA A FM75Ω B 1. Determine the proper voltage for your area: 220 – 230 V or 120 V. 2. If the preset voltage is not correct for your area, insert a screwdriver into the groove in the switch. Slide the switch all the way to the right (120 V) or to the left (220 – 230 V), whichever is appropriate. REMOTE CONTROL AM L FM STEREO / AM TUNER MODEL NO.
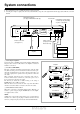
System connections ● ● Do not plug in the power cord until all connections have been made. On each pair of input or output jacks, the lower jack (marked R) corresponds to the right channel, and the upper jack (marked L) to the left channel. Tuning Step Frequency (See page 4. Worldwide model only) To wall outlet Configuration and the number of outlets may vary depending on places of destination. 2 OUTPUT ANTENNA A FM75Ω B REMOTE CONTROL AM L FM STEREO / AM TUNER MODEL NO.
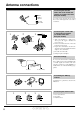
Antenna connections Connecting the 300 ohm ribbon wire to the 75/300 ohm adaptor (for models other than European models) FM/TV Outdoor Antenna 300 ohm ribbon wire 1 2 3 ✦ ✦ ✦ ✦ ✦ ✦ ✦✦ ✦ ✦ ✦ 6 3 6 mm mm mm Slit B 15mm 1 Wire A Slit C 2 Loosen the serews and wrap the wire around these screws, Then tighten the screw with a screwdriver. Connecting the coaxial cable to the 75/300 ohm adaptor (for models other than European models) 1.
Connecting the enclosed T-shaped FM antenna For European models For models other than European models ANTENNA ANTENNA FM75Ω GND A A FM75Ω B AM B The T-shaped FM antenna is for indoor use only. Extend the antenna and move it in various directions until the clearest signal is received. Fix it with push pins or similar in the position giving the least amount of distortion.
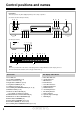
Control positions and names Front Panel The button positions may differ slightly depending on the country of purchase.
Remote control 5 POWER ANTENNA DIMMER 1 6 1 2 3 GROUP 4 5 6 PRESET 7 8 9 MEMORY 0/10 SCAN 7 2 8 TUNING 3 9 10 TIMER MODE 4 TIMER PRESET ENTER ADJUST DISPLAY REMOTE CONTROL 1. Power Button (POWER) [9, 18] 2. Number Buttons (1 ~ 9, 0/10) [10, 17] 3. Memory Button (MEMORY) [10, 11, 15] 4. Timer preset Buttons (TIMER PRESET) [16, 17, 18] 5. Antenna Selector Button (ANTENNA) [10, 12] 6. Dimmer Button (DIMMER) [11] 7. Group Button (GROUP) [10, 11] 8.
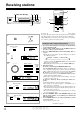
Receiving stations 2 1 (other than Europe) 6 3 4, 7 6 4 7 T-4711 5, 8 4 5, 8 In order to listen to a radio broadcast, first tune in the radio station, then set it. The radio station can be selected in two ways: by using the auto-tuning function or by directly entering the station’s frequency. When tuning in the radio station, refer to page 12 for more information on how to get the best reception possible.
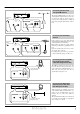
7 PRESET / TUNING Remote control PRESET ANTENNA A TUNED STEREO NARROW HI-BLEND AUTO MEMORY TUNED STEREO NARROW HI-BLEND AUTO MEMORY or SIGNAL STRENGTH 8 DIMMER Remote control MEMORY MEMORY ANTENNA MODE or A 7. When the flashing channel is not the desired channel, turn the PRESET/TUNING dial and select a different channel. ● If a station frequency has already been memorized in the selected channel, the channel number will flash quickly. ● Each group contains ten channels.
Receiving stations ANTENNA STEREO Indicator HI-BLEND IF BAND DISPLAY T-4711 Signal Strength Indicator MODE DISPLAY Getting a better FM reception ■ APR (Automatic Precision Reception) System The APR system is Onkyo’s unique computer-controlled system which automatically chooses the appropriate settings according to the quality of the FM signal currently being received.
Receiving RDS RDS reception is only available in areas where RDS broadcasts are available. However, if radio reception is weak. RDS may not be received. What is RDS? Many FM stations now transmit RDS signals which give additional information. RDS provides you with various services so that (for example) you can choose a station broadcasting your favorite categories of music, or other information. The information below is available on this unit.
Receiving RDS 1 Receiving RDS traffic information RDS (For models other than European models) NARROW STEREO RDS AUTO (For European model) IF BAND HI-BLEND NOTE: If the TP indicator in the top left of the display lights up, the current station is broadcasting traffic information. 2 DISPLAY 1 1. Press the RDS button until “TP Search” appears on the display. 2. Press the SCAN button to start searching for a TP station. When the unit receives a TP station, it stops scanning.
Entering characters 2 3 The following characters can be used. T-4711 A B C D EFG H IJ K LM N O PQ R STU V W X Y Z a bc de fghijklmnopqrs tuvw xyz ! “&%’()*+,-./=?:;<>[]|@\ 0123456789 4, 5 Entering new characters 1 ANTENNA A NARROW HI-BLEND AUTO TUNED STEREO MEMORY SIGNAL STRENGTH 2 TUNED STEREO NARROW If the station you are currently listening to on the T-4711 is an RDS station, the program service name has priority over other information.
Setting the clock 1 2, 4 3 This unit features “ACCUCLOCK”-an automatic clock adjusting feature using RDS broadcast signals. 1 Remote control Using the ACCUCLOCK function to set the clock (for remote control only) ADJUST NOTE: ● Before setting the clock, be sure to preset a station frequency. ● Make sure that your FM antenna has been properly connected as explained in page 7.
3, 4 1 2, 5 Setting the clock manually 1 Remote control ADJUST 2 Remote control ENTER 3 Remote control TIMER Remote control TIMER PRESET 4 Remote control TIMER TIMER PRESET 5 Remote control ENTER You may wish to set the clock manually if the ACCUCLOCK cannot receive RDS signals, if the displayed time is obviously wrong, or if you wish to set your own time (you may intentionally advance the clock) by doing the following: 1. Press the ADJUST button until “Manual Adjust” is displayed. 2.
Using the timer (for remote control only) The remote control can be used to set the following four timer functions. WeekDay: For listening to the radio at a designated time on weekdays. WeekEnd: For listening to the radio at a designated time on weekends. Once: For listening to the radio at a designated time one time only. Sleep: Power off the system after a specified time period. NOTE: ● Make sure that the clock has been set correctly before setting the timer.
5Remote control TIMER Remote control ENTER TIMER PRESET 6 Remote control TIMER Remote control ENTER TIMER PRESET NOTE: If the same time is set for the ON and the OFF times, or the WeekDay and WeekEnd day settings are all turned off, the timer cannot be set. (The small timer indicator goes off.). 7Remote control MODE 5. Press the a/b buttons to set the OFF time, then press the ENTER button. After entering the ON time, the unit will suggest an OFF time of one hour after the entered ON time. 6.
Specifications Troubleshooting Guide FM Tuning Range: • No power. Cause: Power cord is disconnected. Remedy: Connect power cord. • Buzzing noise on AM, usually conspicuous at night or with a weak station. (For models other than European models) Cause: Noise from electrical apparatus such as fluorescent lamps. Remedy: Move set to different location. Remedy: Change the position or direction of the loop antenna. • High pitch noise. Cause: Noise from TV. Remedy: Keep unit away from TV set.