Contents Quick Start 4 Before Using 7 Intelligent Remote Controller USR-5RF Instruction Manual Operations 11 Other Information 39 Thank you for purchasing the Onkyo Intelligent Remote Controller. Please read this manual thoroughly before making connections and plugging in the unit. Following the instructions in this manual will enable you to obtain optimum performance and listening enjoyment from your new Intelligent Remote Controller. Please retain this manual for future reference.
Precautions Care From time to time you should wipe the front and rear panels and the cabinet with a soft cloth. For heavier dirt, dampen a soft cloth in a weak solution of mild detergent and water, wring it out dry, and wipe off the dirt. Following this, dry immediately with a clean cloth. Do not use rough material, thinners, alcohol or other chemical solvents or cloths since these could damage the finish or remove the panel lettering.
Table of contents Quick Start .................................................................................................................. 4 Quick Reference .......................................................................................................... 5 Introduction ................................................................................................................ 7 1. Intelligent remote controller ...............................................................................
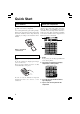
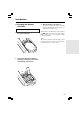
Quick Start Insert batteries Insert 4 AA batteries according to the picture on the inside of the battery compartment. or Use a rechargeable battery pack (sold separately). (Remove the AA battery tray first). Before using the remote controller, be sure to charge the battery completely according to the instructions in the manual. Operate your components Fresh out of the box, the remote controller is already set up to work with popular components made by Onkyo.
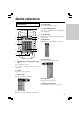
Quick reference Quick reference 5. Panel number Shows what panel you’re seeing. 1 11 6. Left and Right buttons Activate the commands shown immediately above the buttons – CONT + MUTE 2 LIGHT 3 + 10 9 CH 8. Mode menu Customize the remote controller (see below) – 4 7. Scroll button Display next Control Panel. Scroll buttons may appear on left. VOL 8 5 7 6 1. Sending eye (IR transmitter)/Learning eye Send commands to devices For learning commands from other remote controllers 9.
Quick reference Modes 1 2 3 4 5 6 7 8 1. Normal use controlling components. 2. Learn commands from other remote controllers. When a macro panel is displayed, this button changes to REC for recording macros. 3. Assign letters and symbols to buttons and commands. 4. Add a new component or group of macros. 5. Delete a button, component, macro, or macro group. 6. Change the order of commands in a menu. 7. Define the brands of your device. 8.
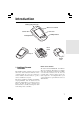
Introduction Sending eye/Learning eye Direct-access buttons Contrast dial Touchscreen Left/Right buttons Backlight button Reset button Serial port Battery cover 1. Intelligent Remote Controller The intelligent remote controller can be used for all devices that understand infrared remote controller signals. It’s easy-to-use touchscreen and its intuitive interface makes it a perfect remote controller for every user. The remote controller is completely customizable and programmable.
Introduction 1. Home: to go to the Home menu Left and Right buttons 2. Macro menu: to open stored list of commands The Left and Right buttons change function depending on the device the remote controller is controlling. Labels displayed above them on the touchscreen show their current function. Touchscreen buttons Buttons on the touchscreen let you control particular devices. You activate the buttons by tapping them with your finger. 3. Control panel: to send commands to components 4.
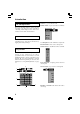
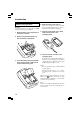
Introduction 2. Charging the Remote Controller AA batteries 1. Slide the battery cover off the back of the remote controller. 3. Slide the battery cover back on. After a few seconds, the remote controller starts up automatically and beeps twice to indicate that it is ready to use. When batteries are running low, the Low Battery icon blinks at the center top of the display. Replace the batteries as soon as possible to ensure perfect performance.
Introduction Optional recharging dock Warning: Use the recharging dock only with the NiMH rechargeable battery pack of BCC-5. 1. Slide the battery cover off the back of the remote controller. 4. Slide the battery cover back on. After a few seconds, the remote controller starts up automatically and beeps twice to indicate that it has finished starting up. 5. Plug the power adapter into a wallet outlet and connect it to the recharging dock. 2. Remove the plastic AA battery tray from the battery compartment.
Getting Started 1. Activate the remote controller Turning on the display ■ Tap the screen gently with your finger or a blunt, soft object like a pencil eraser. The display is activated and you see the Home panel. Notes: • If the display stays blank or becomes black, adjust the contrast dial on the left side. • If another panel is displayed, tap the Home button. • The remote controller shuts down automatically. 2. Define the Brand of Your Device The remote controller uses RC codes to activate device.
Getting Started When you operate Onkyo’s CD player, DVD player, MD recorder or CD recorder which has no connectors or is not connected using interface, you need to define the brand of your device. 1. In the Mode menu, select Brand. 2. Select the device you want to define. 3. Select Next. The brand selection screen appears. 4. If you selected CD player, DVD player or CD recorder, select Onkyo or Onkyo-x other than Onkyo-1 from the brand list. If you selected MD player, select Onkyo-5.
Getting Started 4. Navigate through the list of brands. Use the scroll buttons to scroll up or down in the list of brands. • By tapping the scroll buttons, you scroll through the brands one by one. By touching and holding the scroll buttons, the scrolling speed will increase. • Use the mini-keyboard to jump through the list of brands. To enter a character, tap the keyboard near the character you want to use. The keyboard is zoomed in, allowing you to tap exactly the character you need.
Getting Started 6. Tap Next. When your brand uses only one set of RC codes, the remote controller switches to Try mode. Go to step 9. When there are several code sets for your brand, the following screen appears. Note: However, your device is responding to the current code set, it is recommended to try other code sets. When your device responds to more than one code set, install the most suitable one. 10.
Getting Started Defining brands by searching You can use Search mode to find the matching RC codes for your device when • your brand is not displayed in the list of brands, • you selected your brand, but you do not know which code set to select. 3. Tap Next. The display shows a scrollable list of brands for the selected device and a “virtual autozooming’’ mini-keyboard. 4. Tap Search The remote controller automatically searches through all available brands and code sets to find the RC codes matches. 5.
Getting Started 3. Select a Device Device tab Via the Home menu In the Home menu, you find buttons for the most common video and audio devices. These buttons are preprogrammed to work with popular devices made by Onkyo. If you have devices of other manufacturers that do not respond to your remote controller, you can program your remote controller using your original remote controllers (see “Programming Buttons” on page 23). Device menu ■ Tap the device you want to operate.
Getting Started 4. Operate a Device You operate devices using three kinds of buttons: ■ Touchscreen buttons ■ Left and Right button (below the touchscreen) ■ Direct-access buttons (to the right of the touchscreen) Using touchscreen buttons Sending commands By touching the touchscreen buttons you send commands to the device you have selected.
Getting Started Using the Left and Right button The Left and Right buttons change function depending on the device the remote controller is operating. The current function is displayed on the touchscreen right above the button. The function can be either an IR (infrared) command that is transmitted, or a jump to a specific device page. IR commands Device pages 18 Using the direct-access buttons MUTE, CH and VOL can be operated at any time, even without turning on the touchscreen.
Getting Started 5. Adjust the Settings Most of the remote controller’s features can be set to your own needs. 1. Touch and hold the remote controller icon for a few seconds. The first setup panel appears. You can see the second and third setup panel by using the scroll buttons. 2. Tap the button of the setting you want to adjust. The button becomes black. 3. Use the Left and Right button to adjust the setting.
Getting Started Second setup panel Setting Function Adjusting Level Turns the backlight always on or off Always on: Tap the Level button and when activating the touchscreen. Note: When you choose always off, position the indicator in the left half of the indication bar using the Left you can only activate the backlight using the backlight button. button.
Getting the Maximum out of it 1. Introduction The remote controller is preprogrammed to work with all equipment that recognizes NEC infrared codes. This includes all Onkyo devices and several devices made by other manufacturers. What makes the remote controller so powerful is the ability to extend its functionality in multiple ways like programming additional functions, adding supplementary devices, recording macros and customizing the interface as it suits you best.
Getting the Maximum out of it To switch to another mode 1. Tap the Mode button at the bottom of the touchscreen. The Mode menu pops up. 2. Tap the mode you want to use. The label of the active mode appears on the remote controller icon. You can now work in the selected mode. Note: When a label is displayed, you can also display the Mode menu by tapping the label. To hide the Mode menu To prevent accidental changes to the remote controller interface and commands, you can hide the Mode menu: 1.
Getting the Maximum out of it 2. Programming Buttons You program the remote controller commands by transmitting infrared signals from your existing remote controls to the remote controller’s learning eye. To do this, place the remote controller and the device’s remote controller on a flat surface, 15 to 20 cm (6 to 8 inches) apart. Programming control panel buttons 1. Navigate to the control panel buttons you want to program. 2. Switch to Learn mode by using the Mode button.
Getting the Maximum out of it Programming device items Note: When you program a command to a device item, this command is automatically assigned to the corresponding button in the Home menu. 1. Make sure the device tab is active. The device tab is active when the name of a device is displayed. 2. Switch to Learn mode by using the Mode button. 3. Point the device’s original remote controller to the remote controller’s learning eye as described above. 4. Tap the device tab to open the Device menu. 5.
Getting the Maximum out of it 3. Labeling Buttons and Menu Items The following elements can be labeled: control panel buttons, Device menu items, macros, macro groups and Left/Right buttons. You cannot label Home menu buttons directly. You have to label them by using the Device menu (see page 26). 4. Edit the label. • To delete a character, press the Right button. • To enter a character, tap the keyboard near the character you want to use.
Getting the Maximum out of it 5. Tap Enter to save the changes and return to the panel you were. -or-Tap Cancel to return to the panel you were without saving changes. 6. Label all other items you want and return to Use mode via the Mode button. Labeling a menu item 1. Switch to Label mode by using the Mode button. 2. Tap the device tab to open the Device menu. 3. Touch and hold either the remote controller’s Left or Right button and tap the device you want to program.
Getting the Maximum out of it 4. Adding and Moving Devices Adding devices If you have a device that is not provided in the Device menu, you can add it to the remote controller. You cannot add devices to the Home menu directly. You have to add them by using the Device menu. 1. Make sure the device tab is active. The device tab is active when the name of a device is displayed. 2. Switch to add mode by using the Mode button.
Getting the Maximum out of it 5. Delete and restore Delete You can delete control panel buttons and functions associated with a direct-access or a Left/Right button. You can also delete Device menu items and Macro menu items. Home menu buttons cannot be deleted directly. You have to delete them via the Device menu. Deleting a button or button function Note: Buttons without bold frame can not be deleted. You can only hide them by removing their label (see “Labeling a button” on page 25). 1.
Getting the Maximum out of it Restore After you deleted a control panel button or a menu item, the button or item is no longer visible in Use mode but remains in the remote controller’s memory. This allows you to restore it in Edit mode. Actions associated with direct-access or a Left/ Right buttons cannot be restored. You have to reprogram them as explained in “Programming Direct-access and Left/Right Buttons” on page 24. Control panel buttons 1. Switch to Edit mode by using the Mode button.
Getting the Maximum out of it 6. Recording Macros and Setting Timers 4. Tap the button you want to use for your macro. A macro enables you to send a sequence of IR commands using one single button. 5. Enter the sequence of commands you want to record. You can navigate to any control panel you want, just as you can in Use mode. By setting a time, you can activate a device at the time you prefer. See page 31.
Getting the Maximum out of it Editing macros Setting timers You can edit any macro you have recorded. To activate a device at the time you set. 1. Open the macro group that contains the macro. 1. Tap the Macro menu button. 2. Switch to Edit mode via the Mode button. 3. Tap the macro you want to edit. The contents of the macro appear. 2. Open the macro menu and select a timer group. 3. Switch to Edit mode by using the Mode button. Empty timer buttons appear in the timer control panel. 4.
Getting the Maximum out of it 6. Tap the clock button and set the start time using the Left/Right buttons. Editing timers You can edit any timer you have set. 7. Tap one or more day buttons to select or deselect days for the timer. You can choose to repeat the timer weekly. 8. Scroll down to display the second timer control panel in which you can set the stop time. 9. Enter the command the timer has to execute. 10. Tap the clock button and set the stop time using the Left/Right buttons. 11.
Getting the Maximum out of it 7. Using the remote controller with Radio Frequency Warning: To use the remote controller with radio frequency (RF), you need an RF Receiver, which is not included in package. By default, the remote controller uses infrared (IR) signals to operate devices. This means that you have to point the remote controller’s sending eye towards the device you are operating. IR signals have an operating distance of 10 meters (33 feet).
Getting the Maximum out of it Changing the remote controller’s RF IR Settings All devices are set up by default to work with IR signals. To be able to operate one or more devices with RF signals, you have to change the remote controller’s RF IR settings for those devices. 1. Make sure the Device tab is active. The Device tab is active when the name of a device is displayed at the right side of the touch screen . 4. Tap RF. The RF IR settings for the selected device are transferable from IR to RF.
Getting the Maximum out of it Changing the Extender ID 1. Make sure the Extender ID button is active. The button is active when the button label is white. 2. Press the + and – action buttons to change the Extender ID. The remote controller offers 16 Extender ID’s. 6. Repeat instructions 3 to 5 for all devices for which you want to change the RF IR settings. 7. Tap Close. The remote controller switches back to Use mode. The remote controller is configured to operate the devices you have set with RF signals.
Getting the Maximum out of it Choosing Another Channel When you notice RF interference, for instance from your neighbors, you have to choose another channel to operate your devices. 4. Press the + and – action buttons to change the Channel. The remote controller offers 4 RF Channels. Note: All devices you want to operate with RF signals use the same channel. If you select another channel for one device, the remote controller will automatically change the channel for all devices that work with RF signals.
Getting the Maximum out of it 8.ChadEdit If you want to personalize your remote controller even more, beyond its standard programming features, ChadEdit is the tool for you to use. ChadEdit is the remote controller’s companion software that you can download from http:// www.onkyousa.com www.integrahometheater.com. With ChadEdit you can: ■ upload and download new configurations to and from your remote controller.
Getting the Maximum out of it When you become familiar with ChadEdit, you can achieve results like: Port System requirements ■ PC ■ Windows 95/98/Me, Windows NT 4.
Troubleshooting General Problems The display is blank • Tap the screen to make sure the Remote controller is turned on. • Adjust the contrast dial on the left side. • Make sure the batteries are properly installed. • Install new batteries or recharge the battery pack using the recharging dock. The display is too light or too dark • Adjust the contrast dial on the left side. The Remote controller shuts itself off • This is a feature of the Remote controller to save power.
Troubleshooting The Remote controller will not switch modes • When the batteries are low the Remote controller prevents you from switching to customizing modes so that no customization can get lost. Replace the batteries or recharge the battery pack (see pages 9, 10). The Remote controller is low on memory • The remote controller displays a message to clean up the memory. The Remote controller will do this by permanently removing devices and macro and timer groups you have deleted.
FAQ Can I program a button to execute more than one command? No, you can not. However, you can create a macro to execute a sequence of commands (see page 31). How do I program source switching? See “Programming device items” on page 24. How can I edit, label or delete buttons on home panels? You can do this via the Device menu items. All changes you make to these items are automatically updated in the Home menu.
Overview of Symbols 42 :Pause :Page number up :Stop :Page number down :Normal run; normal speed :Page enlargement :Normal run; normal speed :TV and text mixed :Fast run; fast speed :1st or 2nd language :Fast run; fast speed :Last view; previous program :Slow run; slow speed :Stand-by :Slow run; slow speed :Zone focus: long distance :Eject :Zone focus: very short distance :Recording, general :Single or multi-digit selection :Key :Brightness; brilliance :Navigate :Contrast :Still mod
Specifications Hardware High-resolution (320 x 240) liquid crystal display (LCD) with contrast control Large touchscreen Seven programmable direct-access buttons Backlighting for LCD and direct-access buttons Infrared sending and learning eyes 3-wire (RS232) serial port connector Software Dynamic, animated interface Editable macros (up to 255 commands per macro) Total number of devices and macros limited only by memory Database with RC codes to operate different brands Infrared (IR) Operating distance of 1
Sales & Product Planning Div. : 2-1, Nisshin-cho, Neyagawa-shi, OSAKA 572-8540, JAPAN Tel: 072-831-8111 Fax: 072-833-5222 ONKYO U.S.A. CORPORATION 18 Park Way, Upper Saddle River, N.J. 07458, U.S.A. Tel: 201-785-2600 Fax: 201-785-2650 http://www.onkyousa.com ONKYO EUROPE ELECTRONICS GmbH Industriestrasse 20, 82110 Germering, GERMANY Tel: 089-849-320 Fax: 089-849-3265 E-mail: info@onkyo.de ONKYO CHINA LIMITED Units 2102-2107, Metroplaza Tower I, 223 Hing Fong Road, Kwai Chung, N.T.