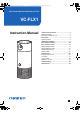
SN29403199_VC-FLX1_En_1711xx.book 1 ページ 2017年11月15日 水曜日 午後9時41分 Voice Control Speaker with Camera VC-FLX VC-FLX1 Instruction Manual Cautions and Disclaimers .......................................2 Safety Precautions .....................................................2 Disclaimers, Trademarks, etc. ...................................4 Parts Name ...............................................................6 Light Ring Status .......................................................
SN29403199_VC-FLX1_En_1711xx.book 2 ページ 2017年11月15日 水曜日 午後9時41分 Cautions and Disclaimers Safety Precautions The rating plate is on the bottom of the product. WARNING: TO REDUCE THE RISK OF ELECTRIC SHOCK, DO NOT REMOVE COVER. NO USER SERVICEABLE PARTS INSIDE. REFER SERVICING TO QUALIFIED SERVICE PERSONNEL. TO PREVENT ELECTRIC SHOCK, MATCH WIDE BLADE OF PLUG TO WIDE SLOT OF AC POWER OUTLET, THEN FULLY INSERT.
SN29403199_VC-FLX1_En_1711xx.book 3 ページ 2017年11月15日 Important: Any changes or modifications not expressly approved by the party responsible for compliance could void the user’s authority to operate this equipment. This device and its antenna(s) must not be co-located or operating in conjunction with any other antenna or transmitter.
SN29403199_VC-FLX1_En_1711xx.book 4 ページ 2017年11月15日 Notes on cleaning Use a soft, dry cloth for cleaning. 0 For stubborn dirt, soak the cloth in a weak detergent solution, wring well and wipe. Use a dry cloth to wipe it dry. Do not use any type of solvent, such as thinners and benzene, as they may damage the surface of the product. 0 If you use a chemical saturated cloth to clean the product, follow that product’s instructions. Notes on moisture condensation Moisture condensation damages the product.
SN29403199_VC-FLX1_En_1711xx.book 5 ページ 2017年11月15日 4. Third party internet services Third party internet services are not provided by ONKYO Corporation, may change or be discontinued at any time and may be subject to internet service provider restrictions. ONKYO Corporation makes no warranties, representations, or assurances about the content, accuracy, availability or functionality of third- party content or services.
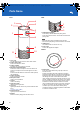
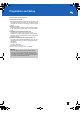
SN29403199_VC-FLX1_En_1711xx.book 6 ページ 2017年11月15日 水曜日 午後9時41分 Parts Name Front Back 3 2 1 4 5 6 7 8 1 2 3 1. Network/Pairing button Press briefly to activate Bluetooth® pairing mode. Press and hold for more than 10 seconds to activate Wi-Fi pairing mode. Note 0 Bluetooth pairing mode is activated for 60 seconds. 0 Wi-Fi access point pairing mode is activate for 30 minutes. 9 11 10 1. Lens cover Can be rotated to cover and turn off the video camera. 2.
SN29403199_VC-FLX1_En_1711xx.book 7 ページ 2017年11月15日 水曜日 午後9時41分 Accessory AC adapter 0 Quick Start Guide 0 Safety Sheet 0 Warranty Card * This document is an online instruction manual. It is not included as an accessory.
SN29403199_VC-FLX1_En_1711xx.book 8 ページ 2017年11月15日 水曜日 午後9時41分 Light Ring Status This unit’s light ring lights up/flashes in different colors to indicate its status. Ring LED color and status Lights up white. Status of unit This unit has been turned on. Ready for initial setup. Connected to Wi-Fi. Flashes blue slowly. This unit is searching for a target wireless router. Flashes red slowly. This unit is unable to update its firmware. (ÄP23) Flashes yellow slowly.
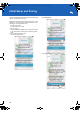
SN29403199_VC-FLX1_En_1711xx.book 9 ページ 2017年11月15日 水曜日 午後9時41分 Preparation and Setup Follow the steps below to use the unit. 1. Placement of your unit. Because this unit includes a home monitoring camera, you should place it where the camera can see what you want to monitor. On a shelf or on the kitchen counter are great options. 2. Plug in your unit. Plug the included AC adapter into your unit and connect to an AC outlet. When you first plug in, the light ring will be white. 3.
SN29403199_VC-FLX1_En_1711xx.book 10 ページ 2017年11月15日 水曜日 午後9時41分 Initial Setup and Pairing Follow the steps below to perform initial setup and pairing the unit with Toshiba Smart Home app. 3. Tap Initial Setup. Before performing initial setup, check the OS version of your smartphone. You can use Toshiba Smart Home app on the following OS. (As of September 2017) 0 iOS: iOS 10.0 or later 0 Android: Android 5.0 or later 1. Plug in your unit.
SN29403199_VC-FLX1_En_1711xx.book 11 ページ 2017年11月15日 5. Tap "THINGS_XXXXXX" on the displayed screen. There may be some differences in how settings are performed depending on the model and OS version. If the Wi-Fi list screen does not display automatically, display the Wi-Fi list screen manually to make the settings. If you are using an iOS smartphone, tap on the upper left to back to "Toshiba Smart Home". 水曜日 午後9時41分 8.
SN29403199_VC-FLX1_En_1711xx.book 12 ページ 2017年11月15日 水曜日 午後9時41分 10.Log in to Amazon Alexa. Important 0 When you select a zone where water may splash (e.g. kitchen), do not place your unit at a place subject to water. 12.Tap Done on the Zone Select screen. Initial setup is now complete. 13.Your device may require a software update after setup. This typically takes a few minutes to complete. Adding another smartphone to this unit 11. Select a zone which the paired this unit covers.
SN29403199_VC-FLX1_En_1711xx.book 13 ページ 2017年11月15日 水曜日 午後9時41分 Items on Home Screen 2 Important 0 This product does not guarantee connection/function operation with all sensors. 1 3 4 5 Notes on Z-Wave 0 This product is a Z-Wave Plus Security Enabled Gateway device in the Central Static Controller Role type. 0 When receiving Basic Command, this product ignores it and do nothing, since it is not supported or mapped to any commands.
SN29403199_VC-FLX1_En_1711xx.book 14 ページ 2017年11月15日 水曜日 午後9時41分 Setting Manager Screen 9 10 1 2 3 11 4 5 12 13 14 6 7 8 15 16 * The screen appearance is subject to change without notice. 1. Device 0 0 0 0 0 0 0 Tap to perform following operations.
SN29403199_VC-FLX1_En_1711xx.book 15 ページ 2017年11月15日 水曜日 午後9時41分 Sensors Manager screen Tapping Sensors on the Setting Manager screen displays the Sensors screen below. Sensors registered by default are shown on the screen. In addition, you can add/remove/delete/edit sensors. Up to 40 sensors can be registered. Regarding the sensor, it corresponds to standard products of ZigBee and Z-Wave for US market. Important 0 Do not use a sensor of countries other than that of the US market.
SN29403199_VC-FLX1_En_1711xx.book 16 ページ 2017年11月15日 Adding a sensor Follow the steps below to add a sensor. 1. Tap Sensors on the Home screen. 水曜日 午後9時41分 4. Operate the sensor you are adding so that the app can find it. Refer to the instruction manual supplied for the sensor for details. When the app finds a sensor, the screen below appears. 2. Tap Add Sensor. 5. Tap Done. 3. Tap Add Sensor on the displayed screen. The sensor has been added to the app.
SN29403199_VC-FLX1_En_1711xx.book 17 ページ 2017年11月15日 3. Tap Remove Sensor on the displayed screen. The screen below appears and the app starts removing the sensor. 水曜日 午後9時41分 3. Tap Edit on the displayed screen. 4. Confirm the message on the bottom, and then tap on the message. 5. Tap Delete sensor on the displayed screen. 6. Tap OK on the displayed screen. The sensor has been deleted. Editing a sensor 4. Tap OK on the displayed screen. On the Edit Sensor screen, you can edit following items.
SN29403199_VC-FLX1_En_1711xx.book 18 ページ 2017年11月15日 Rules Manager Screen 水曜日 午後9時41分 2. Tap Add New Rules. Follow the instructions on the displayed screen. Editing Rules 1. Tap an item to edit on the Rules Manager screen. The Edit Rule screen appears. 2. Tap an item to edit on the Edit Rule screen. * The screen appearance is subject to change without notice. You can add/edit rules on each sensor following the procedure below. Up to 100 rules can be registered.
SN29403199_VC-FLX1_En_1711xx.book 19 ページ 2017年11月15日 水曜日 午後9時41分 History Screen Recording history on the cloud is displayed on the History screen. Up to 64 Notification History will be stored. In addition, you can change order of the list according to the cause of recording. * The screen appearance is subject to change without notice.
SN29403199_VC-FLX1_En_1711xx.book 20 ページ 2017年11月15日 Using the unit Enjoying Audio Source Connect your smartphone to the unit via wireless connection (Bluetooth) to enjoy audio source on your smartphone. Follow the steps below to enjoy audio source by the unit. When You Use the unit via Bluetooth: (ÄP20) When You Use the unit via Bluetooth: 1. Make sure this unit is plugged in. 2. Press the Network/Pairing button once to activate Bluetooth pairing mode on your unit.
SN29403199_VC-FLX1_En_1711xx.book 21 ページ 2017年11月15日 水曜日 午後9時41分 Live Video Follow the steps below to use live video function of this unit. 1. Open the Toshiba Smart Home app. The home screen appears. 2. Select a this unit to use from Device on the Setting Manager screen. Setting Manager Screen (ÄP14) 3. Tap Live Video button. * The screen appearance is subject to change without notice. The Live Video screen appears and you can view the live image from this unit.
SN29403199_VC-FLX1_En_1711xx.book 22 ページ 2017年11月15日 水曜日 午後9時41分 Amazon Alexa Sensors on the unit This unit is compatible with Amazon Alexa, which allows you to control this unit by talking to it. Before using Amazon Alexa, make sure initial setup is completed and you are signing in to Amazon Alexa. Initial Setup and Pairing (ÄP10) 1. Make sure this unit is plugged in. 2. Say "Alexa" to this unit or press and hold the Microphone mute/Talk button to start up Amazon Alexa.
SN29403199_VC-FLX1_En_1711xx.book 23 ページ 2017年11月15日 水曜日 午後9時41分 Troubleshooting Problems with Pairing Check1: Make sure this unit is plugged in. Check2: Make sure this unit is in the pairing mode. Check3: Place your wireless router or device closer to this unit. Check4: Make your smartphone’s battery is sufficiently charged. No Sound Check1: Make sure this unit is plugged in. Check2: Make sure Bluetooth or Wi-Fi is activated on your smartphone.
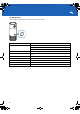
SN29403199_VC-FLX1_En_1711xx.book 24 ページ 2017年11月15日 水曜日 午後9時41分 Specifications Feature Description Appearance Cylindrical 88 mm (dia) x 220 mm (H) (3-1/2” x 8-3/4”) Weight 660 g (Unit) (1.5 lbs.) AC adapter IN: AC 100 - 240 V, 50/60 Hz, 0.9A max OUT: DC 12 V / 3 A Length of cable: 1.8 m Power consumption 22 W (Live camera + BT Speaker (150 Hz Play)) 8.
SN29403199_VC-FLX1_En_1711xx.book 44 ページ 2017年11月15日 水曜日 午後9時41分 1-10-5 Yokoami, Sumida-ku, Tokyo 130-0015 Japan http://www.onkyo.com/ 18 Park Way, Upper Saddle River, N.J. 07458, U.S.A. For Dealer, Service, Order and all other Business Inquiries: Tel: 201-785-2600 Fax: 201-785-2650 http://www.us.onkyo.com/ For Product Support Team Only: 1-800-229-1687 http://www.us.onkyo.com/ Gutenbergstrasse 3, 82178 Puchheim, Germany Tel: +49-8142-4401-0 Fax: +49-8142-4208-213 http://www.eu.