OpenOffice.org 1.1 Impress QuickStart Guide Title: OpenOffice.org 1.1 Impress QuickStart Guide Version: 0.
Contents...........................................................................................................................................1 Overview..........................................................................................................................................4 Copyright and trademark information.........................................................................................4 Feedback......................................................
Formatting characters...........................................................................................................11 Inserting special characters...................................................................................................12 Formatting a paragraph ........................................................................................................13 Creating bulleted and numbered lists........................................................................
Adding graphics to the Gallery themes................................................................................27 Adding a new theme to the Gallery......................................................................................27 Formatting graphic images........................................................................................................28 Moving graphics..............................................................................................................
ACB: DEB%F 'G HJIK LMI N PO The purpose of this guide is to teach OpenOffice.org users how to use Impress to design professional-quality presentations. This quick-start approach provides an overview of the capabilities of Impress. It is designed to quickly give Impress users the knowledge necessary to create high-quality presentations suitable for a wide variety of contexts. QSRUTWVSX Y[Z]\_^ `badce^fX `dcUgUhi`bX jkY8aWl>RUX hi`_^fY[RUa The contents of this Documentation are subject to the Public Docu
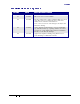
ACB: DEB%F 'G Rc]YlCY[`_^fY[RUa`badcSTcU`_^Mg C8>¡#¢C£ ¤ ¥¦8 ¤§?©¨{ ¡ ª«¦:¡#¢C£¬¢M«®¯M¥M£M° 0.1 06/27/03 Initial edition issued for comment 0.3 07/07/03 TIF screen shots converted to PNGs 0.4 01/27/04 Mostly re-written and re-desktop published. Many new screen shots. New sections on printing, text boxes, charts, lists, Gallery themes, transitions, and animations. Yet to come, new sections on the Navigator, the Stylist, and Slide Show Settings. 0.
± oD² ³ ´ µ: oF ¶ ·LK¸º¹K» ·N Welcome to Impress–OpenOffice.org's slide show program. This easy-to-learn program, which features user-friendly functions and standard toolbars and menus, allows users to create a wide variety of slide layouts for visually attractive presentations. With Impress, users can create slides that contain many different elements, including: text, bulleted and numbered lists, tables, charts, clip art, and a wide array of graphic objects.
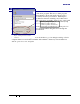
¿D² À, oF ÁÂÀf ' 'G§Ã D² 8: À, oF ÄL ÆÅ ·N ÆÇ Å Æ PO È L K É Å ·N This section shows how to set up a new presentation. Ê^M`bX ^fY8adZe^f\dg ·^MR ¼ Y8[RW^ºTUX g1gUa_^M`_^fY[RUa After launching OpenOffice.org, choose File > New > Presentation, or File > AutoPilot > Presentation. AutoPilot Presentation window number 1 appears. See Figure 1: Autopilot Presentation window.
¿D² À, oF ÁÂÀf ' 'G§Ã D² 8: À, oF Figure 3: Autopilot Presentation window 3 The Effect option creates transitions between all the slides in the presentation. Select No Effect for no transition effect. Transitions can be added and changed later. For more information, see Slide transitions and animations. 6) Select the desired Speed for the transition between the different slides in the presentation from the speed drop-down menu. 7) Click Create. A new presentation is created.
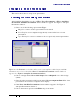
¿D² À, oF ÁÂÀf ' 'G§Ã D² 8: À, oF ÍÎMÏfÐ ÑÓÒвÔ5Õ×Ö]Ø>ٲРÏÚ]ÏfÛÜ Ð²Ô5վݧÛ?Þ ÎßвÙoÎ Þ The Modify Slide window appears. See Figure 4: Modify Slide window. The Select an AutoLayout section contains a wide variety of thumbnail slides to help you format a presentation. Each thumbnail is a display of the visual layout of a slide. Clicking on a thumbnail slide selects that layout. Notice how the description at the bottom of the thumbnails frame changes to reflect the contents of each layout.
¿D² À, oF ÁÂÀf ' 'G§Ã D² 8: À, oF á a1gUX ^fY8adZâadgd §8Y[cUg Inserting slides is easy, yet important—this is how you build a presentation. See Figure 5: Insert Slide dialog box and Figure 6: Full screen with slide tabs. New slides are always inserted after the active, or selected, slide. Do not worry about getting the order perfect the first time—slides can be rearranged easily (see the following section, Rearranging slides). 1) Choose Insert > Slide. The Insert Slide window appears.
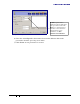
¿D² À, oF ÁÂÀf ' 'G§Ã D² 8: À, oF RUX hi`_^?^fY8adZä`åT`dZUg Select Format > Page to change the margins, size of the slides, and other settings. The Page Setup window appears. See Figure 7: Page Setup window. Click the Page tab for options that help create the desired layout. Figure 7: Page Setup window Click the Background tab for slide background options. See the section Changing the slide background to learn more about this feature.
¿D² À, oF ÁÂÀf ' 'G§Ã D² 8: À, oF Figure 8: Modify Slide window è/ÚÙoÚ?Þ Ð²Ô5Õ¬Ø>ٲРÏÚ5Ø 1) Select the slide you want to delete. 2) Select Edit > Delete Slide. A dialog box appears asking “Are you sure you want to delete 'Slide ##'”? (“##” will be the name of your selected slide.) 3) Click Yes. éÚÔCÖê вÔ5Õ¬Ø>ٲРÏÚ5Ø 1) Select Format > Modify Layout. The Modify Slide window appears. 2) Enter the new name of the slide in the Name text field and delete the old one.
¿D² À, oF ÁÂÀf ' 'G§Ã D² 8: À, oF ì RUX jv§T`dgiíUY[gd Impress has five different workspace views from which to choose. Each view is designed to make completing certain tasks easier. See Figure 9: Workspace view examples. Ë Drawing View is the main view for creating individual slides. Use this view to format and design, add text, graphics, and animation effects. Many of the following sections describe how to create and edit slides in Drawing View.
¿D² À, oF ÁÂÀf ' 'G§Ã D² 8: À, oF ï/ð ÖÔ5ÕfвÔ5Õ×ñÎòÜ ó©Ø>ôCÖCõöÚø÷ÐoÚCñØ There are two ways to change workspace views: Ë Selecting View > Workspace then choosing the desired view, or Ë Clicking one of the View Buttons located at the upper-right corner of the workspace. See Figure 10:The View buttons. Drawing View Outline View Slide View Notes View Handout View Start Slide Show Figure 10:The View buttons ! #" $% '& ( ) * +,&-+/.
¿D² À, oF ÁÂÀf ' 'G§Ã D² 8: À, oF ú SababY8adZe^f\dge§8Y[cUge§\dRd 1) Select Slide Show > Slide Show or click the Start Slide Show button to start slide show. See Figure 10:The View buttons. 2) Use the arrow keys on the keyboard to go to the next slide or to go back to the previous one. You can also click the mouse or press the spacebar on the keyboard to advance to the next slide. 3) When the last slide appears, the message “Click to exit presentation” appears.
¿D² À, oF ÁÂÀ '³/ ³ F oF Áf%ü F ³, 8 ÄL ÆÅ ·N ÆÇ Å Æ¸ ƸýN% ·N ÆÇ ¾þ N ¸ K á a1gUX ^fY8adZe^MgWÿW^ There are two ways to insert text into presentation. One way is to use the AutoLayout as described in the Format slides section. The other way is to type text in a text box you create using the text tool. #Ô5Ø{ÚÜÓÞ Þ Ú r޷вÔøÞ Ú r Þ C Î Ú5ØõrÜ:ÚCÖ?Þ Ú5 Ï ?ÒSݧÛ?Þ Î {Ö?ÒCÎòÛ?Þ 1. Click in the text box that reads “Click here to...” 2. Type your text in the text box.
¿D² À, oF ÁÂÀ '³/ ³ F oF Áf%ü F ³, 8 ÍÎ ÷вÔ5Õ×ÖøÞ Ú rÞ CÎ In Drawing View, notice how the pointer changes to an I-beam as you move it over the text in a text box. 1) Click when the pointer becomes an I-beam. The text box is now in edit mode, with a gray border and green resizing handles. 2) Drag the I-beam (or pointer) over the gray border. Notice how it changes to a fourheaded arrow. 3) When the four-headed arrow appears, click and drag to move the text box.
¿D² À, oF ÁÂÀ '³/ ³ F oF Áf%ü F ³, 8 >ÎòÜ êøÖ?Þ Þ Ð²Ô5Õ×õ ð ÖÜ:ÖCõ{Þ ÚÜ8Ø To view the Character Formatting options, select Format > Character or click the Character button on the Object Bar. The Character window appears. See Figure 12: The Character window. Ë The Font tab has options to change the font, typeface, and size of the text. You can view what the text will look like in the preview box. Ë The Font Effects tab has other options to enhance the text, such as underlining and font color.
¿D² À, oF ÁÂÀ '³/ ³ F oF Áf%ü F ³, 8 #Ô5Ø{ÚÜÓÞ Ð²Ô5Õ¬Ø>ôCÚCõrÐoÖÙ?õ ð ÖÜ:ÖCõ{Þ ÚÜ8Ø To insert special characters, such as copyright, math, geometric, or monetary symbols, or characters from another language: 1) Click in the place in the text where you want to insert the character. 2) Choose Insert > Special Character... The Special Characters window appears. See Figure 13: Special Characters window. 3) Choose the font and character subset from the Font and Subset drop-down menus.
¿D² À, oF ÁÂÀ '³/ ³ F oF Áf%ü F ³, 8 >ÎòÜ êøÖ?Þ Þ Ð²Ô5Õ×Ö¬ôCÖÜ:Ö5ÕfÜ:Öô ð To view the Paragraph Formatting options, select Format > Paragraph or click the Paragraph button on the Object Bar. The Paragraph window appears. See Figure 14: The Paragraph window. Ë The Indents & Spacing tab has options to adjust the spacing of the paragraph selected, including the spacing between lines of text.
¿D² À, oF ÁÂÀ '³/ ³ F oF Áf%ü F ³, 8 ï Ü:ÚCÖ?Þ Ð²Ô5Õ×Ö¬ÔCÚCñÎòÛ?Þ Ù²Ð²ÔCÚ¬ÙoÚ?÷CÚÙ 1) If necessary, press Enter to begin a new line. 2) Press Tab. Each time you press Tab the line indents to the next outline level. Pressing Enter creates a new line at the same level as the previous one. ï ð ÖÔ5ÕfвÔ5Õ]Þ ð / Ú ÛÙ²ÙoÚ?Þ Þ ÒôCÚ For the entire list: 1) Click in the list, then click on the gray border of the text box so that just the green resizing handles are displayed.
¿D² À, oF ÁÂÀ '³/ ³ F oF Áf%ü F ³, 8 Tip: Just as you can place the cursor in a single line and change the bullet style, you can also change it to a number by choosing a numbering style instead of a different bullet style. You can also click and drag to select several contiguous lines and change from bullets to numbers or numbers to bullets, or change the styles. This is very useful if you want a numbered list under a bulleted entry or a bulleted list nested in a numbered one.
¿D² À, oF ÁÂÀ '³/ ³ F oF Áf%ü F ³, 8 Q X g`_^fY8adZâhi`f^MgUXƧ8Y[cUg Master slides contain formatted text and background items that will appear on all of the slides in the presentation. They can give the presentation consistency and save time when designing the slide show. The font type in the titles and/or bulleted text passages on all of the slides can be changed at one time by using master slides. 1) View the master slides by selecting View > Master > Drawing. See Figure 17: Master View.
'À Á,F Á1 ' ò%ü F ³, 'À µ 8Á,D² ´ '³ ÆÅ ÆÇýN ÆÇ Æ ¾þ N ¸ KÅÆ» ¾ÇýL ¹ Ƹ To change a slide background: 1) Select Format > Page. The Page Setup window appears. See Figure 18: Background tab in the Page Setup window. 2) Click the Background tab. 3) Choose the type and style of background desired. 4) Click OK.
'À Á,F Á1 ' ò%ü F ³, 'À µ 8Á,D² ´ '³ To set a common background using the Stylist: 1) Right-click on Background in the Stylist. 2) Select Modify. 3) Choose the type and style of background desired. This background will be applied to all slide backgrounds not formatted by the Format > Page method. Once a background has been set by the Format > Page method, it cannot be changed by the Stylist method.
¿D² À, oF Áµ 'À D# ÄL ÆÅ ·N ÆÇ » ÆÅ L5 á a1gUX ^fY8adZä` v\d`bX ^ There are two ways to insert a chart into a slide. One way is to use the AutoLayout as described in the Format slides section. The other method is to create a chart using the Insert Chart feature. ï Ü:ÚCÖ?Þ Ð²Ô5Õ×Ö¾õ ð ÖÜÓ޷вÔSݧÛ?Þ Î {Ö?ÒCÎòÛ?Þ 1) Select Format > Modify Layout. 2) Choose a layout in the Select an AutoLayout section that contains a chart (look for the vertical bars).
¿D² À, oF Áµ 'À D# ï Ü:ÚCÖ?Þ Ð²Ô5Õ×Ö¾õ ð ÖÜÓÞ·Û5Ø>вÔ5Õ]Þ ð Ú#"£5©C ¦ ¨{¯M¥M ¦1Ñ:ÚCÖ?Þ ÛÜ:Ú 1) Select Insert > Chart, or click the Insert Chart icon on the Main toolbar. A chart appears which has been created using sample data. See Figure 21: Chart made with sample data. 2) To enter your own data in the chart, see the Entering chart data section following. Q \dRR§Y8adZä` v\d`bX ^ ^?VSTg 1) Double-click the chart. It should now have a gray border.
¿D² À, oF Áµ 'À D# $ a_^MgUX Y8adZäv\d`bX ^ cU`_^M` % ôCÚÔвÔ5Õ×Ö¾õ ð ÖÜÓÞvÏÖ?Þ Ö¾ñbвÔ5ÏÎ5ñ 1) Double-click the chart. It should now have a gray border. The main toolbar has now changed to show tools specifically for charts. 2) Click the Chart Data icon or select Edit > Chart Data. The Chart Data window appears. (If the main toolbar is not showing, select View > Toolbars > Main Toolbar.) & Ô?Þ ÚÜ Ð²Ô5Õ¬ÏÖ?Þ Ö Enter data in the Chart Data window. See Figure 23: Chart Data area.
¿D² À, oF Áµ 'À D# RUX hi`_^?^fY8adZe^f\dg v\d`bX ^ >ÎòÜ êøÖ?Þ·êøÚÔÛ The format menu has many options for formatting and fine tuning the look of your charts. Double-click the chart so that it is enclosed by a gray border. Click Format in the main menu list. See Figure 24: Chart format menu. Ë Title formats the titles of the chart, the x axis and y axis. Ë Legend formats the location, borders, background, and type of the legend.
¿D² À, oF Áµ 'À D# There are two main areas of the chart. These areas control different settings and attributes for the chart. See Figure 25: The Chart wall and Chart area. Ë Chart wall contains the graphic of the chart displaying the data. Ë Chart area is the area surrounding the chart graphic. The main title and the key are in the chart area. Note: Chart Floor from the Format menu is only available for 3D charts and has the same formatting options as Chart Area and Chart Wall.
¿D² À, oF Áµ 'À D# Note: If your graphic is 3D, round red handles appear which control the three-dimensional angle of the graphic. You cannot resize or reposition the graphic while the round red handles are showing. With the round red handles showing, shift+click to get the green resizing handles. You can now resize and reposition your 3D chart graphic. See the following tip.
± ( ÿ D# oF Á/Á,D²À:Ã) F µ[ ¶+* ÈK L5 ·N ÆÇ ÇýLÅ È, N »b There are many different types of graphics that can be placed in presentations. You can import your own graphic files or choose ready-made graphics from the Impress Gallery. á heTRUX ^fY8adZäZ]X `bTU\bY[ ýlCX RUh `ilCY8[g 1) Select Insert > Graphics. The Insert Graphics window appears. See Figure 27: Insert Graphics window. 2) Browse to the file containing the desired graphic. 3) Select the file.
± ( ÿ D# oF Á/Á,D²À:Ã) F µ[ á heTRUX ^fY8adZäZ]X `bTU\bY[ ýlCX RUh ^f\dg.-K`b8[gUX V The Gallery contains a collection of images that you can use in a presentation. Select Tools > Gallery or click the Gallery icon palette appears. See Figure 28: The Gallery palette. on the Function Bar.
± ( ÿ D# oF Á/Á,D²À:Ã) F µ[ Ý ÏÏfвÔ5Õ¬ÕfÜ:Öô ð Ðoõ ØÞ Î Þ ð Ú / ÖÙ²ÙoÚÜÓÒøÞ ð ÚêøÚ5Ø You can add new graphic files to the existing themes. To add a file to an existing theme: 1) Right-click on the theme name in the theme scroll box. 2) Choose Properties from the context menu. 3) Click the Files tab, if necessary. 4) Click Add. 5) Select a file. 6) Click Open. The file is added to the theme. To delete a file from a theme: 1) Right-click on the graphic in the Gallery window.
± ( ÿ D# oF Á/Á,D²À:Ã) F µ[ RUX hi`_^?^fY8adZäZ]X `bTU\bY[ Y8hi`dZUg ÍÎ ÷вÔ5Õ¬ÕfÜ:Öô ð Ðoõ Ø 1) Click the graphic, if necessary, to show the green resizing handles. 2) Move the pointer over the graphic until the pointer becomes a four-headed arrow. 3) Click and drag the graphic to the desired position. 4) Release the mouse button. éÚ5Ø>РвÔ5Õ¬ÕfÜ: Ö ô ð Ðoõ Ø 1) Click the graphic, if necessary, to show the green resizing handles.
± ( ÿ D# oF Á/Á,D²À:Ã) F µ[ Q X g`_^fY8adZâ8Y8adg`badcæ§\d`bTg The main toolbar contains the tools used to create rectangles, circles, and other lines and shapes to enhance the design of the presentation. If the main toolbar is not showing, select View > Toolbars > Main Toolbar. For the different tools that can be used to edit lines and shapes, see Figure 29: Line and shape tools.
± ( ÿ D# oF Á/Á,D²À:Ã) F µ[ >ÎòÜ êøÖ?Þ Þ Ð²Ô5ÕÆٲвÔCÚ5ØÖÔ5Ï¬Ø ð ÖôCÚ5Ø Use the Format menu to modify lines and shapes. See Figure 31: Shape format menu. To format lines and shapes: 1) Click on the shape or line to select it. 2) Click Format in the main menu list. Some of the options may not be available (grayed out) because of the type of object selected. For example, if the object is a simple line, the Area choice will be unavailable because a line does not have an area to fill.
1'ü F ³, / oD²À %F oF À '³/À F ( À, oF 2 þ N ¸ ·LÅ K ¾N% ·N K ŠƸ Å N * Å ·N K Slide transitions are the effects that take place when one slide gives way to the next one in the presentation, like “Roll down from top” or “Fly in from left.” They add dynamic flair to a slideshow, smoothing the transition between slides.
1'ü F ³, / oD²À %F oF À '³/À F ( À, oF Effects Extras Preview Assign Update Effects section Speed section Figure 33: Slide Transition window ݧôôÙ ÒвÔ5Õ×Ö]Ø>ٲРÏÚøÞ Ü:ÖÔ5Ø>Ð Þ ÐoÎòÔ¾Ú?ÑÓÑ:ÚCõ{Þ 1) From Slide View, click on a slide to select it. The transition you apply to this slide will occur as the slide comes into view in the slide show. 2) Choose Slide Show > Slide Transition. 3) Choose an Effects category from the pop-up menu above the main Effects window.
1'ü F ³, / oD²À %F oF À '³/À F ( À, oF ݧôôÙ ÒвÔ5Õ×Ö]Ø>ٲРÏÚøÞ Ü:ÖÔ5Ø>Ð Þ ÐoÎòÔøÞ Î ê ÛÙ Þ Ð²ôÙoÚ]Ø>ٲРÏÚ5Ø From slide View, Shift + click all the slides you want the transition applied to. Follow steps 2-9 above. Only the first selected slide will show in the Preview window. éÚêøÎ ÷вÔ5Õ×ÖøÞ Ü:ÖÔ5Ø>Ð Þ ÐoÎòÔ 1) Select the desired slide(s). 2) Choose No Effect from the Effect box in the Object Bar. See Figure 32: Object Bar in Slide View.
1'ü F ³, / oD²À %F oF À '³/À F ( À, oF Ë Choosing Automatic Transition will activate the Duration box. Use the arrows to designate the amount of time the transition should take to complete. You can designate a different time between each slide, if desired. To apply the same time to multiple slides, Shift + click the desired slides first. When the slideshow is run, the transitions will occur automatically with no mouse-clicking or key-pressing necessary.
1'ü F ³, / oD²À %F oF À '³/À F ( À, oF Preview Assign Update Order Extras Text Effects Effects section Effects Figure 35: Animation Effects window Ë The Effects button is the same as in the Slide Transition window—it displays the various animations. The Update, Assign, and Preview buttons are also the same. Ë The Text Effects button is only active when a text box containing text is selected. It displays the various animation effects that you can apply to text objects.
1'ü F ³, / oD²À %F oF À '³/À F ( À, oF ݧôôÙ ÒвÔ5Õ×ÖÔ¾ÖÔвêøÖ?Þ ÐoÎòÔ¾Ú?ÑÓÑ:ÚCõ{Þ 1) From Drawing View, select the desired slide by clicking its tab at the bottom left corner of the workspace. (See Figure 6: Full screen with slide tabs.) 2) Choose Slide Show > Effects, or click the Animations Effects icon on the Main toolbar. 3) Choose an Effects category from the pop-up menu above the main Effects window. Notice how the thumbnail images change with each category.
5 DF oF ÁÂÀÃ D² 8: À, oF 6 LN ·N ÆÇ Å È L K É Å ·N OpenOffice.org provides many options for printing a presentation: with multiple slides on one page, with a single slide per page, with notes, as an outline, with date and time, with page name, and more. To print a presentation: 1) Choose File > Print. 2) Click Options. The Printer Options window appears. See Figure 36: The Printer Options window. 3) Choose the desired settings. 4) Click OK.
5 DF oF ÁÂÀÃ D² 8: À, oF Figure 37: The Modify Slide window ! #" $% '& ( ) * +,&-+/.
7 8 ÿ D# oF Á1 f D{:À B%F Á/F 1 ' D:9 D ( À, ;#< ÈK L5 ·N ÆÇ $ ÿUTRUX ^fY8adZä`` L ÉÅ×I N ÆÇ ¼'? N × Æ L>=f L * Å lCY8[g Portable Document Format files (PDFs) are compatible with most platforms. Impress has the ability to save files as PDF (the extension is .pdf) which can be viewed by anyone who has a freely available PDF viewer. Most computers now come with a PDF viewer already installed, like Adobe's Acrobat Reader.
7 8 ÿ D# oF Á1 f D{:À B%F Á/F 1 ' D:9 D ( À, Figure 38: PDF Options window ! #" $% '& ( ) * +,&-+/.
7 8 ÿ D# oF Á1 f D{:À B%F Á/F 1 ' D:9 D ( À, Note: You can also click the Export Directly as PDF icon to create a PDF. However, clicking the Export Directly as PDF icon will not give you the option to set compression settings, described below. A PDF is immediately generated and saved to your desktop. $ ÿUTRUX ^fY8adZä`` [`§\ilCY8[g Macromedia Flash (SWF) file format (.swf) was created to store “Flash movies,” animation for the World Wide Web.
7 8 ÿ D# oF Á1 f D{:À B%F Á/F 1 ' D:9 D ( À, 4) Under File Format, choose HTML Document(OpenOffice.org Impress)(.htm). 5) Click Save. Your new folder is automatically chosen as the location. If your file name does not match your folder name, at this point you will get the HTML Export window. See Figure 39: HTML Export window. If you see this window at this point, click Cancel, start again, and make sure that your file name matches your folder name. 6) Click Save again.
7 8 ÿ D# oF Á1 f D{:À B%F Á/F 1 ' D:9 D ( À, Figure 40: HTML export designs G TgUabY8adZä`badcæ1`_íUY8adZä` ¼ Rd gUX ¼ RUY8a_^ lCY8[g OpenOffice.org's Impress file format is highly compatible with Microsoft's PowerPoint format. You can open a PowerPoint presentation in Impress, edit it, then save it in its original PowerPoint format or in Impress format.
7 8 ÿ D# oF Á1 f D{:À B%F Á/F 1 ' D:9 D ( À, ! #" $% '& ( ) * +,&-+/.
H Ã,ÿ '³ F 8IH:J 1K ' D# µ:´, L NM O È ÈK ƸýN
H Ã,ÿ '³ F 8a`bJ!c ´ 'µ: oF d NM efV5£¨y¦:¡#¢C£gXC Z? [3[5¨y¦ F1 Open the OpenOffice.org Help menu. Shift + F1 Access Context Help. Control+F4 or Alt+F4 Close the current document (close OpenOffice.org when the last open document is closed). F6 Set focus in next subwindow (e.g. document/data source view). Shift+F6 Set focus in previous subwindow. Control + F7 Access the Thesaurus. F8 Edit Points. Shift+F10 Open the context menu. Control + F12 Reveal Drawing View.
± '³, 8 ¶ Ƹ < ! #" $% '& ( ) * +,&-+/.