
Impress Guide


border, alignment relative to the slide, and position relative to other
objects.
While the background style and line style of an area can be accessed
from the Format menu, in order to access the Alignment and Arrange
menus you need to either open the Drawing toolbar or use the context
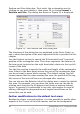
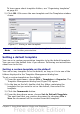
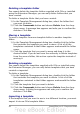
menu. To display the Drawing toolbar (Figure 26), select it in
View > Toolbars; to open the context menu, right-click on the edge of
the rectangular area after selecting it. On the Drawing toolbar, click
the arrow next to the Alignment or Arrange icon (highlighted in Figure
26) to display choices. See the Draw Guide for details.
Figure 26: The Drawing toolbar
The date area and slide number area do not automatically appear on
every slide, even though you have defined them. In order to show
them, you need to close the Master View and select the desired field
from the menu bar: Insert > Page number or Insert > Date and
time. This procedure is explained in detail in Chapter 8 (Adding and
Formatting Slides, Notes, and Handouts).
Adding text to all slides
Some of the supplied slide masters have text objects in the footer. You
can add other text objects to the master page for your slides to act as a
header or a footer.
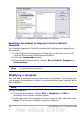
1) Choose View > Master > Slide Master from the menu bar.
2) On the Drawing toolbar (see Figure 26), select the Text icon.
3) Click once and drag in the master page to draw a text object, and
then type or paste your text into the object or add fields as
described below.
4) Choose View > Normal when you are finished.
To add a field, such as the date or page number, to a text object in the
header or footer, choose Insert > Fields. and select the required field
from the submenu. If you want to edit a field in your slide, select it and
choose Edit > Fields.
The fields you can use in Impress are:
• Date (fixed).
• Date (variable) —updates automatically when you reload the file.
Chapter 2 Using Slide Masters, Styles, and Templates 43