
Calc Guide


The Gallery is available in all components of OOo. It does not come with many
graphics, but you can add your own pictures or find extensions containing more
graphics. The Gallery is explained in more detail in Chapter 11 (Graphics, the Gallery,
and Fontwork) in the Getting Started guide. For more about extensions, see Chapter
14 (Setting Up and Customizing Calc) in this book.
This section explains the basics of inserting a Gallery image into a Calc document.
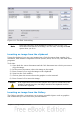
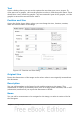
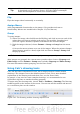
1) To open the Gallery (Figure 112), click on the Gallery icon (located in the
right side of the Standard toolbar) or choose Tools > Gallery from the menu
bar.
2) Navigate through the Gallery to find the desired picture.
3) To insert the picture, either right-click on the picture and choose Insert >
Copy or click and drag the picture from the Gallery into the Calc document.
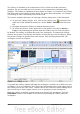
By default, the Gallery is docked above the Calc workspace. To expand the Gallery,
position the pointer over the line that divides it from the top of the workspace. When
the pointer changes to parallel lines with arrows, click and drag downward. The
workspace resizes in response.
Figure 112: Gallery in Calc
To expand the Gallery without affecting the workspace, undock it so it floats over the
workspace. To do so, hold down the Control key and double-click on the upper part of
the Gallery next to the View icons. Double-click in the same area while holding down
the Control key to dock it again (restore it to its position over the workspace).
When the Gallery is docked, to hide it and view the full Calc workspace, click the
Hide/Show button in the middle of the thin bar separating the Gallery from the
workspace.
122 OpenOffice.org 3.3 Calc Guide