
Calc Guide


Filters
Use filters to limit the visible rows in a spreadsheet. Generic filters, common to all
sorts of data manipulations, are automatically provided by the auto filter capability.
You can also define your own filters.
Caution
After applying a filter, some rows are visible and some rows are not. If
you select multiple rows in one operation, you will also select the
invisible rows contained between the selected visible rows. Operations,
such as delete, act on all of the selected rows. To avoid this problem,
you must individually select each of the filtered rows using the control
key.
Auto filters
Use auto filters to quickly create easily accessible filters found to be commonly used
in many different types of applications. After creating an auto filter for a specific
column, a combo box is added to the column. The combo box provides quick access to
each of the auto filter types.
• The All auto filter causes all rows to be visible.
• The Standard auto filter opens the Standard Filter dialog and is the same as
the standard filter.
• The Top 10 auto filter displays the ten rows with the largest value. If the value
70 is in the top ten values, then all rows containing the value 70 in the filtered
column are displayed. In other words, more than ten rows may be displayed.
• An auto filter entry is created for each unique entry in the column.
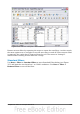
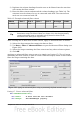
To create an auto filter, first select the columns to filter. For example, using the data
in Table 23, select data in columns B and C. If you do not select the title rows, Calc
asks if the title row or the current row should be used. Although you can place the
auto filter in any row, only the rows below the auto filter are filtered. Use Data >
Filter > AutoFilter to insert the auto filter combo box in the appropriate cell.
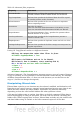
Finally, use the drop-down arrow to choose an appropriate auto filter (see Figure
326).
322 OpenOffice.org 3.3 Calc Guide