
Calc Guide


5) To customize the selected menu, click on the Menu or Modify buttons. You
can also add commands to a menu by clicking on the Add button. These
actions are described in the following sections. Use the up and down arrows
next to the Entries list to move the selected menu item to a different position.
6) When you have finished making all your changes, click OK to save them.
Creating a new menu
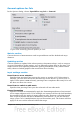
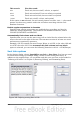
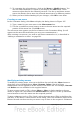
In the Customize dialog, click New to display the dialog shown in Figure 347.
1) Type a name for your new menu in the Menu name box.
2) Use the up and down arrow buttons to move the new menu into the required
position on the menu bar. Click OK to save.
The new menu now appears on the list of menus in the Customize dialog. (It will
appear on the menu bar itself after you save your customizations.)
After creating a new menu, you need to add some commands to it, as described in
“Adding a command to a menu” on page 361.
Figure 347: Adding a new menu
Modifying existing menus
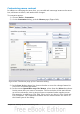
To modify an existing menu, select it in the Menu list and click the Menu button to
drop down a list of modifications: Move, Rename, Delete. Not all of these
modifications can be applied to all the entries in the Menu list. For example, Rename
and Delete are not available for the supplied menus.
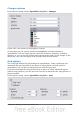
To move a menu (such as File), choose Menu > Move. A dialog similar to the one
shown in Figure 347 (but without the Menu name box) opens. Use the up and down
arrow buttons to move the menu into the required position.
To move submenus (such as File | Send), select the main menu (File) in the Menu list
and then, in the Menu Content section of the dialog, select the submenu (Send) in the
Entries list and use the arrow keys to move it up or down in the sequence. Submenus
360 OpenOffice.org 3.3 Calc Guide