
Draw Guide

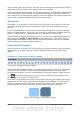
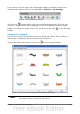
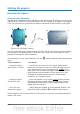
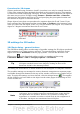

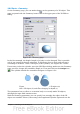

Figure 129: Rotation body created using variation 2.1
Method 2. Click the icon on the Effects pull-down menu on the Drawing toolbar.
This icon can also be accessed from the Mode menu, accessible from View >
Toolbars > Mode. Notice that this icon lacks the curved red arrow of the fixed-axis
rotation icon.
With this method, you can change the location of the rotation axis, which appears as
a dotted line with two white circular endpoints.
Figure 130: Rotation body created using variation 2.2
Click one of the white endpoints and drag it so that the axis moves to the desired
position. You may need to move both ends to achieve this. The outline shows how the
figure will be rotated. When you click on the figure again, the rotation is carried out
and the new 3D body is produced.
Variation 3: Using ready-made objects
Use the 3D Objects toolbar/pull-down menu (Figure 131). To activate this toolbar,
click View > Toolbars > 3D Objects).
Figure 131: The 3D Objects toolbar
If you add the icon to the Drawing toolbar, the 3D Object bar will be available
as a pull-down menu or as a floating toolbar.
Chapter 7 Working with 3D Objects 113