
Getting Started Guide

Workspace views
Each of the workspace views is designed to ease the completion of certain tasks; it is
therefore useful to familiarize yourself with them in order to quickly accomplish those
tasks.
Normal view
Normal view is the main view for working with individual slides. Use this view to
format and design and to add text, graphics, and animation effects.
To place a slide in the slide design area (Normal view), click the slide thumbnail in
the Slides pane or double-click it in the Navigator.
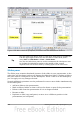
Outline view
Outline view contains all the slides of the presentation in their numbered sequence. It
shows topic titles, bulleted lists, and numbered lists for each slide in outline format.
Only the text contained in the default text boxes in each slide is shown, so if your
slide includes other text boxes or drawing objects, the text in these objects is not
displayed. Slide names are also not included.
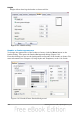
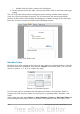
Figure 133: Outline view
Use Outline view for the following purposes.
1) Making changes in the text of a slide:
• Add and delete the text in a slide just as in the Normal view.
• Move the paragraphs of text in the selected slide up or
down by using the up and down arrow buttons (Move
Up or Move Down) on the Text Formatting toolbar.
• Change the outline level for any of the paragraphs in a slide using the left
and right arrow buttons (Promote or Demote).
• Both move a paragraph and change its outline level using a combination of
these four arrow buttons.
2) Comparing the slides with your outline (if you have prepared one in advance).
If you notice from your outline that another slide is needed, you can create it
directly in the Outline view or you can return to the Normal view to create it.
Notes view
Use the Notes view to add notes to a slide.
1) Click the Notes tab in the Workspace.
2) Select the slide to which you want to add notes.
• Click the slide in the Slides pane, or
Chapter 6 Getting Started with Impress 149