
Getting Started Guide

The basic drawing shapes
Draw provides a wide range of shapes, located in palettes accessed from the Drawing
Toolbar. This section describes only a few of the basic shapes. These shapes include;
rectangles and squares, circles, ellipses, and arcs, 3D objects, curves, lines and
arrows, text, and connectors. All shapes in Draw are called objects. See the Draw
Guide for a complete description of the shapes available.
Note
When you draw a basic shape or select one for editing, the Info field at
the left side in the status bar changes to reflect the present action: Line
created, Text frame xxyy selected, and so on.
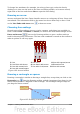
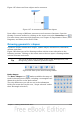
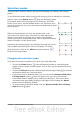
Figure 160 shows part of the Drawing toolbar with the icons needed in the following
sections. The Text icon is also included.
Figure 160: Part of the Drawing toolbar
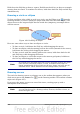
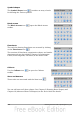
Drawing a straight line
Click on the Line icon on the Drawing toolbar and position the mouse pointer
where you want to start the line. Drag the mouse while keeping the button pressed.
Release the mouse button at the point where you want to end the line.
A selection handle appears at each end of the line, showing that this is the currently
selected object.
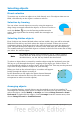
Figure 161: Drawing a straight line
To restrict the angle of the line to a multiple of 45 degrees (0, 45, 90, 135, and so on),
hold down the Shift key while you draw the line.
To snap the end of the line to the nearest grid point, hold down the Control (Ctrl) key
pressed while drawing the line.
Note
The effect of the Ctrl key depends on the settings of the Snap to Grid
option on the View > Grid menu:
Snap to Grid on: Ctrl deactivates the snap option for this activity.
Snap to Grid off: Ctrl activates the snap option for this activity.
To extend the line symmetrically in both directions from the starting point, hold down
the Alt key while drawing the line.
182 Getting Started with OpenOffice.org 3.3