
Getting Started Guide
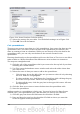
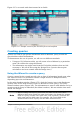
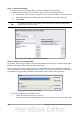
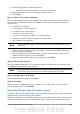
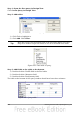

Figure 214: Insert Database Columns dialog
6) Select the settings for your table. Use the default settings as in Figure 214.
7) Click OK. Save the document.
Calc spreadsheets
There are two ways to enter data in a Calc spreadsheet. One enters the data into the
spreadsheet cells. The other creates records in the spreadsheet just like they are
done in creating a form in a database. While you can directly access the data in the
spreadsheet cells, you can only see the data in the records created in the
spreadsheet.
Entering data directly to the spreadsheet cells uses the Data to Text icon as we did to
make a table in a Writer document. But differences exist in these two situations.
The steps are straightforward.
1) Click the cell of the spreadsheet which you want to be the top left of your data
including the column names.
2) Use F4 to open the database source window and select the table whose data
you want to use.
3) Select the rows of data you want to add to the spreadsheet:
• Click the gray box to the left of the row you want to select if only selecting
one row. That row is highlighted.
• To select multiple rows, hold down the Control key while clicking the gray
box of the rows you need. Those rows are highlighted.
• To select all the rows, click the gray box in the upper left corner. All rows
are highlighted.
4) Click the Data to text icon to insert the data into the spreadsheet cells.
5) Save the spreadsheet.
Adding records to a spreadsheet is fairly easy. You need to have the Data Source
window open, your spreadsheet open, and the table you want to use selected.
1) Click the gray box above the field name for the table's ID field.
2) Drop and drag the gray box for the table's ID field to where you want the
record to appear in the spreadsheet.
234 Getting Started with OpenOffice.org 3.3