
Impress Guide

Arranging shapes
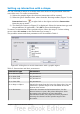
Arrange determines the stacking order of the selected object.
Draw and Impress organize objects in a stack so that the objects
on a high level of the stack cover the objects on lower levels if
overlapping occurs. To modify the position of an object in the
stack, click the small triangle on the side of the Arrange icon to
open the extended toolbar. The same arrange options described
below are available from the right-click menu.
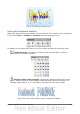
The first four tools determine the position of the selected object:
• Bring to front: the selected object is moved on top of any other object.
• Bring forward: the selected object is moved one level up in the stack.
• Send backwards: the selected object is moved one level down in the stack.
• Send to back: the selected object is given the lowest position in the stack.
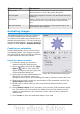
The other three tools determine the relative positions of the selected object and of a
second selected object:
• In front of object: brings the first selected object in front of the second
selected object.
• Behind object: brings the first selected object behind the second selected
object.
• Reverse: swaps the stacking order of two selected objects.
To use the In front of object and Behind object tools:
1) Select the first object by clicking on it.
2) When the green handles show, select the desired arrange action.
3) The mouse pointer changes to a pointing hand. Click on the second object.
Working with connectors
Connectors are lines that can be anchored to particular places, called glue points, on
the graphic object. The advantage of connectors is that when the graphic object to
which the connector is attached is moved or resized, the connector automatically
adjusts to the change. When creating a flowchart, org chart, schematics or diagrams,
it is highly recommended to use connectors instead of simple lines.
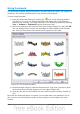
Impress offers a wide variety of predefined connectors, which differ in the
termination shape (none, arrow, custom) and in the way the connector is drawn
(straight, line, curved).
When a connector is drawn or selected Impress displays red handles which are not
shown for normal lines; in particular, the termination points are identified by red
circles, while square handles are used to modify the routing of a connector (where
applicable).
Draw a connector in a similar way to drawing any object. First select the connector
style from the Connector toolbar, then move the mouse cursor over one of the objects
to be connected. When the cursor is over the object, small black crosses appear
around it; these represent the glue points to which the connector can be attached.
Click on the required glue point to attach one end of the connector, then hold the
mouse button down and drag the connector to the second object. When the cursor is
over the glue point of the target object, release the mouse button.
Chapter 5 Managing Graphic Objects 105