
Impress Guide

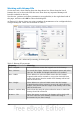

Working with bitmap fills
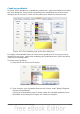
On the Area tab, chose Bitmap from the drop-down list. Select from the list of
bitmaps the one to be used to fill the area. Note that any imported bitmaps will
become available in the list.
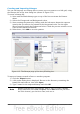
Set the size, position and offset parameters (as applicable) in the right hand side of
the page, and then click OK to close the dialog box.
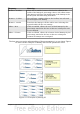
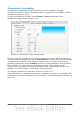
As Figure 111 shows, there are quite a number of parameters to be configured when
using a bitmap fill. These are described in Table 5.
Figure 111: Advanced formatting for bitmap fill
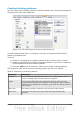
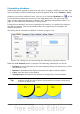
Table 5: Bitmap fill properties
Property Meaning
Size – Original Select this box to retain the original size of the bitmap.
Size – Relative To rescale the object, deselect the Original option and select
this one. The Width and Height edit boxes are enabled.
Size – Width When Relative is selected 100% means that the bitmap
original width will be resized to occupy the whole fill area
width, 50% means that the width of the bitmap will be half
that of the fill area.
Size – Height When Relative is selected 100% means that the bitmap
original height will be resized to occupy the whole fill area
height, 50% means that the height of the bitmap will be half
that of the fill area.
Position – Anchor Map Select from the map the place within the area to which the
bitmap should be anchored.
Position – Tile When this option is selected, the bitmap will be tiled to fill
the area. The size of the bitmap used for the tiling is
determined by the Size settings.
130 OpenOffice.org 3.3 Impress Guide