
Impress Guide

To select the slide master for modification:
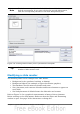
1) Select View > Master > Slide Master from the menu bar. This unlocks the
properties of the slide master so you can edit it.
2) Click Master Pages in the Tasks pane. This gives you access to the pre-
packaged slide masters.
3) Click on the slide master you want to modify among the ones available (Figure
17).
4) Make changes as described in this chapter, then click the Close Master View
icon on the Master View toolbar. Save the file before continuing.
Caution
Any changes made to one slide when in Master View mode will appear on
all slides using this slide master. Always make sure you close Master View
and return to Normal view before working on any of the presentation
slides. Select View > Normal from the menu bar, or click Close Master
View in the Master View toolbar to return to the normal slide view.
The changes made to one of the slides in Normal view (for example, changes to the
bullet point style, the color of the title area, and so on) will not be overridden by
subsequent changes to the slide master. There are cases, however, where it is
desirable to revert a manually modified element of the slide to the style defined in the
slide master: to do that, select that element and choose Format > Default
Formatting from the menu bar.
It is also possible to modify the default layout of the slide master, for example by
moving the title to the side; however, you are restricted to modifications to the “Title,
Text” layout (that is, the layout containing a title box and a text box).
Sometimes, depending on the contents of the slide, you may want to apply a different
layout. The title and text boxes will inherit the properties of the slide master, but if
you have changed the position of these text boxes in the slide master, the layout may
appear corrupted and you may need to re-position some of the layout elements
manually.
Choosing and applying the background
Backgrounds can be applied to a number of elements in Impress: the page, a default
text area, a graphic object and so on. The procedures to apply a background are
always the same.
The following procedure is used to apply a background to the page.
1) To begin, do one of the following:
• Select Format > Page from the menu bar. On the Page Setup dialog box,
choose the Background tab.
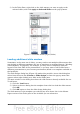
• Make sure the Presentation Styles icon is selected in the Styles and
Formatting window (Figure 22), right-click Background and select
Modify from the pop-up menu. This opens the Background dialog box.
2) Select the type of fill you want for your background from the five choices:
None, Color, Gradient, Hatching, or Bitmap.
32 OpenOffice.org 3.3 Impress Guide