
Impress Guide


To insert an image from the scanner:
1) Prepare the image in the scanner and make sure that the scanner is ready.
2) Choose Insert > Picture > Scan > Request.
3) The rest of the procedure depends on the scanner driver and interface. You
will normally be required to specify the resolution, a scan window and other
parameters. Consult the scanner’s documentation for more information.
4) When the image is ready, Impress places it in the slide. At this point it can be
edited as any other image.
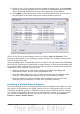
Inserting a picture from the Gallery
The Gallery contains a collection of images that you can use in a presentation. You
can also add your own images to the Gallery, making it an essential tool for creating
presentations quickly and with a consistent look. The Gallery is available in all
components of OpenOffice.org. For an introduction to the Gallery, see Chapter 11
(Graphics, the Gallery, and Fontwork) in the Getting Started guide.
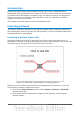
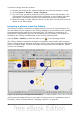
Choose Tools > Gallery or click the Gallery icon on the Drawing toolbar.
The Gallery displays categories of themes with images stored under each category.
Select a theme from the left pane and then scroll as necessary through the right pane
to find a suitable image. Click on the image and drag it onto the workspace. Figure
59 shows an example.
Figure 59. Inserting an image from the Gallery
At this point the image will be in your slide, but may not be of a satisfactory size; if
necessary, resize it as described in “Resizing a picture” on page 83.
80 OpenOffice.org 3.3 Impress Guide