
Impress Guide
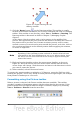

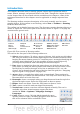


1 Edit Points 4 From File 7 Alignment 10 Interaction
2 Glue Points 5 Gallery 8 Arrange 11 Visible buttons
3 Fontwork 6 Rotate 9 Extrusion On/Off
Figure 71: The second section of the drawing toolbar with utility tools
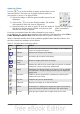
The tools in the second part of the Drawing toolbar are:
1) Edit points: to edit the individual points that form the shape or line, select
this tool, and then select a shape or a line.
2) Glue points: to edit the glue points of a graphic object, select this tool. Glue
points are the positions where connector lines terminate or start. See
“Managing glue points” on page 106 for instructions.
3) Fontwork: opens the Fontwork gallery. See “Using Fontwork” on page 112 for
further information.
4) From file: equivalent to Insert > Picture > From file on the main menu. See
Chapter 4 for details.
5) Gallery: opens the gallery. Equivalent to Tools > Gallery on the main menu.
See Chapter 4 for details.
6) Rotate: select this tool to rotate an object. See Rotating graphic objects on
page 98.
7) Align object: see “Aligning shapes“ on page 103.
8) Arrange object: see “Arranging shapes“ on page 105.
9) Extrusion On/Off: switches 3D effects on or off for the selected object.
Clicking this button also opens the 3D settings toolbar. See “Working with 3D
shapes” on page 107 for details.
10) Interaction: opens a dialog box where you can specify the interaction
between the user and the object. See “Setting up interaction with a shape” on
page 109.
11) Visible buttons: use the black triangle on the far right of the toolbar to open
a menu from which you can add or subtract buttons on the toolbar. See
Chapter 1 (Introducing Impress) for more information.
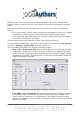
Creating lines and shapes
To create shapes and lines:
1) Select the desired line or shape tool.
2) Click and drag to create the object on the slide.
When drawing a freehand polygon (that is, when you
create a shape segment by segment from one of the
tools on the Curves toolbar, shown on page 92), keep
the Shift key pressed to restrict the angle between
the segments to multiples of 45 degrees. To finish
drawing a polygon, double-click on the last part of the
segment. If a closed polygon was selected, Impress
94 OpenOffice.org 3.3 Impress Guide
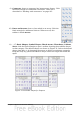
Figure 72: Creating a shape