
Writer Guide
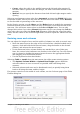


2) On the pop-up menu, choose Row > Insert or Column > Insert. This will
display a dialog box where you can select the number of rows or columns to
add, and whether they appear before or after the selected one.
3) Set Amount to the number of rows or columns to insert, and Position to Before
or After.
4) Click OK to close the dialog box.
Note
Clicking on the Insert Row icon on the Table toolbar inserts one row
below the selected one. Clicking on the Insert Column icon on the Table
toolbar inserts a column after (to the right of) the selected one.
Regardless of how they are inserted, new rows or columns have the same
formatting as the row or column where the cursor was when the insert
command was issued.
You can also quickly insert a row or a column using only the keyboard:
1) Place the cursor in the row or column next to the row or column you want to
insert.
2) Press Alt+Insert to activate keyboard handling.
3) Use the arrow keys as desired to add a row or column:
Left to insert a new column to the left of the cell where the cursor is located.
Right to insert a new column to the right of the cell where the cursor is.
Down to insert a new row below the cell where the cursor is.
Up to insert a new row above the cell where the cursor is.
The above keyboard technique can also be used to delete rows or columns by
substituting the Alt+Insert keystroke combination in Step 2 with Alt+Delete.
Merging and splitting cells
To merge a group of cells into one cell:
1) Select the cells to merge.
2) Right-click and choose Cell > Merge on the pop-up menu, or choose Table >
Merge Cells from the menu bar.
To split a cell into multiple cells:
1) Position the cursor inside the cell.
2) Right-click and choose Cell > Split on the pop-up menu, or choose Table >
Split Cells from the menu bar.
3) Select how to split the cell. A cell can be split either horizontally (create more
rows) or vertically (create more columns), and you can specify the total
number of cells to create.
It is generally a good rule to merge and split cells after completing other layout
formatting. This is because some operations such as deleting a column or a row may
produce a result difficult to predict when applied to a table with merged or split cells.
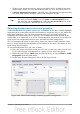
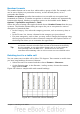
Specifying table borders
On the Table Format dialog box, select the Borders tab.
Here you can set borders for a whole table or groups of cells within a table. In
addition, a shadow can be set for the whole table.
Chapter 9 Working with Tables 273