
Writer Guide


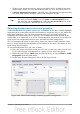


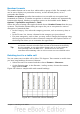

Borders have three components: where they go, what they look like, and how much
space is left around them.
• Line arrangement specifies where the borders go. If a group of cells is
selected, the border will be applied only to those cells. You can specify
individually the style of the border for the outside edges of the selected cells as
well as for the the cell divisions. Writer provides five default arrangements but
you can just as easily click on the line you want to customize in the User-
defined area to get exactly what you want. When multiple cells are selected,
the User-defined area allows you to select the edges of the selection as well as
the cell dividers. By clicking at the intersection of the lines, you can modify
multiple borders simultaneously. For example, in Figure 283 the right edge and
horizontal separators are modified with a single operation.
Note
When the selected cells have different styles of border the User-defined
area shows the border as a gray line. You can click on the gray line to
choose a new border style (first click), leave the border as it is (second
click) or delete the border (third click).
Figure 283: Table Format dialog box: Borders page
• Line specifies what the border looks like: the style and color. There are a
number of different styles and colors to choose from. The Line Style and Color
will apply to those borders highlighted by a pair of black arrows in the User-
defined map on the left hand side of the dialog box.
• Spacing to contents specifies how much space to leave between the border and
the cell contents. Spaces can be specified to the left, right, above, and below.
Check Synchronize to have the same spacing for all four sides. This spacing is
like a padding and it is not factored in when calculating the text
measurements.
274 OpenOffice.org 3.3 Writer Guide