
Writer Guide


Displaying or hiding table boundaries
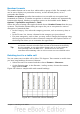
A table boundary is a set of pale (usually gray) lines around the cells when viewed
on-screen in OOo. These boundaries are not printed; their only function is to help you
see where the table cells are.
To display the table the same way on the screen as on the printed page, with no
boundary lines, right-click on the table and choose Table Boundaries from the pop-
up menu. Repeat this to have the boundaries appear again.
Note
Turning boundaries off does not hide the borders that the table may have.
Tip
You can also turn table boundaries on and off through Tools > Options >
OpenOffice.org > Appearance. On that page, you can display or hide
boundaries around text, pages headers and footers, figures, and other
parts of a document.
Formatting the table text
Once the table layout is satisfactory, you can move on to formatting the text in the
individual cells. You can apply manual formatting as with any other paragraph in the
text, but it is highly recommended, for the sake of consistency and ease of
maintenance, that you define your own paragraph and character styles.
Besides the paragraph and character styles, there are other aspects to consider when
placing text in a table cell; such as text flow, alignment and orientation.
You can format each cell independently of other cells, or you can simultaneously
format a group of cells by selecting them before applying the desired formatting.
Specifying text flow
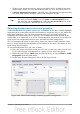
On the Text Flow page of the Table Format dialog box (Figure 286), you can:
• Insert a page or column break either before or after the table. Use the Text
Flow: Break option, combined with the Page or Column and the Before or
After buttons.
If you insert a page break before the table (that is, start the table on a new
page), you can also change the page style that will go with it by checking the
With Page Style box and selecting a new page style. As with any page break,
you can also reset the page numbers using the Page number box.
• Keep a table on one page by deselecting the Allow table to split across
pages and columns option. If this item is deselected, the next item is not
active.
• Keep each row on one page by deselecting the Allow row to break across
pages and columns option.
• Use the Keep with next paragraph option to keep the table and an
immediately following paragraph together if you insert a page break.
• Use the Repeat heading option, and its associated numbers box, to select the
number of table heading rows that will be repeated on each page. A
complicated table may need two or three heading rows to be easily read and
understood.
Chapter 9 Working with Tables 277