
Writer Guide


Entries page
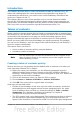
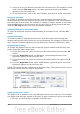
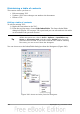
Use the Entries page to define and format the entries in the TOC. Each outline level
can be styled independently from the other levels by adding and deleting elements.
Figure 335. Entries page of Insert Index/Table dialog box
Click on a number in the Level column to select the outline level whose elements you
want to format. This will display the Structure line which contains the elements
included in the entries for that level. The available elements are displayed just below
the structure line and are grayed out if already included:
• The E# button represents the “chapter number”, which means the heading
number, not just for chapters but also for other levels of headings.
• The E button represents the chapter (or sub-chapter) text.
• The T button represents a tab stop.
• The # button represents the page number.
• The LS button represents the start of a hyperlink. (This button does not appear
on the default Structure line.)
• The LE button represents the end of a hyperlink. (This button does not appear
on the default Structure line.)
Each white field on the Structure line represents a blank space. You can add custom
text if you desire.
Note
If the chapter number defined for your document includes the word
“Chapter” before the number itself, then the E# field in the TOC will
also include the word “Chapter”. If you want to include the chapter
number with the page number (for example, in the style “1-1, 1-
2, ...”) , you will find that the page number appears in the TOC as
“Chapter 1-1”, which is probably not what you want.
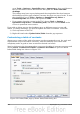
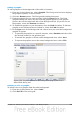
Adding elements
To add an element to the Structure line:
1) Click in the white field where you want to insert the element.
Chapter 12 Tables of Contents, Indexes, and Bibliographies 335