
Writer Guide


Adding a graphic
To add a graphic to the background of the table of contents:
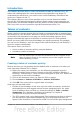
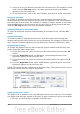
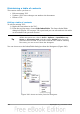
1) From the As drop-down list, select Graphic. The Background tab now displays
the graphics options, as shown below.
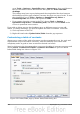
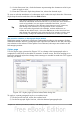
2) Click the Browse button. The Find graphics dialog box opens.
3) Find the graphic file you want and then click the Open button. The Find
graphics dialog box closes and the selected graphic appears in the graphic
preview box on the right-hand side of the Background tab. (If you do not see
the graphic, select the Preview checkbox.)
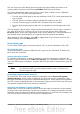
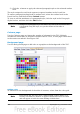
4) To embed the graphic in your document, clear the Link checkbox. To link the
graphic to the document but not embed it, select the Link checkbox.
5) In the Type area of the Background tab, choose how you want the background
graphic to appear:
• To position the graphic in a specific location, select Position and then click
the desired location in the position grid.
• To stretch the graphic to fill the entire background area, select Area.
• To repeat the graphic across the entire background area, select Tile.
Figure 339: Graphic options on the Background page of the Insert
Index/Table dialog box
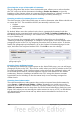
Deleting a color or graphic
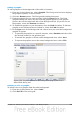
To delete color or a graphic from the table background:
1) From the As drop-down list, select Color.
2) Click No Fill on the color grid.
Chapter 12 Tables of Contents, Indexes, and Bibliographies 339