
Writer Guide
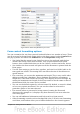

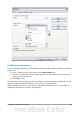
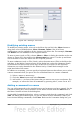
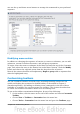
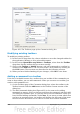
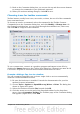
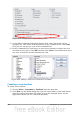

Figure 431: Adding a new menu
Modifying existing menus
To modify an existing menu, select it in the Menu list and click the Menu button to
drop down a list of modifications: Move, Rename, Delete. Not all of these
modifications can be applied to all the entries in the Menu list. For example, Rename
and Delete are not available for the supplied menus.
To move a menu (such as File), choose Menu > Move. A dialog box similar to the one
shown in Figure 431 (but without the Menu name box) opens. Use the up and down
arrow buttons to move the menu into the required position.
To move submenus (such as File | Send), select the main menu (File) in the Menu list
and then, in the Menu Content section of the dialog box, select the submenu (Send)
in the Entries list and use the arrow keys to move it up or down in the sequence.
Submenus are easily identified in the Entries list by a small black triangle on the
right hand side of the name.
In addition to renaming, you can specify a keyboard shortcut that allows you to select
a menu command when you press Alt+ an underlined letter in a menu command.
1) Select a menu or menu entry.
2) Click the Menu button and select Rename.
3) Add a tilde (~) in front of the letter that you want to use as an accelerator. For
example, to select the Save All command by pressing Alt+V, enter Sa~ve All.
Adding a command to a menu
You can add commands to the supplied menus and to menus you have created. On the
Customize dialog box, select the menu in the Menu list and click the Add button in
the Menu Content section of the dialog box.
On the Add Commands dialog box, select a category and then the command, and click
Add. The dialog box remains open, so you can select several commands. When you
have finished adding commands, click Close. Back on the Customize dialog box, you
436 OpenOffice.org 3.3 Writer Guide