
Instruction manual


4
for high sound quality. Systems incorporating moving coil phono preamplifiers and active crossovers are more likely to
suffer.
Your Consonance hi-fi system can be damaged by lightning. Power amplifiers are particularly at risk and should be
turned off when there is risk of lightning strike. For complete protection all mains plugs and any aerial cables should be
disconnected when not in use.
Equipment must not be exposed to dripping or splashing and no objects filled with liquid, such as vases, should be
placed on the equipment.
Important
Do not under any circumstances allow anyone to modify your Consonance equipment without first checking with the
factory, your dealer, or your distributor. Unauthorized modifications will invalidate your guarantee.
For your own safety do not under any circumstances open Consonance equipment without first disconnecting the
mains.
Warning : Danger of electric shock and burns. Keep the unit away from rain or moisture. Do not attempt any of the
instructions in this manual unless the unit has been unplugged for at least 10 minutes. If after reading the entire
manual you feel any of the operations listed below are beyond your ability, please seek qualified technical assistance.
Notice:
Unpacked the amplifier and removed the cover cage of tubes, you have to remove the packing materials upon every
output tubes, which are essential to reduce the possibility of transportation damage but no need anymore, when you
turn on the amplifier after the inspection of all tubes without any physical damage.
UNPACKING & SET-UP
1. Check shipping package for sign of improper handling. Remove unit from plastic bag and inspect for damage.
2. AC Power connection 240V / 230V / 220V / 115V / 100V AC dependent on country.
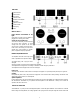
3. Locate the EL34, 6SN7 and 12AT7 vacuum tubes and insert them into their sockets according to the number on
base of tubes. Use the top chassis drawing for socket location and proper tube orientation. Be sure to hold the tube
by its base when inserting and removing. This will minimize the chance of breaking the glue between the socket and
the glass.
4. Place the unit away from heat source and allow for air flow under and around the chassis.
5. Connect the input source to the amplifier’s right and left channel RCA jacks. Refer to rear chassis drawing, these
jacks are labeled with colored washers: red for right and black for left.
6. Connect the speakers cables. Refer to rear chassis drawing for speaker connector location. Be sure the positive
speaker lead is connected to the plus symbol on the speaker connector (In this case, red to red, black to black)
Note: Never turn the amplifier on unless there are speakers connected to both output terminals. Operation
of the amplifier without a load can damage the output transformers.
7. Plug the power cord into a 3 terminal grounded outlet, and place the power switch to the on position. With the
automatic function for high voltage power delay, the front panel indicator will light from slight red to green slowly.
After about 40 seconds a dull orange color from the EL34 power tubes on the chassis top, will indicate normal
filament operation. Note: It takes about 1 minute for the EL34 to reach its normal operating point, and only
slight sonic improvement will be noticed after 5 minutes.