® Blu-ray Disc Player Model No.
Table of Contents Important Information ............................................................... 1 Important Safety Instructions .................................................................................... 1 Precautions ................................................................................................................. 2 FCC Statement ............................................................................................................ 2 Trademarks .........................
Select the Audio Setting.................................................................................................................23 Complete the Easy Setup Wizard ..................................................................................................23 BASIC OPERATIONS................................................................ 24 Disc Playback............................................................................................................ 24 Fast Playback.................
SETUP MENU OPTIONS ........................................................... 44 Using the Setup Menu System.................................................................................. 44 Playback Setup.......................................................................................................... 47 Video Setup ............................................................................................................... 49 Picture Adjustment................................................
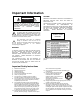
Important Information CAUTION: CAUTION RISK OF ELECTRIC SHOCK. DO NOT OPEN. DANGER OF EXPLOSION IF BATTERY IS INCORRECTLY REPLACED. REPLACE ONLY WITH THE SAME OR EQUIVALENT TYPE. CAUTION: TO REDUCE THE RISK OF ELECTRIC SHOCK, DO NOT REMOVE COVER (OR BACK). NO USER-SERVICEABLE PARTS INSIDE. REFER SERVICING TO QUALIFIED SERVICE PERSONNEL. THIS PRODUCT UTILIZES A LASER. USE OF CONTROLS OR ADJUSTMENTS OR PERFORMANCE OF PROCEDURES OTHER THAN THOSE SPECIFIED HEREIN MAY RESULT IN HAZARDOUS RADIATION EXPOSURE.
I M P O R T A N T I N F O R M A T I O N Precautions • • • • • Before connecting the AC power cord to the appliance, make sure the voltage designation of the appliance corresponds to the local electrical supply. If you are unsure of your power supply, contact your local power company. The acceptable power input range is AC ~ 100V-240V, 50/60Hz The player is still receiving power from the AC power source as long as it is connected to the wall outlet, even if the player itself has been turned off.
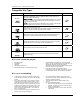
I M P O R T A N T I N F O R M A T I O N Compatible Disc Types Type/Logo BD-Video Features Manual Icon High Definition (HD) movie and music discs BD-ROM and BD-RE/BD-R discs in BDMV and BDAV mode, including 8cm discs (single layer) and DL discs. - Discs supporting BONUSVIEW (BD-ROM version 2 Profile 1 version 1.1/Final Standard Profile) that allows Virtual packages or Picture-inPicture functions to be used.
I M P O R T A N T I N F O R M A T I O N Notes about BD-ROM compatibility Since the Blu-ray Disc specifications are new and evolving, some discs may not play properly depending on the disc type, version and encoding. It is possible that a Blu-ray disc manufactured after the player was manufactured uses certain new features of the Blu-ray Disc specifications. To ensure the best possible viewing experience, the player may need a firmware or software update from time to time.
INSTALLATION Front Panel Controls 1 1. 2. POWER Button IR Remote Sensor 2 3 4 3. 4. Disc Tray Display Window 5. 6. 5 6 OPEN/CLOSE Button Playback Control and Navigation Buttons 7. 7 USB Port Front Panel Display Window 1 11 1. 2. 3. 4. 5. 6.
I N S T A L L A T I O N Rear Panel Connectors 1 1. 2. 3. 2 7.1CH/5.1CH Audio Output Stereo Audio Output Coaxial and Optical Digital Audio Output 3 4. 5. 6. 4 5 6 7 8 Composite Video Output Component Video Output Ethernet LAN Port 7. 8. 9. 9 USB 2.0 Port HDMI Output IR IN and OUT Ports In addition to the above connectors, the AC power inlet is also located on the rear panel. The inlet is the IEC60-320 C18 type.
I N S T A L L A T I O N Remote Control Remote Control Buttons 19 1 20 21 22 2 23 3 24 25 4 26 27 5 28 6 29 7 30 8 9 10 11 31 2 12 32 13 33 14 34 15 35 16 36 17 37 18 38 1. POWER: Toggle power STANDBY and ON 2. ON/OFF: Discrete on/off power buttons 3. PURE AUDIO: Turn off/on video 4. NUMBER Buttons: Enter numeric values 5. CLEAR: Clear numeric input 6. TOP MENU: Show BD top menu or DVD title menu 7. ARROW and ENTER Buttons: Navigate menu selection 8.
I N S T A L L A T I O N Back Side 1. Index Finger Notch 1: When your index finger is placed at this notch while holding the remote control, your thumb is within easy reach to the navigation buttons (ARROW, ENTER, TOP MENU and POPUP MENU). 2. Index Finger Notch 2: When your index finger is placed at this notch while holding the remote control, your thumb is within easy reach to the playback control buttons (STOP, PLAY, PAUSE, PREV, NEXT, REV, FWD). 3.
I N S T A L L A T I O N Setting the Remote Code The remote control supports one of three remote codes. The default is “Code 1”. If you have other OPPO products placed close to the BDP-83, they may inadvertently respond to the BDP-83 remote control. In this case you can select a different remote code to avoid conflicts. To select a new remote code, open the battery compartment cover of the remote control, and then use a ball point pen to flip the switch to one of the positions marked as “1”, “2”, or “3”.
I N S T A L L A T I O N Connecting to a Display HDMI Connection Rear Panel Video In Composite Video Cable (Optional) HDMI In HDMI Cable Method 1 – HDMI Connection Directly to TV • If your TV has an HDMI (High-Definition Multimedia Interface) input, you can use the included HDMI cable to connect the player to the TV. This connection method delivers both video and audio in a pure digital format via a single cable.
I N S T A L L A T I O N DVI Connection Rear Panel DVI Audio DVI Audio Cable HDMI - DVI Cable Method 2 – DVI Connection to TV • If your TV has a DVI input that supports HDCP*, you can purchase an HDMI-DVI adapter cable to connect the player to the TV. This connection method delivers digital video to the TV without any signal degradation. The HDMI video output of the OPPO Blu-ray Disc player presents the highest possible video quality and resolution.
I N S T A L L A T I O N Component Video Connection Rear Panel Audio Component Video Y Audio Cable Component Video Cable Pb/Cb Pr/Cr Method 3 – Component Video Connection to TV • If your TV has no digital video input but has component video inputs, please use a set of component video cables to connect the component video output of the player to the TV. The connectors are color coded, so please make sure the cable connections match on both ends.
I N S T A L L A T I O N Connecting to an Audio System Connecting to a Receiver/Amplifier with HDMI Input/Output Rear Panel HDMI Cable HDMI In HDMI Cable HDMI Out HDMI In AUDIO/VIDEO MULTI-CHANNEL RECEIVER Method 4 – HDMI Connection to Receiver and TV • HDMI can transmit both audio and video signals over a single cable.
I N S T A L L A T I O N Connecting to a Receiver/Amplifier with 7.1ch/5.1ch Audio Input Rear Panel Audio Interconnect Cables L L L CENTER R FRONT R R SURROUND SUBWOOFER S. BACK AUDIO/VIDEO MULTI-CHANNEL RECEIVER Receiver/Amplifier with 7.1ch Audio Input Method 5 – 7.
I N S T A L L A T I O N Connecting to a Receiver/Amplifier with Dolby Digital or DTS Decoder Rear Panel Connect one of these cables: Optical Digital Audio Cable Optical In Coaxial Digital Audio Cable Coaxial In AUDIO/VIDEO MULTI-CHANNEL RECEIVER Receiver/Amplifier with Dolby Digital or DTS Decoder Method 6 – Digital Audio Connection • Please use either a 75-Ohm coaxial digital audio cable with RCA-style connectors or an S/PDIF optical digital audio cable to connect one of the digital audio outputs t
I N S T A L L A T I O N Connecting to a Stereo Audio System Rear Panel L Audio Interconnect Cable R AUDIO IN AUDIO/VIDEO MULTI-CHANNEL RECEIVER Stereo Audio System Method 7 – Stereo Analog Audio Connection • If your audio system only offers stereo audio inputs, or if you would like to connect a dedicated stereo system in addition to the surround system, you can connect it to the STEREO AUDIO OUT terminals of the player.
I N S T A L L A T I O N Connecting to the Internet The OPPO BDP-83 Blu-Ray Disc Player supports the BD-Live feature offered on some Blu-ray Disc titles. BD-Live offers extra downloadable content and additional online interactive programs. The available BD-Live contents vary by discs and studios, and may include additional subtitles, commentaries, movie trailers, games, and/or online chat. Connecting the player to the Internet will also allow the player to obtain firmware updates via the Internet.
I N S T A L L A T I O N Custom Installation External IR (Infrared Remote) Installation The OPPO BDP-83 Blu-Ray Disc Player features IR IN and IR OUT ports on its back panel. If the player is to be installed in an equipment cabinet where direct line-of-sight is not available for remote control, your custom home theater installer can purchase an External IR Remote Sensor (OPPO part number IR-ES1) and plug it into the IR IN port.
I N S T A L L A T I O N Setting Up the Player - Easy Setup Wizard Access the Easy Setup Wizard When the player is turned on for the first time, an Easy Setup Wizard screen will appear. It is a series of guided instructions designed to configure the basic settings for the player. To start the Easy Setup Wizard, please follow these steps: 1) Turn on the TV. 2) Turn on the player. 3) Switch the input selection on your TV so that the TV displays the signal from the player.
I N S T A L L A T I O N Select the Best Output Resolution One of the major advantages of the OPPO Blu-Ray Disc Player is its ability to play high-definition Blu-Ray video and also up-convert standard definition video stored on DVD discs to high definition. The sophisticated video processor inside the player ensures that the video will have the best possible color, detail and motion. The player offers several standard and high definition video output resolutions.
I N S T A L L A T I O N Press the UP/DOWN ARROW buttons to select the desired output resolution, then press the ENTER button. The player will apply the selected output resolution and ask you to confirm the selection. If your TV supports the selected resolution, you will see a dialog box with a countdown clock. Use the LEFT ARROW button to highlight the “OK” option and press the ENTER button to save the resolution setting.
I N S T A L L A T I O N TV Screen Appearance 4:3 Original Content 16:9 Letterbox Pan & Scan Wide Wide/Auto 4:3 16:9 If you have a 4:3 or standard definition screen, select one of these options: • • 4:3 Letterbox – 4:3 TV Letterbox. Choose when the display is 4:3. Widescreen image is displayed in “letterbox” format with black borders on top and bottom (preferred). 4:3 Pan & Scan – 4:3 TV Pan and Scan. Choose when the display is 4:3.
I N S T A L L A T I O N Select the Audio Setting The Blu-ray Disc format brings not only high resolution video, but also high bit rate audio such as Dolby Digital Plus, Dolby TrueHD, DTS-HD High Resolution and DTS-HD Master Audio. Blu-ray Discs may also include additional audio features such as menu click sound and Secondary Audio Program (SAP – audio associated with the secondary video in Picture-in-Picture mode).
BASIC OPERATIONS Disc Playback DVD-A OPEN POWER STOP PLAY SACD 1. Press the POWER button to turn on the player. 2. Press the OPEN/CLOSE (OPEN) button to eject the disc tray. 3. Place the disc with the label side facing up and the recorded side facing down. 4. Press the OPEN/CLOSE (OPEN) button again to retract the tray. 5. The player will read the disc information and starts playback. 6. Depending on the content of the disc, a menu or navigation screen may appear.
B A S I C O P E R A T I O N S 2. Press the REV button on the remote control and the player starts fast reverse playback. Each press of the REV button switches the playback speed in the following sequence: 1 5 2 4 3 NOTE • Certain Blu-ray Discs utilizing the BD-Java technology may have their own fast forwarding and reversing control. The actual speed varies by disc, and a progress scale may be displayed by the disc. Pause and Frame-by-Frame PLAY PAUSE PREV NEXT DVD-A SACD 1.
B A S I C O P E R A T I O N S Blu-ray Disc Menu Playback POP-UP MENU TOP MENU ARROW BUTTONS ENTER COLOR BUTTONS 1. Blu-ray Discs usually contain a Top Menu and a Pop-up Menu. The Top Menu normally appears at the beginning of the playback, after the previews and copyright messages. The Pop-up Menu can be accessed during the movie without interrupting playback. 2. During playback, press the POP-UP MENU button to access the Pop-up Menu. Press the TOP MENU button to access the Top Menu. 3.
B A S I C O P E R A T I O N S In addition to the playback time, the on-screen display may also contain the following information about the content currently playing: • • • • • • Playback status: an icon indicating play, pause, and fast forward/reverse status. Bit rate meter: an indication of the bit rate of the audio and video stream. Current and total title numbers. (DVD and Blu-ray Discs) Current and total title chapters. (DVD and Blu-ray Discs) Current and total tracks.
B A S I C O P E R A T I O N S NOTE Availability of languages and audio channels varies by disc. Some DVD-Audio discs allow audio track selection with the AUDIO button, while others require the user to select from the audio setup menu of the disc. When playing an SACD with both multi-channel and stereo contents, the AUDIO button can be used to switch between the two formats. Subtitle Selection 1.
B A S I C O P E R A T I O N S 2. The disc menu usually features interactive controls to turn on/off the Picture-in-Picture video and Secondary Audio Program. Please use those controls to select the desired secondary audio/video content. 3. There is a PIP button on the remote control. If the disc menu does not offer interactive Picturein-Picture controls, please use this button to turn on/off Picture-in-Picture or select from multiple secondary video programs. 4.
ADVANCED OPERATIONS TV System Selection P/N While you may want to set the video output system (NTSC/PAL) to the same as that supported by your TV, realize that the OPPO Blu-ray Disc Player will convert any content that is not in the correct format your TV understands. The default output is NTSC for North America. Press the P/N button on the remote control to cycle the video output to PAL, NTSC or “Multi” system. The TV screen displays the selected system name.
A D V A N C E D O P E R A T I O N S The following output resolutions are available: NTSC output via HDMI: Auto Æ 1080p(60Hz/24Hz) Æ 1080i 60Hz Æ 720p 60Hz Æ 480p Æ 480i Æ Source Direct PAL output via HDMI: Auto Æ 1080p(50Hz/24Hz) Æ 1080i 50Hz Æ 720p 50Hz Æ 576p Æ 576i Æ Source Direct NTSC output via component: 1080p 60Hz* Æ 1080i 60Hz Æ 720p 60Hz Æ 480p Æ 480i PAL output via component: 1080p 50Hz* Æ 1080i 50Hz Æ 720p 50Hz Æ 576p Æ 576i * When 1080p is selected for the component output, HDMI output resolut
A D V A N C E D O P E R A T I O N S The available zoom levels depend on the “TV Aspect Ratio” setting in the Setup Menu and the aspect ratio of the DVD or Blu-ray Disc. The following zoom levels may be useful for some special applications: 1) Playing 16:9 BD or DVD when “TV Aspect Ratio” is set to “16:9 Wide” or “16:9 Wide/Auto” • Stretch – The image is vertically stretched by 1.33 times. For movies with 2.35:1 aspect ratio, this zoom level cuts off the black borders at the top and bottom of the image.
A D V A N C E D O P E R A T I O N S 3) Playing 4:3 BD or DVD when “TV Aspect Ratio” is set to “16:9 Wide/Auto” • 1:1 – The player maintains the correct 4:3 aspect ratio and adds borders to the left and right sides of the image. Stretch – The image is horizontally stretched by 1.33 times. This zoom level fills up the 16:9 screen, but figures may look shorter and wider than they should be.
A D V A N C E D O P E R A T I O N S 5) Playing 16:9 BD or DVD when “TV Aspect Ratio” is set to “4:3 Letterbox” • 1:1 - The player maintains the correct 16:9 aspect ratio and adds borders to the top and bottom of the image. Stretch – The player disregards the aspect ratio and fills the 4:3 screen. Figures may look taller and narrower than they should be. Full Screen – The player maintains the correct aspect ratio but crops the left and right slightly in order to fit the 16:9 image to the 4:3 screen.
A D V A N C E D O P E R A T I O N S Repeat Playback DVD-A SACD To repeat a certain chapter, title, track or disc, press the REPEAT button on the remote control. REPEAT Each press of the REPEAT button switches the repeat mode in the following sequence: DVD and DVD-Audio: Repeat Chapter Repeat Title Repeat All Repeat Off Blu-ray Disc: Repeat Chapter Repeat Title Repeat Off CD and SACD: Repeat One Repeat All Repeat Off NOTE • Certain Blu-ray Discs may not allow for repeating.
A D V A N C E D O P E R A T I O N S In normal playback mode, each track is played back in sequential order. As the name implies, the Random playback mode randomly selects a track to play. The Shuffle mode also plays back the tracks in random order, but it ensures that each track is played only once. Selecting the Shuffle or Random mode cancels any Repeat mode you may be using. Similarly, selecting a Repeat mode cancels any Shuffle or Random mode.
A D V A N C E D O P E R A T I O N S 2. Chapter time search. For example, search for a specified time within the currently playing chapter. • Press the DISPLAY button to bring up the on-screen display. Use the PAGE UP or PAGE DOWN button to switch the display to chapter time mode. You will see that the icon to the left of the Time Counter change from the Title icon to the Chapter icon. Press the GOTO button to position the cursor at the Time Counter.
A D V A N C E D O P E R A T I O N S 1. Track time search. For example, search for a specified time within the currently playing track. • Press the GOTO button to place the cursor on the track Time Counter. Use the NUMBER or ARROW buttons to enter the hours, minutes and seconds for your specified search and press the ENTER button. 1/8 00:08:16 00:12:33 2. Disc time search. For example, search for a specified elapsed time of the entire disc.
A D V A N C E D O P E R A T I O N S Viewing Pictures on DVD-Audio Discs PAGE UP/DOWN DVD-A Some DVD-Audio discs contain static pictures, such as photos of the band or narration of the album. When a DVD-Audio track is playing, you may use the PAGE UP button to select the previous picture or the PAGE DOWN button to select the next picture. NOTE • Availability of static pictures depends on the DVD-Audio disc.
MEDIA FILE PLAYBACK In addition to playing standard disc-based formats such as Blu-ray Disc, DVD, CD and SACD, the OPPO BDP-83 Blu-ray Disc Player can play media files. You can enjoy digital music, movies and photos stored on an optical disc (recordable CD or DVD) or a USB drive. Due to the variation of media, encoding software and techniques used, compatibility cannot be guaranteed for all user-created or downloaded contents. Support for such contents is on a best effort basis.
M E D I A F I L E P L A Y B A C K There are four selections in the Home Menu. Depending on what type of media files that you intend to play, you can choose among the “Music,” “Movie” and “Photo” categories. The “Setup Menu” selection will bring you to the player’s Setup Menu just like pressing the SETUP button on the remote control. Playing Music Files Music 1 / 2 items Data Disc USB1 To play digital music files stored on an optical disc or USB drive, select “Music” from the Home Menu.
M E D I A F I L E P L A Y B A C K The following operations are available while the “Now Playing” screen is shown: • Prelude I C major Play Title: Artist: Album: Genre: • 02:40 / 05:38 1 / 11 Prelude I C major Various J.S.
M E D I A F I L E P L A Y B A C K Viewing Photo Files To view digital photo files stored on an optical disc or USB drive, select “Photo” from the Home Menu. A file browser will appear to assist you in navigate the files and folders. Photo 1 / 2 items Data Disc USB1 The first step is to select the “Data Disc” or USB device that contains the photo files. The player will take a moment to read the disc and list the folders and photo files.
SETUP MENU OPTIONS The Setup Menu of the OPPO Blu-ray Disc Player presents many setup and configuration options. For most users, the default configuration will be sufficient and will not require any changes to the settings. However if you need to configure the player to perfectly match your home theater settings and viewing preferences, please refer to the following sections for details about each configuration option.
S E T U P M E N U O P T I O N S The preceding diagram should give a good description of the various elements and their context. In this screen we could, for example, instruct you to set the PIP Mark parameter to Off in the Playback Setup section. To indicate where we were, you would see the following: Playback Setup > PIP Mark > Off. NOTE It is possible that some setup items are grayed-out and inaccessible.
S E T U P M E N U O P T I O N S 4. To select a value from the list of available settings, press the UP/DOWN ARROW buttons and then press the ENTER button to confirm.
S E T U P M E N U O P T I O N S Playback Setup The “Playback Setup” section is designed to configure playback preferences for various contents. The setup items in this section are: Setup Menu Playback Setup Language Video Setup Parental Control Audio Format Setup Angle Mark Off Audio Processing PIP Mark On Device Setup SAP Mark On Network Setup SACD Priority Multi-Channel Exit DVD-Audio Mode DVD-Audio Configure language preferences Exit 1. Language: To configure language preferences.
S E T U P M E N U • • • O P T I O N S DVD Ratings - Press the up/down ARROW buttons to select the rating to allow for DVD. The available ratings are Kid, G, PG, PG-13, PGR, R, NC17, Adult and Off. The selected rating and below will be allowed, and any rating above will be blocked. If “Off” is selected, all discs are allowed to play. Area Code – Some Blu-ray Discs may have different parental control ratings for different geographical areas.
S E T U P M E N U O P T I O N S Video Setup The “Video Setup” section of the Setup Menu system allows you to configure video output options. The menu items in this section are: Setup Menu Playback Setup Picture Adjustment Video Setup Primary Output HDMI Audio Format Setup TV Aspect Ratio 16:9 Wide Audio Processing TV System NTSC Device Setup Output Resolution Auto Network Setup 1080p24 Output Off Exit DVD 24p Conversion Off Adjust picture control parameters Exit 1.
S E T U P • M E N U O P T I O N S 16:9 Wide/Auto – Choose this when the display is widescreen 16:9. 16:9 materials will be displayed in its native aspect ratio, and 4:3 materials will be displayed with black borders on both sides in order to maintain the original 4:3 aspect ratio. For a detailed description on how to choose a proper TV Aspect Ratio, please refer to the Determine the Display Aspect Ratio section on page 21 of this manual. 4.
S E T U P M E N U O P T I O N S motion can be achieved by enabling this option, provided that the TV and the disc both meet the conditions for the conversion. The available options are: • • On – Convert DVD to 24Hz frame rate when possible. Off (default) – Do not convert DVD to 24Hz frame rate. NOTE The result of DVD 24p Conversion depends heavily on the quality of the content.
S E T U P M E N U O P T I O N S To aid in the adjustment of picture control parameters, the picture adjustment menu will be reduced to only show the parameter being adjusted once you press the LEFT/RIGHT ARROW buttons. The reduced menu will be positioned near the bottom of the screen. Brightness 0 -16 +16 You can continue adjusting the current parameter by pressing the LEFT/RIGHT ARROW buttons. To select another parameter, press the UP/DOWN ARROW buttons.
S E T U P M E N U O P T I O N S noise. Edge Enhancement works well for less pristine sources. It produces a sharpening effect without making noise more visible. It is also possible to adjust these two controls in different directions to achieve optimal results from certain “difficult” materials. You may use Detail Enhancement to bring up detail in the entire image, but if you find that object edges are over enhanced you can apply negative Edge Enhancement to reduce the over enhancement of the edges.
S E T U P • • • • • M E N U O P T I O N S Auto (default) – Source adaptive de-interlacing is on. This is the recommended setting as it sets the player to optimally process a variety of signal types. Film Bias Mode – The Film Bias Mode may improve film mode detection in some cases. Video Mode – Turn off film mode detection and treat all contents as video origin. Deinterlacing is done by weaving two video fields into a video frame.
S E T U P M E N U O P T I O N S be transmitted using 30-bit (10-bit per channel) or 36-bit (12-bit per channel) data. The increased bit depth should result in smoother color transitions and better gradients. The available options are: • • • 30 Bits – Use the 30-bit per pixel Deep Color mode. 36 Bits – Use the 36-bit per pixel Deep Color mode. Off (default) – Do not use Deep Color.
S E T U P M E N U O P T I O N S Audio Format Setup The “Audio Format Setup” section of the Setup Menu system allows you to configure preferences for audio output formats. The menu items in this section are: Setup Menu Playback Setup Secondary Audio Off Video Setup HDMI Audio LPCM Audio Format Setup SACD Output PCM Audio Processing Coaxial/Optical Output LPCM Device Setup LPCM Rate Limit 48k Network Setup Exit Set the secondary audio program mixing option Exit 1.
S E T U P M E N U O P T I O N S rate (up to 48kHz). If you play high resolution audio content at the 480p/576p resolution, you may get reduced audio resolution, incomplete audio channels, or even no audio/video output at all. Choosing a higher output resolution such as 720p or above allows enough bandwidth for all high sample rate audio channels. 3. SACD Output: To select audio output format for SACD.
S E T U P M E N U O P T I O N S Audio Signal Reference Chart Blu-ray Discs may contain many types of audio signal formats, some of those are of the high resolution types such as Dolby TrueHD and DTS-HD Master Audio. Blu-ray Discs also have many optional audio components such as the Secondary Audio Program and menu clicking sound. The player’s Audio Format Setup menu allows you to configure the audio output to meet your specific preference.
S E T U P M E N U O P T I O N S Recommended Audio Format Options Depending on your specific audio/video connection method, the audio format options of the OPPO Blu-ray Disc Player may need to be adjusted to match your configuration. Please refer to the video and audio connection methods described previously in this guide and the following audio setup guidelines.
S E T U P M E N U O P T I O N S Multi-Channel Analog Audio to Receiver If the player is connected to an A/V receiver through the 7.1ch or 5.1ch analog audio jacks using 8 or 6 RCA cables (as described in “Method 5” on page 14), you can play all supported audio formats and listen to them with your A/V receiver and surround sound systems.
S E T U P M E N U O P T I O N S Audio Processing Setup The “Audio Processing Setup” section of the Setup Menu system allows you to configure how the player will process audio signals before sending them to the output.
S E T U P M E N U O P T I O N S Down Mix Mode Down mix is the process of converting multi-channel audio to a lesser number of channels. For example, converting a 5.1ch source to stereo or converting a 7.1ch source to 5.1ch. Down mixing allows the audio output from the player to match the exact number of speakers available in your home theater. The current down mix mode is displayed in the lower right corner of the speaker placement illustration.
S E T U P M E N U O P T I O N S Speaker Configuration FL C Front Left Speaker FR SW SR SL SBL SBR Size: Large Distance: 12ft Trim: 0.0dB Next Speaker Exit Down Mix Mode: 7.1Ch Configure the front left speaker Exit The following speaker parameters can be configured: 1. Size: The speaker size parameter sets bass filtering control for the speakers. The bass crossover frequency is fixed at 80Hz. The options are: • • • • Large – Bass frequencies are passed to the speakers.
S E T U P M E N U O P T I O N S FL FR C SW 2 Speaker Icons: Distances: 1 FL - Front Left FR - Front Right C - Center SW - Subwoofer SL - Surround Left SR - Surround Right SBL - Surround Back Left SBR - Surround Back Right 1 - Listener to Front 2 - Listener to Center 3 - Listener to Surround Left SL SR 3 SBL SBR For example, in the above diagram, measure the distance (in feet) from the primary listening position to the Front Left or Front Right Speaker.
S E T U P M E N U O P T I O N S Example Channel Delay Adjustment: Supported Configuration Unsupported Configuration 14ft 12ft 12ft 10ft 12ft 10ft 12ft 9ft 14ft 9ft 8ft 18ft 18ft 8ft 16ft Settings: Front Speakers – 12ft Center Speaker – 10ft Subwoofer – 10ft Surround Left – 9ft Surround Right – 9ft Surround Back Left – 8ft Surround Back Right – 8ft 16ft Settings: Front Speakers – 12ft Center Speaker – 12ft Subwoofer – 12ft Surround Left – 12ft Surround Right – 12ft Surround Back Left – 12ft
S E T U P M E N U O P T I O N S Device Setup The “Device Setup” section of the Setup Menu system allows you to configure additional player options related to the hardware and control functions.
S E T U P M E N U O P T I O N S If you have selected a new remote code, you must set the remote control handset to use the same code. Please refer to the Setting the Remote Code section on page 9 of this manual for details. If you have selected “Alt. Code”, the supplied handset will not operate the player, and you must use a universal remote control with the properly configured code set. 4. HDMI CEC: To set HDMI Consumer Electronics Control (CEC) mode.
S E T U P M E N U O P T I O N S 6. Reset Factory Defaults: To reset all settings to the factory default value. The remote control code, parental control password and ratings will not be reset. This operation is only available when the playback is completely stopped or when there is no disc loaded. 7. Firmware Information: To display the currently installed firmware version. 8.
S E T U P M E N U O P T I O N S Network Setup The “Network Setup” section of the Setup Menu system allows you to configure the parameters for the Internet connection of the player, test the connection and restrict BD-Live access. The menu items in this section are: Setup Menu Playback Setup IP Configuration Auto (DHCP) Video Setup IP Address 192.168.100.201 Audio Format Setup Subnet Mask 255.255.255.0 Audio Processing Gateway 192.168.100.1 Device Setup DNS 1 192.168.100.
S E T U P M E N U O P T I O N S 7. BD-Live Network Access: To restrict BD-Live content access. The available options are: • • • On – BD-Live access is permitted. Limited – BD-Live access is permitted only for contents that have a valid content owner certificate. Internet access is prohibited if the BD-Live contents do not have a certificate. This option ensures that you are accessing only authentic content, although it may block your access to smaller independent content providers.
REFERENCES Useful Notes • • • • • In order to prolong the service life of your player, it is recommended to wait at least 30 seconds before you turn it on again after switching it off. Remove disc and turn power off after operation. Some functions of the player may not be applicable to certain discs. Some discs with special features may not be fully supported by the player. This is not a malfunction of the unit. In case of player malfunction, please turn it off, wait for 30 seconds and turn it back on.
R E F E R E N C E S “No Disc” or “Unknown Disc” error Remote control failure Temporary function failure Some Setup Menu items are grayed out No disc or incompatible disc loaded in player Dirty disc recording surface Disc not properly loaded Condensation on the Laser pick-up head Remote control is out of range Low battery Incorrect remote control code Scratched or damaged disc is used Some functions are not available during playback Interference from other devices Some setup options cannot be changed wh
R E F E R E N C E S Language Code List Code 6565 6566 6570 6577 6582 6583 6588 6590 6665 6669 6671 6672 6678 6679 6682 6765 6779 6783 6789 6865 6869 6890 6976 6978 6979 6983 6984 6985 7065 7073 7074 7079 7082 7089 7165 7168 7176 7178 7185 7265 7273 7282 Language Name Afar Abkhazian Afrikaans Ameharic Arabic Assamese Aymara Azerbaijani Bashkir Byelorussian Bulgarian Bihari Bengali, Bangla Tibetan Breton Catalan Corsican Czech Welsh Danish German Bhutani Greek English Esperanto Spanish Estonian Basque Persi
LIMITED WARRANTY OPPO Digital, Inc. Limited One Year Warranty Your OPPO product has been manufactured to precise standards, and with rigid quality control through every process of manufacturing. It is warranted by OPPO DIGITAL, INC. against defective workmanship or materials for one (1) full year from the original date of purchase. This warranty applies only to OPPO brand products imported or manufactured by OPPO Digital, Inc. and sold to the original consumer purchaser in the U.S.A.
L I M I T E D W A R R A N T Y • If it is determined that your product needs service, a Return Merchandise Authorization (RMA) number will be issued to you along with return instructions and address of an OPPO service center. • Pack the product securely, preferably in the original packaging, with your assigned RMA number marked clearly on the outside of the package. Send the package postpaid and insured to the OPPO service center to obtain warranty service. Thank you for choosing OPPO.