® USER MANUAL READ CAREFULLY BEFORE OPERATION Blu-ray Disc Player BDP-105
Table of Contents IMPORTANT INFORMATION...................................................... 1 Important Safety Instructions .................................................................................... 1 Precautions ................................................................................................................. 2 FCC Statement ............................................................................................................ 2 Trademarks ...................................
HDMI / MHL INPUT to BDP-105 ................................................................................. 20 Digital Audio Input (Optical, Coaxial, USB) to BDP-105..........................................21 Connecting to the Internet ........................................................................................22 Internet connection through Ethernet cable ...................................................................................22 Internet connection through wireless adaptor ........
Playback from a Specific Location ...........................................................................39 DVD and Blu-ray Discs ..................................................................................................................39 CD and SACD discs.......................................................................................................................40 Memory and Automatic Resume ..............................................................................
IMPORTANT INFORMATION CAUTION: CAUTION DANGER OF EXPLOSION IF BATTERY IS INCORRECTLY REPLACED. REPLACE ONLY WITH THE SAME OR EQUIVALENT TYPE. RISK OF ELECTRIC SHOCK. DO NOT OPEN. CAUTION: TO REDUCE THE RISK OF ELECTRIC SHOCK, DO NOT REMOVE COVER (OR BACK). NO USER-SERVICEABLE PARTS INSIDE. REFER SERVICING TO QUALIFIED SERVICE PERSONNEL. THIS PRODUCT UTILIZES A LASER. USE OF CONTROLS OR ADJUSTMENTS OR PERFORMANCE OF PROCEDURES OTHER THAN THOSE SPECIFIED HEREIN MAY RESULT IN HAZARDOUS RADIATION EXPOSURE.
I M P O R T A N T I N F O R M A T I O N Precautions x x x x x Before connecting the AC power cord to the appliance, make sure the voltage designation of the appliance corresponds to the local electrical supply. If you are unsure of your power supply, contact your local power company. The acceptable power input range is AC ~ 115V/~230V, 50/60Hz. The apparatus with CLASS I construction shall be connected to a MAINS socket outlet with a protective earthing connection.
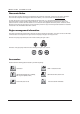
I M P O R T A N T I N F O R M A T I O N Trademarks x “Blu-ray Disc”, “Blu-ray 3D”, “BONUSVIEW” and “BDLive” are trademarks of Blu-ray Disc Association. x Java and all Java-based trademarks and logos are trademarks or registered trademarks of Sun Microsystems, Inc. in the United States and other countries. x DVD Logo is a trademark of DVD Format/Logo Licensing Corp., registered in the U.S., Japan and other countries.
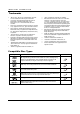
I M P O R T A N T I N F O R M A T I O N Discs that cannot be played BDs with cartridge DVD-RAMs HD-DVDs Data portion of CD-Extras DVDs / Blu-Rays with a region code other than 1 or A Some Dual-Discs: A Dual-Disc is a two-sided disc with DVD-video on one side and digital audio on the other side. The digital audio side does not meet the technical specifications of the Red Book CD format so playback is not guaranteed. Audio discs with copy-protection may not be playable.
I M P O R T A N T I N F O R M A T I O N Gracenote Notice Music and Video recognition technology and related data are provided by Gracenote®. Gracenote is the industry standard in music and video recognition technology and related content delivery. For more information visit www.gracenote.com. CD, DVD, Blu-ray Disc, and music and video-related data from Gracenote, Inc., copyright © 2000 to present Gracenote. Gracenote Software, copyright © 2000 to present Gracenote.
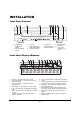
INSTALLATION Front Panel Controls 1 2 3 4 5 1. POWER Button 4. Disc Tray 7. 2. POWER Status Indicator 5. OPEN/CLOSE Tray Button (with backlight) 8. 3. Front Panel Display Window 6. IR Sensor Window 6 7 8 9 10 USB 2.0 Input 9. MHL-Compatible HDMI Input Playback Control and Navigation Buttons 10. ¼-inch Stereo Headphone Jack (6.3mm) Front Panel Display Windows 1 2 3 4 5 6 7 8 9 10 11 12 13 13 1. Mute Icon – Indicates that the audio is muted 8. 2.
I N S T A L L A T I O N Rear Panel Connectors 1 2 3 4 5 6 7 8 9 10 11 12 13 14 15 16 17 1. Ethernet LAN Port 7. Balanced Stereo Audio Output 13. RS-232C Serial Control Port 2. HDMI Input (Back) 8. HDMI 2 Output (3D Compatible) 14. Optical Digital Audio Input 3. Stereo Audio Output 9. HDMI 1 Output (3D Compatible) 15. Coaxial Digital Audio Input 4. Diagnostic Video Output 10. USB 2.0 Input 16. USB (Type B) Audio Input 5. Coaxial Digital Audio Output 11. USB 2.
I N S T A L L A T I O N Remote Control Remote Control Buttons 19 1 20 21 2 22 3 23 24 4 25 5 26 27 6 28 7 29 8 9 10 11 30 2 12 31 13 32 14 33 15 34 16 35 17 36 18 37 1. POWER: Toggle power STANDBY and ON 2. NETFLIX: Netflix access button 3. PURE AUDIO: Turn off/on video 4. NUMBER Buttons: Enter numeric values 5. CLEAR: Clear numeric input 6. TOP MENU: Show BD top menu or DVD title menu 7. ARROW and ENTER Buttons: Navigate menu selection 8.
I N S T A L L A T I O N Back Side 1 2 4 3 5 With Battery Cover 1. Index Finger Notch 1: When your index finger is placed at this notch while holding the remote control, your thumb is within easy reach of the navigation buttons (ARROW, ENTER, TOP MENU and POP-UP MENU). 2. Index Finger Notch 2: When your index finger is placed at this notch while holding the remote control, your thumb is within easy reach of the playback control buttons (STOP, PLAY, PAUSE, PREV, NEXT, REV, FWD). 3.
I N S T A L L A T I O N Changing the Remote Code The remote control contains three OPPO remote codes. The default is “Code 1”. If you have other OPPO products placed close to the BDP-105, they may inadvertently respond to the BDP-105 remote control. To prevent this, you can select a different remote code. To select a new remote code, open the battery compartment cover of the remote control, and then use a ball point pen to flip the switch to one of the positions marked as “1”, “2”, or “3”.
I N S T A L L A T I O N Common Connection Methods Connecting to an A/V Receiver via HDMI Rear Panel HDMI Cable HDMI In (to HDMI 1 or 2) HDMI Cable HDMI OUT HDMI IN AUDIO/VIDEO MULTI-CHANNEL RECEIVER x If you have an HDMI-capable receiver that can support HDMI audio, you can simply run an HDMI cable from the player to your receiver and enable HDMI audio on the receiver (see your receiver’s owner’s manual for more information).
I N S T A L L A T I O N Connecting to a TV and A/V Receiver via Dual HDMI Rear Panel HDMI Cable 2 HDMI Cable 1 HDMI IN HDMI IN AUDIO/VIDEO MULTI-CHANNEL RECEIVER The BDP-105 provides a “Dual HDMI” connection to make sure you can enjoy the highest possible video quality, in addition to high bit rate audio content.
I N S T A L L A T I O N Connecting to a TV via HDMI Rear Panel Video In Composite Cable (Optional) HDMI In HDMI Cable (to HDMI 1 or 2) If your TV has an HDMI input, you can use the included HDMI cable to connect the player directly to the TV. This connection method delivers both video and audio in a pure digital format via a single cable. The HDMI output of the player allows for the highest possible video quality and audio resolution.
I N S T A L L A T I O N Connecting to Two TVs via HDMI Rear Panel HDMI In HDMI In HDMI Cables TV 2 TV 1 x The two HDMI outputs (HDMI 1 OUT and HDMI 2 OUT) available on the rear panel of BDP-105 can be connected to two TVs at the same time, and each output can deliver both digital video and audio signals.
I N S T A L L A T I O N Connecting to a TV via DVI Rear Panel DVI HDMI (from HDMI 1 or 2) - DVI Cable DVI Audio Audio Cable If your TV has a DVI input that supports HDCP, you can purchase an HDMI-DVI cable to connect the player to the TV. This connection method delivers digital video to the TV without any signal degradation. We recommend that you use HDMI 1 OUT since it benefits from the dedicated video processor.
I N S T A L L A T I O N Alternate Audio Connections Connecting to a Stereo Audio System though RCA-style Cable Rear Panel L R Audio Interconnect Cable AUDIO IN AUDIO/VIDEO MUL TI-CHANNEL RECEIVER Stereo or Surround Audio System x If your audio system offers only stereo audio inputs, or if you would like to connect a dedicated stereo audio system in addition to the surround audio system which is already connected to the HDMI, coaxial or optical output, you can connect the dedicated stereo audio s
I N S T A L L A T I O N Connecting to a Stereo Audio System though XLR Balanced Cable Rear Panel R L Audio Interconnect Cable AUDIO IN AUDIO/VIDEO MUL TI-CHANNEL RECEIVER Stereo or Surround Audio System You can also connect the BALANCED STEREO AUDIO OUT to your stereo audio system. Three-pin (XLR3) cables are needed, and the XLR terminals on the player are male type.
I N S T A L L A T I O N Connecting to an A/V Receiver or Amplifier via Analog Outputs Rear Panel Audio Interconnect Cables L L R R L CENTER FRONT R SURROUND SUBWOOFER S. BACK AUDIO/VIDEO MULTI-CHANNEL RECEIVER Receiver/Amplifier with 7.
I N S T A L L A T I O N Connecting to an A/V Receiver or Amplifier via S/PDIF (Coaxial / Optical) Rear Panel Connect one of these cables: Coaxial Digital Audio Cable Coaxial In Optical Digital Audio Cable Optical In AUDIO/VIDEO MULTI-CHANNEL RECEIVER Receiver/Amplifier with Dolby Digital or DTS Decoder x Please use either a 75-Ohm coaxial digital audio cable with RCA-style connectors or an S/PDIF optical digital audio cable to connect one of the digital audio outputs to the corresponding input termi
I N S T A L L A T I O N HDMI / MHL INPUT to BDP-105 Front Panel Rear Panel HDMI Cable HDMI Cable or HDMI/MHL Cable Audio/Video Source x The BDP-105 provides two HDMI input ports, located on the front panel and the back panel separately, both of which can accept up to 1080p high-definition video and digital audio. You can use the included HDMI cable to connect a source device such as a digital TV box, mobile phone or camcorder to the HDMI IN port(s).
I N S T A L L A T I O N Digital Audio Input (Optical, Coaxial, USB) to BDP-105 Rear Panel (Type B Male) Optical Audio Cable Coaxial Audio Cable USB 2.0 Cable Digital Audio Source x The BDP-105 can function as a dedicated Digital-to-Analog Converter (DAC) and process external digital audio signals with its internal SABRE32 Reference audio processors. Three digital audio input ports are available: OPTICAL, COAXIAL and USB DAC, all located on the back panel.
I N S T A L L A T I O N Connecting to the Internet The BDP-105 has significantly improved its internet streaming capabilities compared to its predecessors. Currently, it supports Netflix and VUDU, as well as in-home network media sharing via My Network which is capable of connecting with DLNA and SMB/CIFS clients. Additional online streaming applications may also be added with future firmware updates. The BDP-105 also supports the BD-Live feature offered on some Blu-ray Disc titles.
I N S T A L L A T I O N x Refer to the operating instructions supplied with the broadband router or modem, or contact the Internet service provider for questions related to setting up the router or modem. NOTE x Only connect the LAN port of the player to an Ethernet port that supports 10BASE-T or 100BASE-TX. Connecting to any other ports or jacks, such as a phone jack, can damage the player.
I N S T A L L A T I O N Custom Installation External IR (Infrared Remote) Installation The BDP-105 features an IR IN port on its back panel. If the player is to be installed in an equipment cabinet where direct line-of-sight is not available for the remote control, you can purchase an external IR Remote Sensor and plug it into the IR IN port. Place the sensor head at a location where there is direct line-of-sight to ensure reliable operation. Rear Panel 3.
I N S T A L L A T I O N Quick Start Guide Power On and Play The BDP-105 is pre-configured with settings that have been optimized for most home theater systems, so it can fit into your audio/video system without any additional adjustment. To begin, please follow these steps: 1. Connect the OPPO player into your system. 2. Turn on the TV and/or receiver/amplifier, and then turn on the player. 3. Switch the input selection on your TV or receiver so that the TV displays the signal from the player.
I N S T A L L A T I O N For both HDMI outputs, the following output resolutions are available: 4Kx2K, Auto, 1080p, 1080i, 720p, 480p/576p, 480i/576i, and Source Direct. If Auto is selected, the player will determine the output resolution based on the best signal resolution that the TV can display.
BASIC OPERATIONS DVD-A Disc Playback POWER STOP OPEN PLAY SACD 1 2 3 Press the POWER button to turn on the player. Press the OPEN/CLOSE button to eject the disc tray. Place the disc with the label side facing up and the recorded side facing down. 4 5 6 Press the OPEN/CLOSE button again to retract the tray. The player will read the disc information and begin playback. Depending on the content of the disc, a menu or navigation screen may appear.
B A S I C O P E R A T I O N S Within Video Discs (DVD, BD) and Video File Playback: Subtitle shift: Adjusts the position of subtitles on the screen. See details on page 37. Picture adjustment: Opens the Picture Adjustment menu. See details on page 58. Zoom: Opens the image zoom level menu. See details on page 35. Angle: Changes the viewing angle. This function is only available when the DVD/BD is recorded with multiple angles. Within Photo File playback: Zoom: Displays the image at different zoom levels.
B A S I C O P E R A T I O N S Slow Playback To play the video in slow-motion, follow these steps: PLAY PAUSE REV FWD 1. Press the PAUSE button on the remote control to pause playback. 2. Press the FWD button to select a forward slow playback speed. Each press of the FWD button increases the playback speed in the following increments: 1/16 1/2 1/8 1/4 3. Press the REV button to select a reverse slow playback speed.
B A S I C O P E R A T I O N S DVD-A On-Screen Display SACD 1. During the playback of a DVD or Blu-ray Disc, press the INFO button on the remote control to show its status information. For CDs and SACDs, the status information is shown automatically. 2. When the status information is shown, press the PAGE UP/DOWN buttons to scroll through several different display formats. The playback time information displayed on the front panel changes together with the on-screen display. 3.
B A S I C O P E R A T I O N S NOTE The volume level for the analog output and the headphone output are adjusted and saved separately. Depending on whether a headphone is connected or not, the BDP-105 can automatically apply the current volume control setting to the headphone output or analog output. You can set the default volume level for the headphone output at Setup Menu > Audio Processing > Headphone Volume. DVD-A Mute MUTE SACD 1.
B A S I C O P E R A T I O N S Subtitle Selection SUBTITLE 1. When playing a DVD, Blu-ray Disc or other video programs recorded with subtitles, press the SUBTITLE button on the remote control to select the desired subtitle. 2. Repeatedly press the SUBTITLE button or use the UP/DOWN ARROW buttons to choose from all available subtitles. 3. To turn off subtitles, select Off from the list. HDMI / MHL INPUT Selection 1. 2. 3.
B A S I C O P E R A T I O N S Audio Return Channel (ARC) Selection 1. When sending a digital audio signal from the TV back to the BDP-105 through an HDMI connection, press the INPUT button on the remote to bring the Input Source menu. 2. Use the UP/DOWN ARROW buttons to choose the required ARC channel. 3. You can always select BLU-RAY PLAYER to return to OPPO HOME menu. NOTE x Audio Return Channel (ARC) is a feature introduced in HDMI v1.
ADVANCED OPERATIONS Output Resolution The BDP-105 supports multiple output resolutions. For a detailed discussion on how to choose the best output resolution, please refer to the Select the Best Output Resolution section on page 25 of this manual. If you would like to change the output resolution, you may do so by pressing the RESOLUTION button on the remote. RESOLUTION 1. Make sure the HDMI cable is properly connected. 2. Turn on the TV and adjust the TV to use its HDMI input port. 3.
A D V A N C E D O P E R A T I O N S Composite video outputs on the BDP-105, and only kept a standard definition DIAG video output for troubleshooting purposes. Zooming and Aspect Ratio Control This feature zooms in and out of the displayed frame and also changes the aspect ratio (image width vs. height). ZOOM To change the zoom level, press the ZOOM button on the remote control. Each press of the ZOOM button will switch the zoom level in sequence.
A D V A N C E D O P E R A T I O N S 2) Playing 4:3 BD or DVD when TV Aspect Ratio is set to 16:9 Wide x 1:1 – The image fills up the entire 16:9 screen but is horizontally stretched. Figures may look shorter and wider than they should be. x Compress – The player maintains the correct 4:3 aspect ratio and adds borders to the left and right sides of the image.
A D V A N C E D O P E R A T I O N S Subtitle Shift For customers using a 2.35:1 “Constant Image Height” video projection system, subtitles may get cut off because they are positioned outside of the active video area. SUBTITLE The Subtitle Shift feature can be used to shift subtitles up or down so they are displayed within the active video area. To shift the display position of subtitles, please follow these steps: 1.
A D V A N C E D O P E R A T I O N S DVD-A Repeat a Selected Section SACD To repeatedly play a specific section, please follow these steps: 1. During normal playback, press the AB REPLAY button on the remote at the desired beginning point (Point A) for the repeat play. The TV screen displays “A-”. AB REPLAY 3. 2. When playback reaches the desired ending point (Point B) for the repeat play, press the AB REPLAY button again. The player now repeatedly plays back the specified section (A-B).
A D V A N C E D O P E R A T I O N S Playback from a Specific Location DVD-A SACD DVD and Blu-ray Discs During the playback of a DVD or Blu-ray Disc, you may specify a location to start playback by entering the title, chapter or time directly. Press the GOTO button to bring up the on-screen display.
A D V A N C E D O P E R A T I O N S NOTE x Some discs may prohibit the search operation. You will not be able to select a search location, or you may get an “invalid operation” icon after specifying a search location. Some Blu-ray Discs feature their own search function. Follow the on-screen instructions to use the search function provided by such discs. x CD and SACD discs You may specify a point to start playback by entering the disc elapsed time, track elapsed time or track number directly.
A D V A N C E D O P E R A T I O N S Memory and Automatic Resume POWER OPEN DVD-A SACD 1. The player automatically saves the current position when playback is interrupted. Operations such as OPEN and POWER cause the player to save the current playing position. 2. This position is saved even after turning off the unit or changing the disc. STOP PLAY 3. The next time a disc with a saved playing position is inserted, the player will resume playback from that point.
A D V A N C E D O P E R A T I O N S NOTE x x Pure Audio mode is automatically canceled when the unit is switched off or when playback is stopped. Because HDMI carries audio together with video, the HDMI video signal cannot be completely turned off. A black screen is transmitted instead to minimize any potential interference.
MEDIA FILE PLAYBACK In addition to playing standard disc-based formats such as Blu-ray, DVD, CD and SACD, the BDP-105 can play media files. You can enjoy digital music, movies and photos stored on a data disc (recordable CD, DVD or Blu-ray) or an external USB drive. Due to the variation of media, encoding software and techniques used, compatibility cannot be guaranteed for all user-created or downloaded content. Support for such content is on a best effort basis.
M E D I A F I L E P L A Y B A C K In-home Network Media Sharing ᵯᵯᵯ The BDP-105 can remotely play back music, photo, and video files stored on media devices that are connected to the same home network. You will need to prepare hardware such as a computer or NAS (Network Attached Storage) and install and configure software which is functionally equivalent to DLNA or SMB/CIFS (a network file sharing protocol) client.
M E D I A F I L E P L A Y B A C K Internet Streaming on HOME Menu The BDP-105 presents a Home Menu to assist you in navigating and playing media files from an inserted optical disc, USB flash drive, external hard drive, home network sharing and internet streaming. Basically, the Home Menu is the starting point for accessing media files. ᶑᶩᶰᶵᶰ ᶎᶰᶷᶪᶦ ᶏᶦᶵᶸᶰᶳᶬ ᶔᶦᶵᶶᶱ HOME HOME ᶑᶪᶤᶢᶴᶢ ᶄᶪᶯᶦᶮᶢᶏᶰᶸ ᶓᶩᶢᶱᶴᶰᶥᶺ You can bring up the Home Menu with the HOME button on the remote control.
M E D I A F I L E P L A Y B A C K VUDU, Film Fresh or Picasa, either press HOME button or repeatedly press RETURN button until the Home Menu appears. To exit Pandora, either press HOME button or select Exit Pandora in Pandora’s Menu selection. To exit CinemaNow, either press HOME button or select Exit in CinemaNow’s Menu selection. Please contact OPPO customer support if you need assistance.
M E D I A F I L E P L A Y B A C K Shows playback status: Play, Pause, Track and Time. Display and change playback mode: Shuffle/Random, Repeat One/All. Music information: Displays information like album art and tags, either embedded in the original file or found online from the Gracenote database.
M E D I A F I L E P L A Y B A C K To stop the movie and return to the file browser, press the STOP button. You can also press the HOME button at any time to stop the playback and return to the Home Menu. Press the OPTION button to access features such as Video Information, Subtitle Shift, Picture Adjustment and Picture Zooming. Details can be found on page 27. Viewing Photo Files To view digital photo files stored on an optical disc or USB drive, select Photo from the Home Menu.
M E D I A x x F I L E P L A Y B A C K Change slideshow transition effect: YELLOW color button. Press the OPTION button to access to features like Image Zooming and Image Rotation. Details can be found on page 27. Adding Background Music You can also add background music to the photo slideshow. To do so, you will need to prepare digital music files. The music files can be stored on the same disk as the photos, or on a different USB drive. Start music playback first by selecting Music from the Home Menu.
SETUP MENU OPTIONS The Setup Menu of the BPD-105 presents many setup and configuration options. For most users, the default configuration will be sufficient and you will not require any changes to the settings. However, if you need to configure the player to perfectly match your home theater setup and viewing preferences, please refer to the following sections for details about each configuration option.
S E T U P M E N U O P T I O N S NOTE It is possible that some setup items may be grayed-out and inaccessible. This can be caused by a disc being played back or having changed a prerequisite setup item. Please stop playback or eject the disc before trying to change these setup items. If you still cannot access the setup item, please check for configuration conflicts and consistency. For example, if Video Setup > 3D Output is set to Off, the 3D Setting menu item will be grayed-out.
S E T U P M E N U O P T I O N S 4. To select a value from the list of available settings, press the UP/DOWN ARROW buttons and then press the ENTER button to confirm. For example, to select Off for Auto Play Mode, use the UP/DOWN ARROW buttons to highlight the Off selection and press the ENTER button. 5. To exit the Setup Menu at any time, press the SETUP button on the remote control or select Exit from the Setup Menu sections.
S E T U P M E N U O P T I O N S Playback Setup The Playback Setup section is designed to configure playback preferences. The setup items in this section are: 1. SACD Priority: Select which audio layer to play for SACD (Super Audio CD). Multi-Channel – Play the high resolution multi-channel surround audio layer Stereo – Play the high resolution 2-channel stereo audio layer CD Mode – Play the CD layer of a hybrid SACD disc 2. DVD-Audio Mode: Select which portion of a DVD-Audio disc to play.
S E T U P M E N U O P T I O N S DVD Ratings – Press the UP/DOWN ARROW buttons to select the rating to allow for DVDs. The available ratings are Kid, G, PG, PG-13, PGR, R, NC-17, Adult and Off. The selected rating and above will be blocked, and any rating below will be allowed. If Off is selected, all discs are allowed to play. Area Code – Some Blu-ray Discs may have different parental control ratings for different geographical areas.
S E T U P M E N U O P T I O N S Video Setup The Video Setup section of the Setup Menu allows you to configure video output options. ᵰᶂᶶᶵᶰ 1. Picture Adjustment: Adjusts picture control settings. The BDP-105 provides a wide array of picture controls. Please refer to the Picture Adjustment section on page 58 for details about each control. 2. Dual HDMI Output: Allows you to select the output mode when both HDMI Output ports are in use.
S E T U P M E N U O P T I O N S 4. 3D Setting: Adjusts the playback settings for better 3D visual quality. Blank HDMI 2 (Yes/No) – Allows you to force HDMI 2 OUT to output a blank 2D screen when HDMI 1 OUT outputs 3D video. During 3D movie playback, when HDMI 1 is connected to a 3D display and HDMI 2 is connected to a non-3D receiver which is in turn connected to the same 3D display, you may encounter an issue where there is no audio coming from the receiver.
S E T U P M E N U O P T I O N S achieved by enabling 1080p24 Output for these discs. This option only applies to the HDMI output at 1080p resolution. The available options are: x Auto (default) – Video encoded at a 24Hz frame rate will be output as 1080p 24Hz if the TV informs the player that it can support the 1080p24 signal. x On – Video encoded at a 24Hz frame rate will be output as 1080p 24Hz without regard to whether the TV can support the 1080p24 signal or not.
S E T U P M E N U O P T I O N S Angle Mark (On/Off) – Turns on/off the display of the angle icon when a DVD or Blu-ray Disc with multiple angles is played. Keeping the angle mark off avoids distraction from normal movie watching. Screen Saver – Allows you to turn on/off the screen saver function. The screen saver is designed to minimize burn-in concerns for plasma and CRT display devices.
S E T U P M E N U O P T I O N S HDMI 2 Picture Mode Mode 1 Brightness 0 -16 +16 Contrast 0 -16 +16 Hue 0 -16 +16 Saturation 0 -16 +16 Sharpness 0 0 +2 Noise Reduction 0 0 +3 Exit Picture Adjustment Menu for HDMI 2 OUT To change a picture adjustment parameter, use the UP/DOWN ARROW buttons to highlight the parameter, and use the LEFT/RIGHT ARROW buttons to change its value.
S E T U P M E N U O P T I O N S in shadows when watching darker scenes. Televisions have brightness (black level) and contrast (white level) controls; however, it may require a combination of tweaking both the player and your television to get the optimal result. We recommend using a calibration disc such as the Spears & Munsil™ High Definition Benchmark Blu-ray Edition or Digital Video Essentials HD Basics as aids for adjusting.
S E T U P M E N U O P T I O N S At level 7, the player applies the most aggressive CAR for very low quality video, and adds Motion Adaptive VNR at level 8. Remember that excessive noise reduction may cause a loss of details. We recommend using the noise reduction function only when you encounter poorly encoded or compressed video that has apparent noise artifacts. For HDMI 2, the noise reduction level can be set between 0 and +3. The default is level 0.
S E T U P M E N U O P T I O N S (10-bit per channel) or 36-bit (12-bit per channel) data. The increased bit depth should result in smoother color transitions and better gradients. x 36 Bits – Uses the 36-bit per pixel Deep Color mode. x 30 Bits (Dithered) – Uses the 30-bit per pixel Deep Color mode with dithering technique. x 30 Bits – Uses the 30-bit per pixel Deep Color mode. x Off (Dithered) – Does not use Deep Color, but applies the dithering technique.
S E T U P M E N U O P T I O N S Audio Format Setup The Audio Format Setup section of the Setup Menu allows you to configure preferences for audio output formats. 1. Secondary Audio: Allows you to set the Secondary Audio Program mixing option. Some Blu-ray Discs contain a secondary audio and video program, such as a director’s commentary. Some Blu-ray Discs have a sound effect when you make menu choices.
S E T U P M E N U O P T I O N S with high sample rate (up to 192kHz), or 8 channels of audio with standard sample rate (up to 48kHz). If you play high resolution audio content at the 480p/576p resolution, you may get reduced audio resolution, incomplete audio channels, or even no audio/video output at all. Choosing a higher output resolution such as 720p or above allows enough bandwidth for all high sample rate audio channels. 3.
S E T U P x M E N U O P T I O N S Off (default) – HDCD is treated as regular CD. This is useful when the player is connected to an HDCD-capable A/V receiver via a digital audio output link (Coaxial, Optical, or HDMI) so the A/V receiver can perform HDCD decoding. NOTE If your receiver is capable of HDCD decoding, it is recommended that you set the HDCD Decoding setting to Off on the BDP-105 in order to avoid decoding HDCD twice.
S E T U P M E N U O P T I O N S Audio Signal Reference Chart Blu-ray Discs may contain many types of audio signal formats, some of which are high resolution types such as Dolby TrueHD and DTS-HD Master Audio. Blu-ray Discs also have many optional audio components such as the Secondary Audio Program and menu clicking sound. The player’s Audio Format setup menu allows you to configure the audio output to meet your specific preference.
S E T U P M E N U O P T I O N S Recommended Audio Format Options Depending on your specific audio/video connection method, the audio format options of the BDP-105 may need to be adjusted to match your configuration. Refer to the video and audio connection methods described previously in this guide and the following audio setup guidelines.
S E T U P M E N U O P T I O N S Multi-Channel Analog Audio to Receiver If the player is connected to an A/V receiver through the 7.1ch or 5.1ch analog audio jacks using 8 or 6 RCA cables (as described on page 18), you can play all supported audio formats and listen to them with your A/V receiver and surround sound systems.
S E T U P M E N U O P T I O N S Audio Processing Setup The Audio Processing section of the Setup Menu allows you to configure how the player will process audio signals before sending them to the output. In this section, all of the settings only affect the dedicated stereo and multi-channel audio outputs, except for Dynamic Range Control (DRC), which also affects the HDMI outputs.
S E T U P M E N U O P T I O N S Down Mix Mode Downmixing is the process of converting multi-channel audio to a lesser number of channels. For example, converting a 5.1ch source to stereo or converting a 7.1ch source to 5.1ch. Downmixing allows the audio output from the player to match the exact number of speakers available in your home theater. The current down mix mode is displayed in the lower right corner of the speaker placement illustration.
S E T U P M E N U O P T I O N S Speaker Settings You can set the size, distance and trim level for each speaker by using the LEFT/RIGHT ARROW buttons to move the cursor to highlight the speaker and then press the ENTER button. The Speaker Settings menu on the right side of the screen will be activated. In Speaker Settings, use the UP/DOWN ARROW buttons to select a parameter, and then press the ENTER button to change it.
S E T U P M E N U O P T I O N S Speaker distance compensation is not required if the A/V receiver has the capability to adjust channel delay and compensate for speaker distance differences. However, if your receiver does not have such functions (most receivers do not offer these functions for their multi-channel analog input), you may adjust them through the player. Speaker distance delay is only applied if the player is decoding multi-channel audio.
S E T U P M E N U O P T I O N S be heard. In this situation, it is necessary to reduce the Trim Level until the distortion is removed. When using the Trim Level for speakers, it is recommended that you set the least sensitive speaker’s Trim Level to 0dB, and set other speakers’ Trim Level to negative values. x The Test Tone can be used in conjunction with the player’s trim control. Each speaker can be set to independent trim levels and there is no linked pair limitation.
S E T U P M E N U O P T I O N S x Variable – Enables the analog volume control. Use the VOL+/- buttons on the remote to increase/decrease the analog audio output level (the maximum is 100). x Fixed – Disables the analog volume control. The VOL+/- buttons on the remote will no longer affect the analog audio output, and the volume level is fixed to 100. 5. Headphone Volume: Allows you to enter the default volume level for the headphone output.
S E T U P M E N U O P T I O N S Device Setup The Device Setup section of the Setup Menu system allows you to configure additional player options related to the hardware and control functions. I ᶔᶭᶦᶦᶱᵡᶕᶪᶮᶦᶳ 1. Firmware Information: To displays the currently installed firmware version. 2. Firmware Upgrade: To upgrades the player’s firmware. Please note that this operation is only available when the playback is completely stopped, or when there is no disc loaded.
S E T U P M E N U O P T I O N S 4. Remote Control Code: The BDP-105 can respond to one of four sets of remote control codes. The default is “Code 1”. If you have other OPPO products in the vicinity of the BDP-105, the other products may respond to the BDP-105 remote control. To prevent this, you can select a different remote code. The available codes are: x Code 1 – OPPO disc player remote code is set to 1. This is the default remote code. x Code 2 – OPPO disc player remote code is set to 2.
S E T U P M E N U O P T I O N S 6. Standby Mode: Allows you to choose between two standby modes. In Energy Efficient mode, the player consumes a minimal amount of power but takes more time to get ready for operation after being turned on. In Quick Start mode, the player can start up significantly faster at the expense of additional power consumption during the standby period. Energy Efficient (default) – The player will take slightly longer to start up, but will consume less power in standby mode.
S E T U P M E N U O P T I O N S NOTE The new storage device choice becomes effective only after the player is restarted. Please make sure that you turn off the player and then turn it back on after changing the Storage Device option. Space Used – Displays the used space of the persistent storage. If too much space is used and the available space becomes too low, some Blu-ray Discs may not play properly.
S E T U P M E N U O P T I O N S Network Setup The Network Setup section of the Setup Menu system allows you to configure the player’s network connection, test the connection, and enable or disable BD-Live access. ᶑᶭᶢᶺᶦᶳᵡᶏᶢᶮᶦ ᶐᶑᶑᶐᵡᶃᶅᶑᵮᵲᵱᵶ 1. Connection Information: Displays the current internet connection information, such as connection type, IP address, Ethernet MAC, Wireless MAC, etc. 2.
S E T U P M E N U O P T I O N S 6. Internet Connection: Allows you to select the internet connection type. x Ethernet (default) – Connect to the internet through an Ethernet cable. Please refer to the connection instructions on page 22. Selecting this will make the Wireless Setting option gray and un-selectable. x Wireless – Connect to the internet through the external wireless adaptor. Please refer to the connection instructions on page 23.
S E T U P M E N U O P T I O N S Manual – Allows you to manually enter the information for a wireless network. You need to use the remote control to input the SSID, select the Security Mode and input the Security Key. The player will then test the connection and display the results. WPS – Starts the Wi-Fi Protected Setup. The BDP-105 supports the WPS standard to provide an easy and secure establishment of a wireless home network.
S E T U P M E N U O P T I O N S Subnet Mask: Each IP address has an associated subnet mask. It is used by the player to decide whether to route network traffic through the router or directly to another device on the same network. When IP Setting is set to Auto (DHCP), the value displayed here is obtained using DHCP and cannot be changed. Gateway: The IP address of the router. It is also called “default gateway” or “default router”.
REFERENCES Useful Notes In order to prolong the life of your player, it is recommended that you wait at least 30 seconds before you power it on after switching it off. Remove discs and turn the power off after operation. Some functions of the player may not be applicable to certain discs. Some discs with special features may not be fully supported by the player. This is not a malfunction of the unit. In the case of player malfunction, please turn it off, wait for 30 seconds and turn it back on.
R E F E R E N C E S Use the remote control within the effective range. Replace the batteries. Open the disc tray. Aim the remote at the player. Press and hold the ENTER button on the remote for 5 seconds to set the remote code. 9 9 Replace the disc. 27 Stop playback completely, then try again.
R E F E R E N C E S Specifications Designs and specifications are subject to change without notice. Disc Types* BD-Video, Blu-ray 3D, DVD-Video, DVD-Audio, AVCHD, SACD, CD, HDCD, Kodak Picture CD, CD-R/RW, DVD±R/RW, DVD±R DL, BD-R/RE BD Profile BD-ROM Version 2.5 Profile 5 (also compatible with Profile 1 Version 1.0 and 1.1) Internal Storage 1GB (Actual space available for persistent storage varies due to system usage) Output Analog Audio: 7.1ch, 5.1ch, stereo.
R E F E R E N C E S User Manual Updates Online An updated version of the User Manual may be available online at the OPPO Digital web site (www.oppodigital.com). To read or download the latest online User Manual, Click on the BDP-105 product, and open its “Support” tab. Occasional updates are needed to reflect new features added to the player since the User Manual was printed. As future firmware updates bring in new features and functions, the online version of the User Manual will be updated accordingly.
R E F E R E N C E S Language Code List Code 6565 6566 6570 6577 6582 6583 6588 6590 6665 6669 6671 6672 6678 6679 6682 6765 6779 6783 6789 6865 6869 6890 6976 6978 6979 6983 6984 6985 7065 7073 7074 7079 7082 7089 7165 7168 7176 7178 7185 7265 7273 7282 Language Name Afar Abkhazian Afrikaans Amharic Arabic Assamese Aymara Azerbaijani Bashkir Byelorussian Bulgarian Bihari Bengali, Bangla Tibetan Breton Catalan Corsican Czech Welsh Danish German Bhutani Greek English Esperanto Spanish Estonian Basque Persia
Gracenote Terms of Use This application or device contains software from Gracenote, Inc. of Emeryville, California (“Gracenote”). The software from Gracenote (the “Gracenote Software”) enables this application to do disc or file identification and obtain musicrelated information, including name, artist, track, and title information (“Gracenote Data”) from online servers or embedded databases (collectively, “Gracenote Servers”) and to perform other functions.
LIMITED WARRANTY OPPO Digital, Inc. Limited Two Years Warranty Your OPPO product has been manufactured to precise standards, and with rigid quality control through every process of manufacturing. It is warranted by OPPO DIGITAL, INC. against defective workmanship or materials for two (2) full years from the original date of purchase. This warranty applies only to OPPO brand products imported or manufactured by OPPO Digital, Inc. and sold to the original consumer purchaser in the U.S.A.
x If it is determined that your product needs service, a Return Merchandise Authorization (RMA) number will be issued to you along with return instructions and address of an OPPO service center. x Pack the product securely, preferably in the original packaging, with your assigned RMA number marked clearly on the outside of the package. Send the package postpaid and insured to the OPPO service center to obtain warranty service. Thank you for choosing OPPO. Your satisfaction is our highest priority.
51976808 V1.
® www.oppodigital.