
User's Manual


SETUP MENU OPTIONS
60
in shadows when watching darker scenes. Televisions have brightness (black level) and
contrast (white level) controls; however, it may require a combination of tweaking both the
player and your television to get the optimal result. We recommend using a calibration disc
such as the Spears & Munsil™ High Definition Benchmark Blu-ray Edition or Digital Video
Essentials HD Basics as aids for adjusting. First adjust the television’s picture controls for the
best possible picture. Once that is done, try changing the player’s settings to further refine the
picture to the optimal result.
4. Hue: Allows you to adjust the hue (tint) of the video output.
5. Saturation: Allows you to adjust the saturation (color intensity level) of the video output.
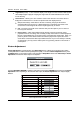
6. Sharpness: Allows you to set the sharpness of video output. Sharpness (also called Detail/Edge
Enhancement in previous OPPO players) is a video processing function that can control the
image sharpness but at the same time may cause unwanted artifacts.
For HDMI 1 OUT, the sharpness level can be set between -16 and +16. The default is level 0,
which turns off sharpness enhancement. The negative levels reduce or eliminate overly
sharpened video, and the picture may appear soft. The positive levels increase the sharpness.
At level 1, the player applies low level Detail Enhancement, during which the video
processor isolates the detailed parts from the original image, processes them separately
and integrates back before the final output.
At level 2, the player increases Detail Enhancement to a higher level. Generally, to make an
image “sharper”, we recommend using level 1 and 2.
At level 3 and above, the player adds Luminance Transition Improvement (LTI) and Chroma
Transition Improvement (CTI), which further sharpen the luminance transition and chroma
transition. However, we do not recommend using level 3 and above unless the source
content is poorly produced and blurry.
For HDMI 2 OUT, the sharpness level can be set between 0 and +2. The default is level 0. The
higher the level, the sharper the video details are. However, too high a sharpness level may
cause white lin
es or halo-like effects to appear around objects.
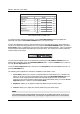
7. Noise Reduction: Allows you to select whether the player will apply video noise reduction
processing.
For HDMI 1, the noise reduction level can be set between 0 and 8. The default is level 0, which
turns off noise reduction.
When set to level 1, the player adjusts the picture quality by reducing the “mosquito noise”
(artifacts around the outlines of objects) and “block noise” (mosaic-like patterns caused by
video compression). These two noise reduction methods are also called Compression
Artifacts Reduction (CAR) and have several levels of aggressiveness.
When set to level 2, the player applies the Motion Adaptive Video Noise Reduction (VNR),
which handles the random noise and the film-grain noise (natural variation of picture
intensity caused by film grain). Its level is automatic because there is noise estimator
circuitry in the video processor that calculates how much noise is present and adjusts the
level of VNR accordingly.
When set to 3 or 4, the player applies both CAR and Motion Adaptive VNR, with more
aggressive “block noise” reduction at level 4.
At level 5, the player applies aggressive CAR for low quality video content, and adds
Motion Adaptive VNR at level 6.