
Manual


- 8 -
- 9 -
8
8-1
Masking the Detection Areas using
Masking Plates
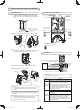
The near area mirror mounted in the main unit has 2 near
masking plates; one at the right side of this mirror and another
at the left side of this mirror. You can mask the detection area
by changing the position of these masking plates.
Cautions>>
You can mask the outside detection areas only; they are
areas 1 and 6. Use the area masking seals (an accessory)
to mask the other detection areas (see Step 8-2).
Applicable models
SIP-3020WF SIP-4010WF SIP-404WF
6 4 2 5 3 1
10 [m]155051015
[ft.]30 20 10 0 10 20 30 40 5050 40
6
5
4
3
1
2
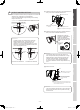
MASKING THE NEAR AREA SENSOR
8-2
Masking the Detection Areas using
Masking Seals
Using the tweezers (an accessory), carefully attach the area
masking seals (an accessory) to the near area mirror.
F 6
E 6
F
E
D
C
B
E
E
E
E
E
E
D
D
D
D
D
D
C
C
C
C
C
C
B
B
B
B
B
B
F
F
F
F
F
F
6 4 2 5 3 1
6 4 2 5 3 1
6 4 2 5 3 1
6 4 2 5 3 1
6 4 2 5 3 1
135246
[m]10 1515
5050 40
50510
[ft.]
30 20 10 0 10 20 30 40
[m]
4
2
0
[ft.]
13
0
10
0
10 20 30
0
10 20 30 40 50 60 70 80 90 100 [ft.]
[m]
6
3
5
2
1
4
B
C
D
E
F
BCDEF
Points>>
If you are using the SIP-3020WF, SIP-4010WF, or
SIP-404WF sensor unit when you have completed Step 8,
proceed to Step 9.
Near area mirror
Rib
Rib
Near area mirror
2 Attach the masking plate to the mirror, and
secure it to the ribs.
3Insertthexingrubberformtosecurethe
knob of the masking plate.
1 Remove the masking plate
from the storage, and
check the detection area
and the mirror you use by
referring to the area chart.
If tree branches or other moving objects
are in the path of the detection beam.
Area masking seals
MIRROR
REDWALL-V_SP-WF_EN.indd 8 2009/05/19 15:50:48