Manual for the Demonstration application for printing via Bluetooth for the OPL9724 with the TEC B-SP2D printer Version LFC24851 PRINT DEMO TEC B-SP2D (BLUETOOTH)
CAUTION: This user’s manual may be revised or withdrawn at any time without prior notice. Version: User’s manual for the demonstration application for printing via Bluetooth (SPP) for the OPL9724 with the TEC B-SP2D printer Version: LFC24851 July 2003 Copyright 2003, Opticon Sensors Europe B.V. All rights reserved. Limited warranty and disclaimers By opening the package of this product you agree to become bound by the liability and warranty conditions as described below.
GRAPHICAL DEMO APPLICATION - PAGE 3 Table of contents TABLE OF CONTENTS 2 1. USING THE MENUS 4 2. 2.1 2.2 2.3 2.4 MAIN MENU Scan Labels Scroll data Delete data Version 5 5 6 7 7 3.
GRAPHICAL DEMO APPLICATION - 1. PAGE 4 Using the Menus The demo application consists of graphical menus through which the different options of the application can be accessed. Navigating through the menus and selecting or toggling options can be done by using the 3 keys of the OPL9724.
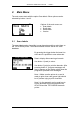
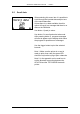
GRAPHICAL DEMO APPLICATION - 2. PAGE 5 Main Menu The main menu starts with the option Scan labels. Other options can be selected by button 1 and 2. Options of the main menu are: • Scan labels • Scroll data • Delete data • Version 2.1 Scan Labels The scan labels makes it possible to scan barcodes and then print them on the TEC B-SP2D printer. The scanned labels are also stored in a small database. By pressing the trigger button the laser line emits and it is possible to scan a barcode.
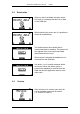
GRAPHICAL DEMO APPLICATION - 2.2 PAGE 6 Scroll data When selecting this menu item it is possible to scroll through the inputted data and print one of the stored barcodes. Unless there is no data available, then this option will result in a message that there is no data on the RAM disk. Use button 1 (back) to return. Use button 2 to scroll and select a barcode. After pressing button 2’, progress messages will start to appear on the display which show the progress or possible error messages.
GRAPHICAL DEMO APPLICATION - 2.3 PAGE 7 Delete data When no data is available the option select will result in a message that there is no data on the RAM disk. When selecting this menu item it is possible to delete the inputted data. The default screen when delete data is selected and data is available. This screen will also appear when a successful send data (data transmission) occurs. When cancel is selected the database is not removed from the RAM disk.
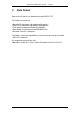
GRAPHICAL DEMO APPLICATION - 3. PAGE 8 Data format Each record is stored in a database file called DATA.TXT. The fields in a record are:
GRAPHICAL DEMO APPLICATION - PAGE 9 Appendix: Making a bluetooth connection A connection between the OPL9724 and a bluetooth printer can be established by taken the following steps. The first step of setting up a connection between the OPL9724 and the bluetooth printer is by making sure the bluetooth printer is on. Otherwise the OPL9724 can’t find the bluetooth device. The second step of setting up a bluetooth connection is to let the OPL9724 discover the printer.