
Installation Guide

3
INSTALLATION PROCEDURE:
1. Shut off power to luminaire
2. Open or remove luminaire lens or grille (if present).
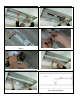
3. Remove fluorescent lamps and ballast cover(s). (See figure 1)
4. Confirm that the branch circuit voltage of your electrical system is compatible with this kit
5. Disconnect input power from ballast and remove existing ballast, sockets, brackets and socket wiring.
(see figure 2)
6. Place driver inside the ballast box, allowing the magnet to hold it in place temporarily. (see figure 3)
7. Connect power input wires to the input wires on the LED driver. IMPORTANT NOTE: TWIST-ON OR
PUSH-ON CONNECTORS MUST BE RATED FOR A MINIMUM OF 600V (see figure 4)
8. Permanently secure driver to the luminaire body with #8 x ½” or shorter self-tapping screws, through the
mounting flanges on the driver case. Be certain that there are no power wires in the path of the screws.
(see figure 5)
9. Be certain that “Line” wire is connected to the black input wire of driver, and that “Neutral” wire is
connected to the white input wire of driver.
10. Be certain that the ground wire of the power circuit remains connected to the body of the luminaire.
11. Connect the LED driver output to the “Y” harness, and reinstall the ballast cover(s), covering the driver
and all electrical connections. Route the harnesses out the end of the ballast cover, in such a way as to
not expose them to any sharp edges, or pinch them between any metal surfaces. (see figure 6)
12. One at a time, plug the LED strip(s) into the “Y” harnesses and insert them into/onto the body of the
luminaire. (see figure 7).
13. At this time, you may temporarily turn on power to test retrofitted luminaire
14. Permanently affix the Retrofit Kit label to the body of the luminaire in a conspicuous place, where it will
be plainly visible when the fixture is opened for service
15. Close or reinstall the lens/grille/cover and restore power to luminaire