Cat. No. 31-3037 Digital Synthesize Audio/Video Surround Receive STAV-3580 Owner’s Manual Please read before using this equipment.
Introducing the Optimus STAV-3580 Your Optimus STAV-3580 Digital Synthesized A/V Surround Receiver is the perfect control center for your audio/video system. It combines 110 watts-per-channel of clean power with modern styling and provides connections for one tape deck, one audio/video source, one more tape deck or audio/video playback source, a turntable, a CD player, and a video monitor. Your receiver also has special sound options.
IMPORTANT SAFETY INSTRUCTIONS This receiver is made and tested to meet exacting safety standards. It meets both UL and FCC requirements. WARNING: TO REDUCE THE RISK OF FIRE OR ELECTRIC SHOCK, DO NOT EXPOSE THIS APPLIANCE TO RAIN OR MOISTURE. To prevent fire or shock hazard, do not expose this system to rain or moisture. This section lists important information that will help you properly use and enjoy your receiver and accessories.
Contents Preparing Your Receiver . . . . . . . . . . . . . . . . . . . . . . . . . . . . . . . . . . . . . . . . . . . . . . . . . . . . . . . . . . . . . . . . . . . . . . . . . . . . . 5 Positioning Speakers . . . . . . . . . . . . . . . . . . . . . . . . . . . . . . . . . . . . . . . . . . . . . . . . . . . . . . . . . . . . . . . . . . . . . . . . . . 5 Connecting Speakers . . . . . . . . . . . . . . . . . . . . . . . . . . . . . . . . . . . . . . . . . . . . . . . . . . . . . . . . . . . . . . . . . .
Preparing Your Receiver Caution: Make all the necessary connections before you plug in or turn on the receiver. Positioning Speakers a L R Halfway Point Between Speake b a=b Person in Listening Area Where you place your speakers (not supplied) can make a noticeable difference in your system’s sound. The guidelines in this section will help you choose the best locations. After you use your receiver for a while, you might want to try different locations for your speakers.
Preparing Your Receiver Connecting Speakers Follow these guidelines when you select and connect speakers. • Be sure you properly connect all speakers. • Do not connect two pairs of speakers to a single set of terminals (A or B) at the same time. When you use two pairs of speakers, connect one set to Speakers A and one set to Speakers B. • Optimus and other high-quality speakers have color-coded speaker terminals (red for positive polarity and black for negative polarity).
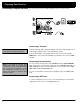
Preparing Your Receiver Connecting the A and B Speakers Note: Be sure you connect the receiver’s right and left positive (+) and negative (–) terminals to the speaker’s corresponding right and left positive (+) and negative (–) terminals. Follow these steps to connect the right speaker to the receiver’s right FRONT SPEAKERS A terminals. 1. Press the receiver’s FRONT SPEAKERS A R (+) red lever and insert the ridged or color-coded conductor’s end into the small hole.
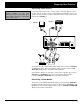
Preparing Your Receiver Connecting Program Sources You can connect up to five external program sources to your receiver. L OUT PUT R L L R L R L CD Player FM UNBAL 75 R TO MONITOR TV GND IN OUT IN VIDEO VIDEO OUT REC AM PLAY L IN GND L LOOP R ANTENNA ANTENNA CD R OUT PHONO TAPE2 MONITOR CD LD VCR /TAPE1 R CONTROL GND L R L R R Connecting a Turntable Use shielded audio cables with phono connectors for all audio connections.
Preparing Your Receiver Connecting Video Sources If you connect two video sources such as VCRs or laser disc players to your receiver, you can use the receiver to switch between viewing the sources. You can also use the receiver to easily record from the video sources to the source connected to VCR/TAPE 1.
Preparing Your Receiver Connecting the Antennas In many cities, the supplied indoor AM loop and FM antennas provide adequate reception. AM Antennas Assemble the included antenna’s base by swinging the base in the direction of the arrow and inserting the antenna’s bottom tabs into the base’s slot. Then attach the antenna wires to the AM and GND terminals (bottom two terminals). Leg Place the antenna on a flat surface and rotate it for the best AM reception.
Preparing Your Receiver Warning: To prevent injury, read and follow all cautions and warnings that accompany the outdoor antenna. For the best radio reception, use an outdoor antenna. Follow these steps to connect an outdoor FM antenna to the receiver using 75Ω cable. Note: If your antenna has 300Ω twin-lead cable, consult your local RadioShack store for the correct adapter. 1. Disconnect the supplied FM antenna from the receiver’s FM UNBAL 75Ω terminal. 2.
Preparing Your Receiver Using One Remote Control for More than One Unit Note: When you plug the cable into a component’s CONTROL IN jack, that component’s remote sensor does not function. If you also have an Optimus professional series CD player, VCR, or cassette deck with the OSR mark, you can connect its CONTROL IN jack to the receiver so you can control all of your equipment with a single remote control. You can also use the other component’s remote control by pointing it at the receiver’s front panel.
Preparing Your Receiver Using the AC Power Outlet Your receiver has an AC power outlet that you can use to power an electronic device, such as a turntable, cassette deck, VCR, and so on. This switched outlet turns on and off with the receiver and provides a maximum of 100 Watts. Caution: Do not connect appliances with high power consumption, such as a heater, iron, monitor, or TV, to this AC outlet. Doing so can cause a risk of overheating and fire, and could damage the receiver.
Basic Operation Warning: To prevent possible hearing loss, turn VOLUME to MIN before you turn on the receiver or change the program sources. After you turn on the receiver or change the program source, adjust VOLUME to a comfortable listening level. Note: The controls on the remote control work the same as the buttons on the receiver’s front panel. Follow these steps to use the receiver. 1. Press POWER to turn on the receiver’s power. It takes about 5 seconds to begin hearing sound. 2. Select the speakers.
Basic Operation Balance Control The BALANCE control lets you adjust the sound balance between the left and right speakers. If you properly position the speakers and your listening area is centered between them, the center control setting is usually best (see “Positioning Speakers” on Page 5). For an unusual speaker placement, adjust BALANCE as follows: 1. Select TUNER. Then press FM/AM to select the FM band. 2. Press FM MONO until MONO appears.
Basic Operation Tuning the Radio Your receiver offers three types of electronic tuning—manual, automatic, and memory. Manual and Automatic Tuning Follow these steps to manualy or automatically tune to the stations. 1. Press TUNER. Then press FM/AM to select the desired band. When you select the AM or FM radio band, the receiver tunes to and displays the frequency last selected in that band. 2. Press SELECT so FREQ appears on the JOG MODE display. 3.
Basic Operation Using FM Mono To receive FM stations in stereo, press FM MONO until MONO disappears from the display. STEREO appears on the display when you receive an FM broadcast in stereo. You can improve the reception of weak FM stations by pressing FM MONO until MONO appears. This reduces noise while you listen to a weak FM station, but you get monaural instead of stereo sound. Turning Off the Display You can turn the display off so it does not bother you in a darkened room. Press DISPLAY OFF.
Cassette Deck/VCR Features You can connect two cassette decks to the receiver. Selecting either VCR/TAPE 1 or TAPE 2 MONITOR lets you hear the playback from the cassette deck you connected to the receiver’s corresponding (VCR/TAPE 1, TAPE 2 MONITOR) jacks. Using the VCR/TAPE 1 Button Press VCR/TAPE 1. VCR appears on the display. You hear the playback from the cassette deck or VCR you connected to the receiver’s VCR/TAPE 1 jacks. Using the TAPE 2 MONITOR Button Press TAPE 2 MONITOR.
Cassette Deck/VCR Features Playing and Recording Video Tapes You can connect two video sources to the receiver. If you connect a VCR to the VCR/TAPE 1 audio and video jacks, you can copy video cassette tapes from one VCR to another and monitor the dubbing process. Playing a Video Cassette Tape To play a video tape, load the tape into the VCR connected to either VCR/TAPE 1 or LD. Press the button (VCR/TAPE 1 or LD) that corresponds to the jack the VCR is connected to. VCR or LD appears on the display.
Using Advanced Sound Options Your receiver has four special sound options: Dolby Pro-Logic Surround, Dolby 3CH Logic, Studio-Effect Surround, and Simulated Surround. These special options enhance a program source. Notes: • To get the full benefit from programs encoded with Dolby Surround Sound, you need a stereo VCR. • Dolby Surround does not operate correctly if the signal passes through a graphic equalizer.
Using Advanced Sound Options Sound Mode Adjustments (Remote Control Only) Notes: • If you do not use a center speaker, the monaural signals are only reproduced if you select PHANTOM. • You cannot select PHANTOM in the Dolby 3CH Logic sound mode. Center Mode Setting The center mode setting affects the center channel’s bass signals. It operates only when you select the Dolby Pro-Logic Surround or Dolby 3CH Logic mode. Slide AUDIO•VCR on the remote control to AUDIO.
Using the Remote Control The remote control works up to a distance of about 23 feet, and within a 30degree angle on either side of the receiver. Point the control at the receiver’s front panel and press the desired button(s). Many buttons on the remote control work the same as buttons on the receiver’s front panel. Use these buttons exactly as you would use the corresponding buttons on the receiver.
Using the Remote Control MUTING Silences the receiver. Press again to restore the sound to its previous level. See Page 15. – TUNING + Tunes to radio stations with AUDIO/VCR set to AUDIO. See Page 16. Manual Tuning: Press once to select the next higher or lower frequency. Or, press and hold down to rapidly change frequencies. Automatic Tuning: To search for the next higher or lower station, release + TUNING –when the frequency starts to change.
Using the Remote Control Tape/VCR Section Before operation: • Set AUDIO/VCR to AUDIO for a cassette deck or to VCR for a VCR. • For a cassette deck, select TAPE 2 MONITOR or VCR/TAPE 1. Tape/VC Section • For a dual cassette deck, select DECK 1 or DECK 2. If you use a single cassette deck, press DECK 2. • You must connect the tape deck both to your receiver’s CONTROL OUT and audio jacks for these functions to work. Press to start normal play. Press to play the reverse side of an auto-reverse cassette deck.
Troubleshooting If the receiver is not working as it should, the following suggestions might help. If you follow the suggestions in this chart and the receiver still does not work properly, contact your local RadioShack store for assistance. Problem Power does not turn on. Cause Solution • Power cord is disconnected. • Plug in the power cord. • Protection circuit is activated. • Unplug the power cord, then plug it in again. The receiver does not respond to button presses.
Care and Maintenance Your STAV-3580 Digital Synthesized A/V Surround Receiver is an example of superior design and craftsmanship. The following suggestions will help you care for the receiver so you can enjoy it for years. Keep the receiver dry. If it gets wet, wipe it dry immediately. Liquids can contain minerals that can corrode the electronic circuits. Handle the receiver gently and carefully. Dropping it can damage its circuit boards and can cause the receiver to work improperly.
The FCC Wants You to Know Your receiver might cause radio or TV interference even when it is operating properly. To determine whether your receiver is causing the interference, turn off your receiver. If the interference goes away, your receiver is causing it.
Specifications Amplifier Front Channel Average Power Output . . . . . . . . . . . . . . . . . . . . . . . . . . . . . . . . . . . . . . . . . 110 Watts per Channel into 8 Ohms From 20 to 20,000 Hz, With No More than 0.09% Total Harmonic Distortion Measured Pursuant to the Federal Trade Commission’s Trade Regulation Rule on Amplifier Output Power Claims Front Channel Surround Power Output . . . . . . . . . . . . . . . . . . . . . . . . . . . . . . . . . . . . . . . . . . . . . . . . . .
Specifications FM Tuner Frequency Range . . . . . . . . . . . . . . . . . . . . . . . . . . . . . . . . . . . . . . . . . . . . . . . . . . . . . . . . . . . . . . . . . . . . . . . 87.5 to 108 MHz Usable Sensitivity . . . . . . . . . . . . . . . . . . . . . . . . . . . . . . . . . . . . . . . . . . . . . . . . . . . . . . Mono: 11.2 dBf, IHF (1.0 µV/75 Ohms) 50 dB Quieting Sensitivity Mono . . . . . . . . . . . . . . . . . . . . . . . . . . . . . . . . . . . . . . . . . . . . . . . . . . . . . . . . . . .
Index to Features by Control Name This table lists the control and indicator names found on the front of your receiver, along with the page number where the control or indicator is discussed. To find a description for the buttons on the remote control, see “Using the Remote Control” on Page 22.
Notes 31
RadioShack Limited Warranty This product is warranted against defects for 2 years from date of purchase from RadioShack company-owned stores and authorized RadioShack franchisees and dealers. Within this period, we will repair it without charge for parts and labor. Simply bring your RadioShack sales slip as proof of purchase date to any RadioShack store. Warranty does not cover transportation costs. Nor does it cover a product subjected to misuse or accidental damage.