Cat. No. 31-3045 Audio/Video Receiver STAV-3780 DOLBY SURROUND P R O L O G I C STAV-3780 AUDIO/VIDEO RECEIVER STANDBY 5-D THEATER DOLBY PRO LOGIC VIRTUAL SRS DSP MODE DSP VCR TAPE 1 OSR DVD/TV LD/SAT CD FM/AM PHONO TAPE 2 MONITOR DIGITAL SIGNAL PROCESSOR DVD 5.
Introducing the Optimus STAV-3780 Your Optimus STAV-3780 Audio/Video Receiver operates as the perfect control center for your audio/video system. It combines 100 watts-perchannel of clean power with modern styling. It provides connections for one tape deck, one VCR, two audio/video sources, a turntable, a CD player, and two TV’s or video monitors. Your receiver has special sound options.
IMPORTANT SAFETY INSTRUCTIONS This receiver is made and tested to meet exacting safety standards. It meets both UL and FCC requirements. WARNING: To reduce the risk of fire or shock hazard, do not expose this product to rain or moisture. CAUTION RISK OF ELECTRIC SHOCK. DO NOT OPEN. ! CAUTION: TO REDUCE THE RISK OF ELECTRIC SHOCK, DO NOT REMOVE COVER OR BACK. NO USER-SERVICEABLE PARTS INSIDE. REFER SERVICING TO QUALIFIED PERSONNEL.
Contents Preparing Your Receiver . . . . . . . . . . . . . . . . . . . . . . . . . . . . . . . . . . . . . . . . . . . . . . . . . . . . . . . . . . . . . . 5 Positioning Speakers . . . . . . . . . . . . . . . . . . . . . . . . . . . . . . . . . . . . . . . . . . . . . . . . . . . . . . . . . . . . . . . . 5 Connecting Speakers . . . . . . . . . . . . . . . . . . . . . . . . . . . . . . . . . . . . . . . . . . . . . . . . . . . . . . . . . . . . . . . 6 Connecting Program Sources . . . . . . . . . . . . . .
Preparing Your Receiver Caution: Make all the necessary connections before you plug in or turn on the receiver. Positioning Speakers a L R Midway Point Between Speakers b a=b Normal Listening Point • Surround speakers generally sound best if you position them above ear level. • To avoid picture interference of a nearby TV, use magnetically shielded speaker systems. This is particularly important for the center speaker since it is usually located closest to the TV.
Preparing Your Receiver Connecting Speakers Preparing the Speaker Wires Follow these guidelines when you select and connect speakers. • Only connect speakers that are rated at between 6 and 16 Ohms. • Be sure you properly connect all speakers. Speaker wire consists of two conductors (individual wires) encased in insulation and is usually color-coded or marked with a ridge along one side so you can identify each conductor.
Preparing Your Receiver Right Front Speakers Right Left Left Center Speaker AUDIO IN R L R L CENTER PRE OUT CAUTION: SPEAKER IMPEDANCE 6Ω OR 8Ω ~16Ω / SPEAKER PRE OUT SUB WOOFER AUDIO IN CENTER SPEAKER SURROUND SPEAKERS R L A A B B R L FRONT SPEAKERS Amplified Subwoofer Right Surround Speakers Left R Connecting the Front Speakers Note: Be sure you connect the receiver’s right and left positive (+) and negative (–) terminals to the speaker’s corresponding right and left positive (
Preparing Your Receiver Preparing Your Receiver Connecting Surround-Sound Speakers You can connect a pair of speakers to the receiver for surround-sound programs. Follow the steps in “Connecting the Front Speakers” to connect the speakers to the SURROUND SPEAKERS terminals. Connecting the Center Speaker The center speaker gives additional ambience to surround sound. Follow the steps in “Connecting the Front Speakers” to connect the center speaker to the CENTER SPEAKER terminals.
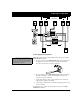
Preparing Your Receiver Connecting Program Sources You can connect up to five external program sources to your receiver. DVD 5.1CH INPUT SURROUND CENTER CENTER PRE OUT L VIDEO OUT TO MONITOR TV PRE OUT SURROUND SUB SUB WOOFER R WOOFER CONTROL 2 1 OUT VIDEO IN IN IN IN IN OUT IN OUT L L R R PHONO PLAY DVD/ TV LD/ DVD 5.
Preparing Your Receiver DVD 5.1CH INPUT SURROUND CENTER CENTER PRE OUT L VIDEO OUT TO MONITOR TV PRE OUT SURROUND SUB WOOFER SUB R WOOFER CONTROL 2 1 V OUT VIDEO IN IN IN IN IN OUT IN OUT L R PHONO DVD/ TV LD/ DVD 5.
Preparing Your Receiver DVD 5.1CH INPUT SURROUND CENTER CENTER PRE OUT L VIDEO OUT TO MONITOR TV PRE OUT SURROUND SUB SUB WOOFER R WOOFER CONTROL 2 1 OUT VIDEO IN IN IN IN IN OUT IN OUT L R PHONO CD PLAY DVD/ TV LD/ DVD 5.1CH SAT FRONT REC VCR/TAPE1 PLAY REC TAPE2 MONITOR SIGNAL GND R L L R L V R L V R AUDIO OUT VIDEO OUT SURROUND CENTER OUT OUT L L R R SUBWOOFER OUT DVD DVD DVD 5.
Preparing Your Receiver Connecting the Antennas In many areas, the supplied indoor AM loop and FM antennas provide satisfactory reception. AM Antennas Assemble the supplied AM antenna’s base by swinging the base in the direction of the arrow and inserting the antenna’s bottom tabs into the base’s slot. If the receiver is in a rack or on a shelf and there is no room for the AM loop antenna, use two screws (not supplied) to mount the base on the wall or another location as shown.
Preparing Your Receiver Warning: To prevent injury, read and follow all cautions and warnings that accompany the outdoor antenna. For the best radio reception, use an outdoor antenna. Follow these steps to connect an outdoor FM antenna to the receiver using 75Ω coaxial cable. Note: If your antenna has 300Ω twin-lead cable, consult your local RadioShack store for the correct adapter. 1. Disconnect the supplied FM antenna from the receiver’s 75Ω terminal. FM UNBAL 2.
Preparing Your Receiver Using One Remote Control for More than One Unit Note: When you plug the cable into a component’s CONTROL IN jack, that component’s remote sensor does not function. If you also have an Optimus professional series CD player, VCR, or cassette deck with the OSR mark ( ), you can connect its CONTROL IN jack to the receiver so you can control all of your equipment with a single remote control.
Preparing Your Receiver Using the AC Power Outlet Caution: Do not connect appliances with high power consumption, such as a heater, iron, monitor, or TV, to this AC outlet. Doing so can cause a risk of overheating and fire, and could damage the receiver. Your receiver has an AC power outlet that you can use to power an electronic device, such as a turntable, cassette deck, or VCR. This switched outlet turns on and off with the receiver and provides a maximum of 100 watts.
Basic Operation Warning: To prevent possible hearing loss, turn VOLUME to MIN before you turn on the receiver or change the program sources. After you turn on the receiver or change the program source, adjust VOLUME to a comfortable listening level. The controls on the remote control work the same as the buttons on the receiver’s front panel, though some are labeled differently. Follow these steps to use the receiver. 1. Press POWER to turn on the receiver’s power. 2.
Basic Operation Tuning the Radio Notes: • A class is a group of up to 10 station frequencies. • For weak signals, we recommend manual tuning. Your receiver has four types of electronic tuning — manual, automatic, direct access, and memory. Manual and Automatic Tuning Follow these steps to manually or automatically tune to stations. Note: If none of the tuning buttons on the remote control operate, press TUNER first. 1.
Basic Operation Memory Tuning Notes: • If you store a frequency in a memory that already contains a frequency, you replace the previous frequency. • If your receiver is disconnected from AC power for several days, it loses all the stored frequencies. Memory tuning lets you store up to 30 AM or FM frequencies in three different classes (10 frequencies in each class), then quickly tune to a class and station. Follow these steps to store a station in a memory location using the front panel controls.
Basic Operation Using Headphones To listen with headphones (not supplied), insert the headphones’ 1/4inch plug into the receiver’s front panel PHONES jack. To silence the speakers and listen with headphones without disturbing others, press appears on the display. SPEAKER so only SP Listening Safely To protect your hearing, note the following when using headphones. • Set the volume to its lowest setting before you begin listening. After you begin listening, adjust the volume to a comfortable level.
Cassette Deck/VCR Features You can connect two cassette decks to the receiver. Selecting either VCR/ TAPE 1 or TAPE 2 MONITOR lets you hear the playback from the cassette deck you connected to the receiver’s corresponding (VCR/TAPE 1or TAPE 2 MONITOR) jacks. Using the VCR/TAPE 1 and TAPE 2 MONITOR Buttons Press VCR/TAPE 1. VCR appears on the display. You hear the playback from the cassette deck or VCR you connected to the receiver’s VCR/TAPE 1 IN jacks. Press TAPE 2 MONITOR.
Cassette Deck/VCR Features Playing and Recording Video Tapes You can connect two video sources to the receiver. If you connect a VCR to the VCR/TAPE 1 and DVD/TV or LD/SAT audio and video jacks, you can copy video cassette tapes from one VCR to another and monitor the dubbing process. Playing a Video Tape To play a video tape, load the tape into the VCR connected to either VCR/ or LD/SAT. Press the button (VCR/TAPE 1, DVD/TV, or LD/SAT) that corresponds to the jack the VCR is connected to.
Using Advanced Sound Options Your receiver has four special sound options: Dolby Pro Logic Surround, Dolby 3CH Logic, DSP Effect, and Dolby Virtual. These special options enhance the sound from a connected program source. Notes: • To get the full benefit from programs encoded with Dolby Surround Sound, you need a stereo audio/video source. • Dolby Surround does not operate correctly if the signal passes through a graphic equalizer.
Using Advanced Sound Options 5-D Theater 5-D Theater provides clearer and more dynamic sound effects by outputting audio signals through the rear channel to simulate the stereo sound, compared with a standard surround system which provides only monaural signals to the rear speakers. Press 5-D THEATER to turn this feature on/off. DVD 5.1-Channel Input Together with a multi-channel decoder or DVD player with 5.1-channel output, you can feed sound to all five speaker channels.
Using Advanced Sound Options Test Tone Notes: • You must use the remote control to make these sound adjustments. • Use the VOLUME control to adjust the overall sound level. The test tone lets you balance the signal levels between all your speakers. To adjust the levels, see “Center Level” and “Rear Level.” To turn on the test tone, select one of the surround sound modes (PRO LOGIC, or 5.1-CH) then press SURROUND. Then press TEST TONE.
Using the Remote Control The remote control works up to a distance of about 23 feet, and within a 30-degree angle on either side of the receiver. Point the control at the receiver’s front panel and press the desired button(s). Many buttons on the remote control work the same as buttons on the receiver’s front panel. Use these buttons exactly as you would use the corresponding buttons on the receiver. CONTROL MODE Buttons The CONTROL MODE buttons select the device you want to control.
Using the Remote Control VCR Brand Code Fisher 410,426,412,427,425,420 Goldstar 411,409 Hitachi 408,401,406,436,434 JVC 428,430,429,408,414,431,407 Magnavox 414,408,426,403 Mitsubishi 409,420,421,422,423,424,408,407 Optimus 408,432,433,402,418,419 Panasonic 408,432,433 Pioneer 400 RCA 401,406,408,414,405,413,411,415 Sanyo 410,412,425,435 Sharp 402,418,419 Sony 416,417,404,408 Toshiba 405,409,426 Zenith 403,404,417 TAPE Brand 26 Code Denon 810 Fisher 813 JVC 802,815 K
Using the Remote Control CD Brand Code Denon 309 JVC 303 Kenwood 310,321,311 Marantz 323,312,324 Onkyo 320,308,307 Optimus 300 Philips 312,322 Pioneer 300 RCA 302,319,313 Sanyo 313 Sony 301,316,317,318 TEAC 305,306,327,324,325 Technics 304,326 Yamaha 315,314,328 TV Brand Code GE 601,608,610,611,617,602,628,618 Goldstar 610,623,621,602 Grandiente 635 Hitachi 606,610,624,625,618 JVC 613,623 Magnavox 607,610,603,612,629 Mitsubishi 609,610,602,621 Panasonic 608,622
Using the Remote Control CATV Brand Code Jerrold 711,701,702,712,704,713,703,714,716,715 Pioneer 700 S.A. 705,706,708,709 Zenith 707,717,710 MD Brand Code Denon 904 Kenwood 903 Pioneer 900 Sharp 902 Sony 901 2. While holding down PRESET, press the button for the the device you want to set. The PRESET RECALL indicator lights. The labels on the CONTROL MODE buttons are for your convenience only. You can program any device to any button.
Using the Remote Control Receiver/Amplifier Operation Before operation, press STATION BAND TUNING TUNER TUNER to select receiver/amplifier operation. Tunes to the next higher or lower memory location. Selects the AM or FM tuner band. Tunes to radio stations. MPX Selects the FM reception mode. CLASS Selects the memory class. DIRECT ACCESS Allows direct input of the station frequency. Number Buttons Select the corresponding memory station. During Direct Access, enter the station’s frequency.
Using the Remote Control CD Player/MD Recorder Operation Note: You must have connected the CD player to both of your receiver’s CONTROL OUT and audio jacks or programmed the code for your CD player/MD recorder into the remote control for these functions to work. CONTROL MODE CD Before operation, press CD (or the one connected to your CD player/MD recorder) to select CD player operation. CD Player Buttons Turns the CD player/MD recorder on and off.
Using the Remote Control DVD Player Operation Note: You must have programmed the code for your DVD player into the remote control for these functions to work. DVD Before operation, press DVD (or the one connected to your DVD player) to select DVD player operation. Turns on/off the DVD player. POWER Press to switch the audio input. On some DVD players, pressing this button switches the angle.
Using the Remote Control LD Player Operation Note: You must have programmed the code for your LD player into the remote control for these functions to work. CONTROL MODE Before operation, press LD (or the one connected to your LD player) to select LD player operation. LD Player Buttons LD Turns the LD player on and off. POWER / | | / Returns to the beginning of the current chapter/track or advances to the next chapter/track. Rapidly advances backward/forward within a chapter/track.
Using the Remote Control TV and CATV Operation Note: You must have programmed the code for your TV or CATV into the remote control for these functions to work. Before operation, press TV (or the one connected to your TV or CATV) to select TV/CATV operation. TV POWER CHANNEL TV FUNC (TV only) TV VOL Number Buttons Turns on/off the TV or CATV. Press to change the tuner channel. Selects the TV’s input mode, antenna or line input. Adjusts the volume. Selects channel directly.
Troubleshooting If the receiver is not working as it should, the following suggestions might help. If you follow the suggestions in this chart and the receiver still does not work properly, contact your local RadioShack store for assistance. Problem Power does not turn on. Cause Suggestion Power cord is disconnected. Plug in the power cord. Protection circuit is activated. Unplug the power cord, then plug it in again. The receiver does not respond to button presses.
Care and Maintenance Your Optimus STAV-3780 Audio/Video Receiver is an example of superior design and craftsmanship. The following suggestions will help you care for the receiver so you can enjoy it for years. Keep the receiver dry. If it gets wet, wipe it dry immediately. Liquids can contain minerals that can corrode the electronic circuits. Handle the receiver gently and carefully. Dropping it can damage its circuit boards and can cause the receiver to work improperly.
The FCC Wants You to Know Your receiver might cause radio or TV interference even when it is operating properly. To determine whether your receiver is causing the interference, turn off your receiver. If the interference goes away, your receiver is causing it.
Specifications Amplifier Front Channel Average Power Output . . . . . . . . . . . . . . . . . . . . . . . . . . . . . . 100 Watts per Channel into 8 Ohms From 20 to 20,000 Hz, With No More than 0.09% Total Harmonic Distortion Measured Pursuant to the Federal Trade Commission’s Trade Regulation Rule on Amplifier Output Power Claims Front Channel Surround Power Output . . . . . . . . . . . . . . . . 100 Watts per Channel (1 kHz, 0.9% THD, 8 Ohms) Center Channel Surround Power Output . . . . . . . . . . . . .
Specifications FM Tuner Frequency Range . . . . . . . . . . . . . . . . . . . . . . . . . . . . . . . . . . . . . . . . . . . . . . . . . . . . . . . . . . . . 87.5 to 108 MHz Usable Sensitivity . . . . . . . . . . . . . . . . . . . . . . . . . . . . . . . . . . . . . . . . . . . Mono: 13.2 dBf, IHF (1.3 µV/75 Ohms) 50 dB Quieting Sensitivity Mono . . . . . . . . . . . . . . . . . . . . . . . . . . . . . . . . . . . . . . . . . . . . . . . . . . . . . . . . . . . . . . . . . . . 20.2 dBf Stereo . . . . . .
Index to Features by Control Name This table lists the control and indicator names found on the front of your receiver, along with the page number where the control or indicator is discussed. To find a description for the buttons on the remote control, see “Using the Remote Control” on Page 25.
Limited Two-Year Warranty This product is warranted by RadioShack against manufacturing defects in material and workmanship under normal use for two (2) years from the date of purchase from RadioShack companyowned stores and authorized RadioShack franchisees and dealers.