6-547.fm Page 1 Tuesday, July 20, 1999 4:45 PM Cat. No. 16-547/630 OWNER’S MANUAL Please read before using this equipment.
16-547.fm Page 2 Tuesday, July 20, 1999 4:45 PM IMPORTANT SAFETY INSTRUCTIONS 1. Read instructions — All the safety and operating instructions should be read before the appliance is operated. 2. Retain Instructions — The safety and operating instructions should be retained for future reference. 3. Heed Warnings — All warnings on the appliance and in the operating instructions should be adhered to. 4. Follow Instructions — All operating and use instructions should be followed. 5.
16-547.fm Page 3 Tuesday, July 20, 1999 4:45 PM 14. Lightning — For added protection for this VCR receiver during a lightning storm, or when it is left unattended and unused for long periods of time, unplug it from the wall outlet and disconnect the antenna or cable system. This will prevent damage to the VCR due to lightning and power-line surges. 15.
16-547.fm Page 4 Tuesday, July 20, 1999 4:45 PM FEATURES Your Optimus Model 110 4-Head VHS HQ VCR/Model 60 4-Head VHS HQ Hi-Fi Stereo VCR offers some of the most advanced features available in home video cassette recorders. Your VCR’s PLL (phase-locked loop) tuning ensures extremely accurate tuning of up to 68 VHF and UHF channels and up to 125 cable channels. The VCR’s full-function universal remote control and on-screen programming make the VCR easy to use.
16-547.fm Page 5 Tuesday, July 20, 1999 4:45 PM OTHER FEATURES Multichannel Television Sound (MTS) (Model 60 only) — decodes stereo broadcasts for listening or recording. This VCR can also receive and record special audio programs (SAP) that accompany some MTS broadcasts. We recommend you record the VCR’s model and serial number here. This information is on the VCR’s back panel.
16-547.fm Page 6 Tuesday, July 20, 1999 4:45 PM CONTENTS Before You Begin ......................................................................................................................... Accessories ............................................................................................................................. Moisture Condensation ............................................................................................................ Using This Manual ............................
16-547.fm Page 7 Tuesday, July 20, 1999 4:45 PM BEFORE YOU BEGIN ACCESSORIES Recording — describes the different methods for recording. Be sure to remove these items before you store the packing material. Additional Information — includes a troubleshooting section, care and maintenance procedures, and the VCR’s specifications. • Remote Control • 75-ohm Coaxial Cable Depending upon your audio/video system setup, you might need additional cables or adapters.
16-547.fm Page 8 Tuesday, July 20, 1999 4:45 PM INSTALLATION Caution: Some state laws restrict direct connections to cable wires (connections that do not go through a cable box). Check the laws in your area before you make connections. COMMON CONNECTIONS Refer to the illustrations on Pages 8 and 9 for these connections. Note: Some connections shown in this section might require additional supplies, available from your local RadioShack store.
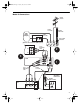
16-547.fm Page 9 Tuesday, July 20, 1999 4:45 PM Model 60 Connections Outside Antenna 75-Ohm Coax Cable Cable (CATV) Company 75-Ohm Coax Cable Cable Box IN 300-Ohm Lead-In Wire 300-to-75 Ohm Transformer OUT or (Optional Camcorder/2nd VCR/DSS System) or or Stereo Audio/Video Cable L Audio 2 R Video 3 VCR R IN FROM ANT. AUDIO 1 L OUT VIDEO 1 Stereo Audio/Video Cable 1 VHF/UHF IN OUT TO TV 3 CH.
16-547.fm Page 10 Tuesday, July 20, 1999 4:45 PM Model 110 Connections Outside Antenna 75-Ohm Coax Cable Cable (CATV) Company 75-Ohm Coax Cable Cable Box IN 300-to-75 Ohm Transformer OUT or (Optional Camcorder/2nd VCR/DSS System) L 300-Ohm Lead-In Wire or or Audio/Video Cable Audio 2 R Video 3 VCR IN FROM ANT. AUDIO 1 IN OUT VIDEO 1 IN OUT 1 VHF/UHF OUT TO TV 3 CH.
16-547.fm Page 11 Tuesday, July 20, 1999 4:45 PM HOME THEATER CONNECTIONS (MODEL 60 ONLY) Refer to this illustration to connect your VCR to a home theater system.
16-547.fm Page 12 Tuesday, July 20, 1999 4:45 PM CAMCORDER CONNECTIONS (MODEL 60 ONLY) Your Model 60 VCR has jacks on its front panel that let you easily connect a camcorder or other video source. You need a stereo A/V cable for this connection. RECORD/TIME PLAY REWIND FAST-F AV 2 VIDEO IN L – AUDIO IN – R TV/VCR POWER STOP EJECT CHANNEL MEMORY SENTINEL 1. Insert the plugs at one end of the cable into the AV 2 AUDIO and VIDEO IN jacks on the Model 60’s front panel. 2.
16-547.fm Page 13 Tuesday, July 20, 1999 4:45 PM VCR SETUP SETTING THE 3 CH. 4 SWITCH If you connected the VCR’s OUT TO TV terminal to a TV or another VCR, set the VCR’s 3 CH. 4 switch (on the back of the VCR) to 3 or 4, whichever is not an active channel in your area. When VCR appears on the display, the VCR sends the signal from the video source connected to its IN FROM ANTENNA or AUDIO 1/ VIDEO 1 IN (or AV2 for the Model 60) terminals to the TV on the channel you selected. 1.
16-547.fm Page 14 Tuesday, July 20, 1999 4:45 PM INITIAL SET UP Notes: Setting the On-Screen Language/ Channels/Clock When you first plug in the VCR and turn it on, or when you turn it on after a power interruption longer than 24 hours, the VCR automatically prompts you to select a language, and then automatically scans for active channels in your area and stores them. If a station in your area transmits EDS signals, the VCR automatically sets the clock.
16-547.fm Page 15 Tuesday, July 20, 1999 4:45 PM If no station broadcasts the EDS signal (or if you do not know which channel sends an EDS signal), press SEL t to select MANUAL SET and skip to Step 2 under “Manually Setting the Clock” on Page 16. Note: Your VCR has a memory sentinel feature that protects clock settings for up to 3 minutes if a power failure occurs or if the power cord becomes unplugged. After about 3 minutes without power, the VCR loses the clock setting.
-547.fm Page 16 Tuesday, July 20, 1999 4:45 PM Manually Setting the Clock Note: The clock must be accurately set for proper automatic timer and quick timer recording. We suggest you refer to a radio station or time/temperature service for the correct time. If the SET CLOCK menu already appears on the screen, skip to Step 3. 1. Press MENU. Use SEL s/t to highlight SET CLOCK, then press SET. 2. Use SEL s/t to highlight MANUAL SET, then press SET.
16-547.fm Page 17 Tuesday, July 20, 1999 4:45 PM Adding/Erasing Channels We recommend you check the channels the VCR automatically stored. It might have stored a distant, weak channel that you normally would not watch, or it might have missed a channel you want to store. CHANNEL 08 DELE TED or ADDED If the tuner stores a channel that you do not want, tune to that channel and press ADD/DLT. CHANNEL nn DELETED appears on the TV, and the unwanted channel is erased from the tuner’s memory.
16-547.fm Page 18 Tuesday, July 20, 1999 4:45 PM Changing the On-Screen Language Resetting the VCR’s Memory You can change the on-screen programming language at any time. If at any time you want to erase all settings, including the time, local channels, and programmed events, eject any loaded tape then press and hold PLAY and REW on the VCR for at least 5 seconds. The VCR clears all settings and turns off. 1. Press MENU to display the main menu. 2.
16-547.fm Page 19 Tuesday, July 20, 1999 4:45 PM SETTING THE REMOTE CONTROL’S CODES In addition to controlling your VCR, the remote control can operate the basic functions of your TV or cable box. To use the remote control with your TV or cable box, follow these steps to program the remote control with the correct manufacturer’s code number for the TV or cable box. Note: Some brands have more than one code listed in the charts. If a code does not work with your TV or cable box, try another code.
16-547.fm Page 20 Tuesday, July 20, 1999 4:45 PM CABLE BOX BRAND CODE 2. While pressing and holding down TV POWER, enter the code number for your TV using the number buttons. Regal 14, 41 Regency 28 While pressing and holding down CATV POWER, enter the code number for your Rembrandt 29, 32, 39, 42, 44, 88 cable box using the numbered buttons.
16-547.fm Page 21 Tuesday, July 20, 1999 4:45 PM OPERATION WATCHING TV Using the TV’s Tuner your cable box. You might need to experiment to determine the proper cable channel designations for your cable system. For more information, contact your local cable company. To watch a broadcast using the TV’s tuner, turn off the VCR, or press TV/VCR until VCR does not appear on the VCR’s display. • Two of the cable channels are designated for audio only.
16-547.fm Page 22 Tuesday, July 20, 1999 4:45 PM VIEWING A VIDEO TAPE NO CASSETTE Loading a Video Tape PLEASE INSERT A CASSETTE 1. Turn on the TV and set it to the same channel as the VCR’s 3 CH. 4 switch. Note: If you are using a TV/monitor that is connected to the VCR’s AUDIO/VIDEO OUT jacks, set the TV/monitor to the video mode. 2. Hold the cassette with the main label facing up and the spine facing out from the VCR.
16-547.fm Page 23 Tuesday, July 20, 1999 4:45 PM SPECIAL FUNCTIONS SPECIAL DISPLAYS TAPE MOTION CONTROLS Blue Screen Display Fast-Forward/Rewind and Visual Search The blue screen display appears when you select the VCR mode, play unrecorded portions of a tape, or when you tune to a weak TV station. The blue screen also appears if you set the VCR to the audio/video mode when the AUDIO/VIDEO IN jacks are not receiving any signals. Note: The VCR does not record the blue screen.
16-547.fm Page 24 Tuesday, July 20, 1999 4:45 PM Notes: • If you leave the VCR in the freeze-frame mode for 3 minutes, the VCR stops playing the tape. • To reduce or eliminate jitter in the freezeframe picture, press and hold CH s/t until the picture is clear. Frame Advance During freeze-frame, you can advance the picture one frame at a time by repeatedly pressing SLOW . This feature works best with video cassettes recorded at the SP or EP speed. Press PAUSE to return to normal playback.
16-547.fm Page 25 Tuesday, July 20, 1999 4:45 PM TRACKING Notes: • If you rewind the tape past the zero point, the TV displays the time with a minus (–) sign. • The counter does not work with blank tapes or blank portions of partially recorded tapes. REPEAT PLAY This function lets you automatically repeat playback of a tape from the beginning to the end (or to a blank part), instead of having the tape automatically rewind and eject. 1. While the tape is stopped, press MENU to display the main menu. 2.
16-547.fm Page 26 Tuesday, July 20, 1999 4:45 PM RECORDING There are three ways to record using your VCR — immediate recording, automatic timer recording, and dubbing. Your VCR automatically records the audio signal and adjusts the sound level while it records. The following chart shows the maximum recording times for different-length tapes at the recording speeds. TAPE LENGTH SP LP EP The video cassette you use for recording must have the erase-protection tab in place.
16-547.fm Page 27 Tuesday, July 20, 1999 4:45 PM SELECTING THE SIGNAL TO RECORD Follow these steps to select the signal to record — from the IN FROM ANT jack or an audio/video source. 1. Press MENU. The TV displays the main menu. 2. Press SEL s/t to highlight SET UP VCR, then press SET. The TV displays the SET UP VCR menu. SEL s/t to highlight INPUT SELECT, then press SET so the TV displays the desired indicator: TUNER to 3.
16-547.fm Page 28 Tuesday, July 20, 1999 4:45 PM IMMEDIATE RECORDING Notes: Recording a Program as You Watch It • To ensure that you record all the desired program, set the recording length longer than the program length. Follow these step to record a program as you watch it. If you know how long the program is, you can set how long the VCR records.
16-547.fm Page 29 Tuesday, July 20, 1999 4:45 PM AUTOMATIC TIMER RECORDING The VCR’s automatic timer lets you program it to select an input source, start recording from that source at a time you set, then stop recording at a time you set. You can set up to eight program timers to record any combination of weekly, daily, or one-time events.
16-547.fm Page 30 Tuesday, July 20, 1999 4:45 PM If you have not yet entered any programs, the TV displays the program entry menu when you press PROG . 8. Use SEL s/t to select the date when you want to record. To record a program at the same time on the same day every week, press either button until the TV displays WEEKLY and the desired day of the week.
16-547.fm Page 31 Tuesday, July 20, 1999 4:45 PM Monitoring an Automatic Timer Recording Clearing a Program Timer If the timer recording has not yet started: 1. Turn on the TV and set it to the same channel as the VCR’s 3 CH. 4 switch. 1. Follow Steps 1–3 under “Checking/Changing Program Timers.” Note: If you are using a TV/monitor that is connected to the VCR’s AUDIO/VIDEO OUT jacks, set the TV/monitor to the video mode. 2. Highlight the program you want to clear, then press CLEAR . 2.
16-547.fm Page 32 Tuesday, July 20, 1999 4:45 PM DUBBING The process of recording from one audio/video device to another is called dubbing. An audio/video device where a signal originates is called the dubbing source. You can use another VCR, camcorder, satellite receiver, or other device with A/V outputs as the dubbing source, connect the dubbing source and the VCR, then use your VCR to record the signal from the dubbing source. Or, you can use this VCR as the dubbing source for another VCR.
16-547.fm Page 33 Tuesday, July 20, 1999 4:45 PM ADDITIONAL INFORMATION TROUBLESHOOTING If you follow the instructions in this manual and still have trouble operating your VCR, refer to the following troubleshooting chart. PROBLEM No power. Cannot make a timer recording. Cannot record. POSSIBLE SOLUTION The power cord is not connected. Plug the power cord into an AC outlet. • The program timer is not set or is set incorrectly. Check the program timer. • The power is on. Turn off the power.
16-547.fm Page 34 Tuesday, July 20, 1999 4:45 PM CARE AND MAINTENANCE Your Optimus Model 110 4-Head VHS HQ VCR/Model 60 4-Head VHS HQ Stereo Hi-Fi VCR is an example of superior design and craftsmanship. The following suggestions will help you care for the VCR so you can enjoy it for years. Keep the VCR dry. If it gets wet, wipe it dry immediately. Liquids might contain minerals that can corrode the electronic circuits. Use and store the VCR only in normal temperature environments.
16-547.fm Page 35 Tuesday, July 20, 1999 4:45 PM Servicing Your VCR Storing Your Video Cassettes There are no user-serviceable parts inside your VCR. If you encounter a problem that you cannot correct using this manual and its troubleshooting guide, take the VCR to your local RadioShack store for assistance. Unless you are making an automatic timer recording, eject and store the cassette before you turn off the VCR. This helps protect the cassette and the VCR’s internal mechanisms.
16-547.fm Page 36 Tuesday, July 20, 1999 4:45 PM SPECIFICATIONS Television System ............................................................................... NTSC Standard Color Signal Recording System................................................................................. Four-Head Double Azimuth Tape Width ............................................................................................................................. 1/2 Inch Tape Speed: SP.......................................
16-547.fm Page 37 Tuesday, July 20, 1999 4:45 PM Frequency Response: Regular Audio SP.................................................................................................................. 80 Hz–10 k Hz EP.................................................................................................................... 80 Hz–5 kHz Hi-Fi Audio (Model 60 only) In All Modes.............................................................. 20 Hz–20kHz Power Requirement .................................
16-547.
16-547.
16-547.fm Page 40 Tuesday, July 20, 1999 4:45 PM RadioShack Limited Warranty This product is warranted against defects for 90 days from date of purchase from RadioShack companyowned stores and authorized RadioShack franchisees and dealers. Within this period, we will repair it without charge for parts and labor. Simply bring your RadioShack sales slip as proof of purchase date to any RadioShack store. Warranty does not cover transportation costs.