iCON® 452 User Guide The intelligent HSUPA USB modem Fast, future-proof and truly worldwide
iCON® 452 User Guide NOTICE The information in this User Guide is subject to change without notice. The contents herein are provided "as is". Except as required by applicable law, no warranties of any kind, either express or implied, including, but not limited to, the implied warranties of merchantability and fitness for a particular purpose, are made in relation to the accuracy, reliability or contents of this document.
iCON® 452 User Guide CONTENTS 1 WELCOME 4 2 FEATURES 5 3 SYSTEM REQUIREMENTS 5 4 iCON® 452 PACKAGE CONTENT 5 5 INSTALLING AND SETTING UP YOUR 6 USING YOUR iCON® 452 8 7 LED STATUS INDICATOR 10 8 SAFE REMOVAL 10 9 iCON® 452 GLOBETROTTER® CONNECT 3 SOFTWARE Product Features Short Description And Intended Use 9.2.1 Basic Use 9.3 Installing And Setting Up Globetrotter® Connect 3 9.3.1 Installation 9.3.2 Installation Process 9.3.3 Running GlobeTrotter® Connect 3 9.3.
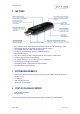
iCON® 452 User Guide 1 WELCOME Zero-CD® Retractable USB connector Quad-band configuration Micro-SD card slot High speed wireless internet connectivity Download 7.2/Upload 2.0 (5.76 Ready) The new iCON® 452 from Option® offers the latest available technology in the world market. Perfect for tech-savvy consumers and mobile professionals alike, this little device offers high upload (5.76Mbps) and download (7.2Mbps) speeds.
iCON® 452 User Guide 2 FEATURES • • • • • • • • • • • Easy connection to any PC and the internet: insert the device, install the Zero-CD® software and go on-line Quad-band high-speed 3G and quad-band 2G support for worldwide operation Up to 5.76Mbps upload and 7.
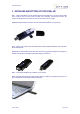
iCON® 452 User Guide 5 INSTALLING AND SETTING UP YOUR iCON® 452 Step 1 – Remove the SIM-slot cover and insert the SIM card into the iCON® 452. If you want to use the iCON® 452 as a memory stick, you need to insert a micro-SD card (not included). The micro-SD card slot is also located under the SIM-slot cover. Slide in your micro-SD card and close the cover again. IMPORTANT! Only insert/remove the SIM or micro-SD card while the iCON® 452 is not powered up. Step 2 – Start up your computer.
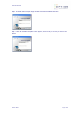
iCON® 452 User Guide Step 4 - An installer window will open. Simply click “Next” and follow the installation instructions. Step 5 - When the “Installation Completed” screen appears, click “Exit” and you are ready to connect to the internet.
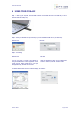
iCON® 452 User Guide 6 USING YOUR iCON® 452 Step 1 – Start up your computer. Insert the USB connector of the iCON® 452 into a free USB slot (or use an extension cable for desktop use). Step 2 – Enter your SIM PIN code (not necessary if you have disabled the PIN code on your SIM card). Windows® OS Mac OS® Step 3 – Connecting Windows® OS Mac OS® You are now ready to connect to the internet by using the GlobeTrotter® Connect application in the system tool tray.
iCON® 452 User Guide Disconnecting can be done in the same way. Windows® OS Mac OS® Right click on the GlobeTrotter® Connect application icon in the system tool tray and click “Disconnect”. Alternatively click on the “Disconnect” button in the GlobeTrotter® Connect window. Open the “Application” folder and run “GlobeTrotter Connect“. In this tool, click the “Disconnect” button.
iCON® 452 User Guide 7 LED STATUS INDICATOR The iCON® 452 is equipped with a multicolor LED. The different operating statuses are indicated by the frequency and color of blinking. The colors indicate different network generations (data speed capabilities). The blinking scheme indicates the state of connection to the network.
iCON® 452 User Guide 9 GLOBETROTTER® CONNECT 3 SOFTWARE 9.1 Product Features • • • Easy installation Simple intuitive user interface Compatible with most modern desktop and laptop PCs equipped with Microsoft Windows® 2000, Windows® XP or Windows Vista® 9.2 Short Description And Intended Use The GlobeTrotter® Connect 3 application is a small, easy to use tool to manage your connection to the internet over 2G and 3G mobile networks. It is designed for use with all of Option®’s data products. 9.2.
iCON® 452 User Guide 9.3.2 Installation Process The installation process is straightforward. You will see various screens appear, indicating the installation progress of your iCON® 452. Figure 2: Found New Hardware Balloon Figure 3: GlobeTrotter® Connect 3 Installation Wizard Click “Next” to continue the installation. After GlobeTrotter® Connect 3 is installed, the following screen will be shown. Click “Finish” to close the installation wizard.
iCON® 452 User Guide 9.3.4 Entering your PIN code If you have enabled the PIN code on your SIM card, you will automatically be asked to type it in. If enabled, you won’t be able to use your iCON® 452 until you have typed in the PIN code. This will happen every time you power up the device. Figure 6: Pin Code Dialog 9.3.5 Checking Status Once the PIN code is entered (or immediately if you have disabled the PIN code), the iCON® 452 will look for the network.
iCON® 452 User Guide 9.3.6 Exit GlobeTrotter® Connect 3 When you click or , this doesn’t kill the application. It just retreats to the Systray (see Figure 5: GlobeTrotter® Connect 3 icon). This behavior is equivalent to other Windows® applications such as MSN messenger. To terminate the application you must “Right Click” on the Title Bar and choose “Exit”. Figure 10: Exit GlobeTrotter® Connect 3 9.
iCON® 452 User Guide 9.4.2 Disconnecting To disconnect, click on the Systray icon to show the menu and select the “Disconnect” option. Figure 12: Disconnect 9.4.3 Changing the program options Although GlobeTrotter® Connect 3 is simple and straightforward, it has a number of items that need to be configured at least once (either preconfigured by the operator or manually by the user). To change the settings, launch the GlobeTrotter® Connect 3 main window.
iCON® 452 User Guide 9.4.3.1 APN The Access Point Name (APN) defines your route to the internet. Your mobile operator can supply the APN (some operators may also specify a user name and password if required). Most users will never have to change this setting. If you have entered the APN manually a button saying Automatic will appear next to the Save button. If you press this button the software will try to ‘guess’ the APN needed based on your SIM. 9.4.3.
iCON® 452 User Guide 9.5 Additional Features Via the “More” button additional features are available. Figure 15: Accessing additional functionality 9.5.1 Using the SMS Centre To launch the SMS Centre click the “More” button and select “SMS Centre”. On the left-hand side you will see the different folders: • Inbox • Sent • Unsent (contains draft SMSs) Figure 16: SMS Centre Click on any of these folders to see the messages it contains. To read a message, click on it in the Sender or Date column.
iCON® 452 User Guide To create a new message, press the “New” button. The New SMS Message window opens and you can start typing your message (maximum 160 characters). To send the message, fill in the recipient’s telephone number and click “Send”. If you prefer to send your message at a later time click the “Save” button which automatically stores your message in the Unsent folder for later use. Figure 17: New Message To delete a message, select it as explained above, and press the “Delete” button. 9.5.
iCON® 452 User Guide 10 TROUBLESHOOTING If you are having trouble getting a reliable connection, please check with your network provider for advice on network coverage in your area. Other characteristics such as network cell handover, dead coverage spots, geographic or structural obstructions, etc. may also affect the performance of the data transmission. Symptom / possible causes No LED burning. No SIM inserted. Insufficient signal strength.
iCON® 452 User Guide 11 DETAILED TECHNICAL SPECIFICATIONS Specifications 3G • Quad-band 850/1900/2100/AWS • HSDPA modes: • HSDPA 1.8: Categories 1-4, 11 and 12 • HSDPA 3.6: Categories 5 and 6 • HSDPA 7.2: Category 8 • HSUPA 2.0: Category 5 • HSUPA 5.
iCON® 452 User Guide Approvals and Certifications • All applicable regulatory approvals (i.e.
iCON® 452 User Guide 12 PRODUCT SUPPORT AND ADDITIONAL HELP GlobeTrotter® Connect 3 updates will be made available on the Option® support website. 12.1 Technical Support Questions and answers regarding GlobeTrotter® Connect 3 can be found on the Option® support website. 12.2 Help To access the Help file go to “Help” via the “More” button.
iCON® 452 User Guide APPENDIX A: LIMITED WARRANTY HARDWARE: Option® warrants its products to be free from defects in workmanship and materials, under normal use and service, for one year. If a product does not operate as warranted during the applicable warranty period, Option® shall, at its option and expense, repair the defective product or part, deliver to Customer an equivalent product or part to replace the defective item. All products replaced will become property of Option®.
iCON® 452 User Guide APPENDIX B: HEALTH, SAFETY AND CERTIFICATION INFO FCC-ID NCMOGI0452 Your iCON® 452 is like a mobile phone Your iCON® 452 uses the same technology as a mobile phone. It is important that you always obey all safety regulations related to mobile phone use. If you have any doubt about the safe operation of your iCON® 452 you should remove the iCON® 452 from the PC and seek advice from authorized personnel.
iCON® 452 User Guide 1.8 Interference from radio signals: Option® relies on advice from health authorities and relevant expert bodies about potentially undesirable reactions to radio emissions from the iCON® 452. 1.9 Immunity to interference: Electromagnetic interference is the disturbance of the normal operation of a device due to its response to radio signals from an external source. Occasionally, in some situations you may hear short sounds coming from audio equipment such as radio or multimedia PC.
iCON® 452 User Guide 2. Certification requirements 2.1 Federal communications commission notice This equipment has been tested and found to comply with the limits for a Class B digital device, pursuant to Part 15 of the FCC Rules. These limits are designed to provide reasonable protection against harmful interference in a residential installation.
iCON® 452 User Guide Version: v007ext Page: 27 of 28
iCON® 452 User Guide Option nv – Gaston Geenslaan 14 – 3001 Leuven Belgium – T +32 16 317 411 – F +32 16 207 164 www.option.