User Manual IREX Digital Reader® 800SG Version: DR800SG-US 1.
Table of Contents IREX® Digital Reader 800SG – Reading at Its Finest ............ 5 Getting Started...................................................................... 5 Charging ................................................................................ 8 Buttons and Switches.......................................................... 10 On-Screen Features............................................................. 13 Chapter 2 – Viewing and Managing Content ................... 17 The Home Screen ...
Browsing Shops ................................................................... 37 eBook Mall Menu ................................................................ 38 Making Purchases in a Bookstore ....................................... 38 Downloading ....................................................................... 39 Samples ............................................................................... 40 Chapter 6 – Settings........................................................
Device Reactivation............................................................. 50 Chapter 9 – Additional Information ................................ 51 Copyrights ........................................................................... 51 Terms of Use and Warranty Information ............................ 52 Product Specifications......................................................... 52 Help .....................................................................................
IREX® Digital Reader 800SG – Reading at Its Finest Welcome to the world of digital reading! At IREX, we take pride in offering you the best possible reading and writing experience from a digital reader. Being the leader in electronic paper display technologies, we have taken yet another monumental step with this generation of digital readers. We hope you will join us in our continued effort to conserve natural resources and protect the environment by reducing the amount of paper that is printed each day.
time believing you are reading from a screen and not a real book. Your eyes will thank you! A World of Books at Your Fingertips – Thousands of titles from the most popular authors are all waiting for you in our eBook Mall. You can explore their bookshelves from the comfort of your favorite chair. Your purchases are downloaded directly to your device in no time at all. Powerful Reading Tools –Did you read something you need to remember? No worries—easily bookmark the page.
this ID, you will not be able to download or open any items protected by Digital Rights Management (DRM).
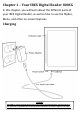
Chapter 1 – Your IREX Digital Reader 800SG In this chapter, you will learn about the different parts of your IREX Digital Reader, as well as how to use the flipbar, Menu, and other on-screen features. Charging 1. WARNING CAUTION To comply with FCC RF exposure requirements the Digital Reader must be secured to the cover that is supplied in the box during normal operations as shown in figure 1.0 on page 3.
Charge your device by using the included USB cable and plugging it into a computer or an electrical outlet using a wall adapter (accessory). The light above the flipbar will turn orange indicating that the battery is charging. 2.Continue charging until the indicator light turns green. The device can be used while charging. When the device has a completely empty battery, it cannot turn itself on. Charge the battery.
Buttons and Switches WARNING CAUTION To comply with FCC RF exposure requirements the Digital Reader must be secured to the cover that is supplied in the box during normal operations as shown in figure 1.0 on page 3.
Power Switch – Turns the device on and off. To turn your device on, slide the switch to the left and release. The Home screen will appear when the device is ready for use. To turn the device off, slide the switch to the left and hold for two seconds. The device will turn itself off. If your device does not turn on or has frozen, reset it by sliding the power switch to the left and holding it for three seconds. Key Lock – Locks the buttons on the device.
Flipbar – Moves the on-screen cursor up, down, and side-toside. Opens items, pushes buttons, and confirms Menu choices. Turns pages in reading material. Menu – Contains tools for changing views, sorting, deleting files, or others. Menu options change depending on your location within the device. Stylus – Chooses items on the screen. Clicks buttons and hyperlinks in the eBook Mall. Indicator Light – Indicates what your device is currently doing.
disconnected the battery cable during the process of exchanging cards, be sure to reconnect the cable and reset the time and date on your device. SIM Card – Connects the device to networks. Not all devices require a SIM card. To eject the card, gently push the card and release. You can now pull it free from the device. To insert a new card, place it into the device and gently push it until it clicks into place.
Open the Menu by pressing the Menu button one time. Use the flipbar to move to an action, and press the flipbar once to choose it. Press the Menu button to close the Menu. The Menu can also be used with the stylus that came with your device. To open the Menu, tap on the Menu icon or text in the lower left-hand corner of your screen. Choose an action by tapping once with the stylus. To close the Menu, tap on the Menu icon or text in the lower left-hand corner of your screen.
Numbers, Special Characters, and Symbols – These are found by tapping on on the keyboard. To switch back . to regular characters, tap on Status Indicators Status indicators are found in the lower right corner of your screen and give you an overview of the status of your device. Battery Indicator – – Tells you how much battery power is available. When it is connected to a power source, the battery indicator will display a charging symbol so you know it is receiving power.
indicator appears full. Tap on the error icon to learn about an error that occurred during download. Screen Rotation You can switch from portrait to landscape mode anytime by choosing Rotate from the Menu.
Chapter 2 – Viewing and Managing Content This chapter details the ins and outs of finding and managing the reading materials on your device. The Home Screen The Home screen provides entry points to all the different categories and sections on your device. The first icons (Books, News, and Images) are categories that show a list of all books, periodicals, and images you own. The Personal Documents icon opens the Personal Documents folder on the SD card. The Help icon opens the Help folder on the SD card.
Screen Features Header The header lists the category you are currently browsing (such as Books or News). Following this description is supplemental information. In the example above, Books (category) are ordered by title (supplemental information). Cover Thumbnail or Icon Each item you have saved on your device will be represented by an icon. If you have never opened the item before, a default icon will be used.
opened will be represented by an image of the cover or first page. Title and Author The item’s name or title is listed first, with the author listed underneath the title. Unread Title An item that has never been opened has a default icon. Search Tap on this icon to search for an item on the device. Index When your content has been sorted by title or by author, an index bar will appear on the far right side of the screen. Tap on a letter with the stylus to see a list of all books that begin with that letter.
the screen. You can sort your items, change the appearance of the items, and delete items you no longer wish to keep. Sorting Your Content By default, the device will sort your items by name. You can easily change this by following the instructions below. How to Sort 1.Open the Menu by using the Menu button or by tapping on the Menu icon. 2.Choose the way you want to sort the items: Sort by Title, Sort by Author, Sort by Date Added, or Sort by Recently Read. The Menu will close and the screen will refresh.
Deleting Content from Your Device To permanently remove items from your device: 1.Open the Menu by using the Menu button or by tapping on the Menu icon. 2.Choose Delete. The Menu will close. Items that can be deleted are indicated with a delete icon. 3.Tap the delete icon or press the flipbar on each item you want to delete. Restore the item by tapping or pressing the flipbar a second time. 4.Choose Done Deleting, located at the top of the page. 5.Confirm that you want to delete the item(s).
Chapter 3 – Reading In this chapter, you will find information about the features you will discover while reading your favorite book, magazine, or newspaper. Content Categories You can organize and group your reading material into five different categories: Books, News, Images, Help, and Personal Documents.
How to Change the Font Size 1.Open the Menu and choose Adjust Font Size. 2.Choose Original Layout, Small, Medium, Large, or Extra Large from the secondary Menu. The Menu will close and the font will adjust in size. Page Numbering Increasing the size of the font on a page means that the total length of the text increases. The device adds more pages to hold overflow text. The page numbering remains the same, regardless of the size of the font.
Navigating Pages and Views Flipping Pages Flip pages in two different ways: 1.Use the flipbar. To move forward one page, use your thumb to nudge the flipbar to the right one time. To move back a page, nudge the flipbar one time to the left. Skip 5 pages forward or backward by flipping and holding the flipbar for half of a second. –Or– 1.Use the on-screen arrows. Tap the arrows in the page indicator at the bottom of the screen.
Bookmarks are collected and organized automatically. The size of this list can vary depending on how actively you work with your items. Images cannot be bookmarked.
Using the Table of Contents to Navigate 1.Open the Menu and choose View Table of Contents. The Table of Contents will open to display all the main and sub-headings. 2.Choose the chapter you would like to view. The Table of Contents will close and the selected chapter will appear. Using Bookmarks to Navigate 1.Open the Menu and choose View Bookmarks. The view will open to display a list of all the bookmarks you have created. 2.Choose the bookmarked page you would like to see.
How to Find a Definition 1.Open the Menu and choose Define Word. A pop-up will open with instructions; you can choose not to see the instructions again. 2.Select the word you wish to have defined by tapping once with the stylus. The device will provide a list of resources that you can use to find a word’s definition. 3.Choose the resource you wish to use. 4.Choose Continue Reading from the top of the screen to return to your text.
Creating a Bookmark 1.Tap the upper right corner of the page with the stylus. –Or– 1.Open the Menu and choose Add Bookmark. Deleting a Bookmark 1.Tap the bookmark in the upper right corner of the page. –Or– 1.Open the Menu and choose Delete Bookmark. Viewing Your Annotations If this is your first time working with the Bookmarks view, you may find it helpful to read the Navigating Pages and Views section of this chapter to learn more about this view. Viewing Your Bookmarks 1.
Chapter 4 – Searching This chapter will explain the different ways you can search for something to read, as well as how you can search within the text of a book, newspaper, or document. Searching for Reading Material on the Device You can search the SD card for items you have downloaded or saved. How to Search 1.Choose Search from the Home screen. 2.Type the name or author of the item you are looking for using the on-screen keyboard and stylus. 3.Tap the Find button; the device will begin searching.
Search Results for Reading Material Once the search is complete, the results are displayed in a new screen. The closest matches to your search will appear at the top. This view is unique compared to the ones you see when managing or browsing your content. This view is a collection of virtual links to the items you own. You can open the items, but you are not able to delete them. Searching for a Word in a Text When reading a text, you can search for words throughout the entire text. To search for a word: 1.
Searching a Shop in the eBook Mall With thousands of titles and authors available in the eBook Mall, searching is a handy tool to help you find what you’re interested in. Individual shops inside the eBook Mall can be searched. Each store has its own design, so you may find that results pages may vary, as can the location of the search function.
Chapter 5 – eBook Mall The eBook Mall puts thousands of titles right in the palm of your hand. This chapter will explain how to register your device, access the eBook Mall, and make purchases. Registration and Activation If you haven’t yet registered your device, please follow the printed instructions that came with your device or follow the instructions below. Creating an Adobe® ID and registering it on your device is critical.
Create an Adobe ID on the Device If you have an existing Adobe ID, skip steps 3 and 4. 1.Choose Settings from the Home screen. 2.Choose Adobe ID Activation. 3.Tap on Create Adobe ID. 4.Follow the webpage instructions for creating your personal account. Close the webpage after you have successfully created an account. 5.Enter your Adobe ID and password. New users: use the same email address and password you entered when creating an account in step 4. 6.Tap on Activate. 7.
Creating an Adobe ID on a Computer 1.Go to https://www.adobe.com/cfusion/membership. 2.Click Create an Adobe Account. 3.Follow the instructions to successfully create an account. 4.Choose Settings from the Home screen on the device. 5.Choose Adobe ID Activation. 6.Fill in the email address and password you used in step 3. Tap on Activate. Your device will activate your Adobe ID, allowing you to download and open DRM-protected items you have purchased. 7.
Create a MYIREX Account on the Device 1.Choose Settings from the Home screen. 2.Choose MYIREX Account. 3.Tap on Create Account. 4.Follow the webpage instructions for creating your personal account. Close the webpage after you have successfully created the account. 5.Enter your MYIREX email address and password. New users: use the same email address and password you entered when creating an account in step 4. 6.Tap on Save. 7.Open the Menu and choose Back to Home to exit Settings.
Create an Account on a Computer 1.Go to https://myirex.irexnet.com/user.php/createuser. 2.Fill in your email address in the field and click Send. 3.Check your email. A message containing a password should arrive within a few minutes. If you do not receive a mail, check your junk/spam folder. 4.Click on the link in the email to activate your account. 5.Choose Settings from the Home screen. 6.Choose MYIREX Account. 7.Fill in the email address and password from step 2 and 3. Tap on Save. 8.
To Access the Mall 1.Choose eBook Mall from the Home screen. A list of all shops will appear. 2.Enter any shop by choosing it from the list. Browsing Shops Once you have chosen a shop/store, you will leave the eBook Mall and enter the store.
might have different layouts—just like shopping in a real mall. Use the stylus to tap on hyperlinks and buttons in a shop. Use the flipbar to move from link to link. Pressing the flipbar will click the link. eBook Mall Menu Pressing the Menu button while in the eBook Mall will open the device Menu. Here, you will find a short list of functions available within the eBook Mall. Making Purchases in a Bookstore When you have found an item to purchase, tap on a Buy button on the store page.
your payment details. The store might also require other information to complete the transaction. Once the shop has processed the transaction, the item will be digitally delivered to your device. You must have an Adobe ID to complete the download. To see the download status, tap on the download indicator at the bottom of the screen. Downloading Your content will be downloaded from the shop to the Downloads folder on the memory card.
How to Complete a Download 1.Locate the item on the device. The item will display the name/title and instructions for downloading the item. 2.Choose the item to begin the download. The device will connect and attempt to download the item to the device. Samples Some stores have samples you can download and read on your device. Look for a Sample link in the shop. You might be asked to provide some details before you can download the sample to the device. You must have an Adobe ID to complete the download.
Chapter 6 – Settings You can edit and adjust several settings on your device. This chapter will review the different options for each setting offered. Most setting pages are designed for use with the flipbar as well as a stylus. With the stylus, tap on the choice you wish to activate. To activate a setting with the flipbar, move the selection box around the setting and press to select it.
Some settings are a little more complicated and will require more interaction to make changes. When necessary, extra instructions have been provided. Airplane Mode Airplane mode controls the wireless activity on the device. When airplane mode is turned on (wireless disabled) the airplane mode indicator will appear at the bottom of your screen. Airplane mode can also be turned off by tapping once on the indicator at the bottom of the screen. The default mode is off.
MYIREX Account A MYIREX account is used to deliver newspaper and periodical subscriptions directly to your device. Please see Chapter 5 for detailed instructions for creating and saving a MYIREX account. You can create and save details for your MYIREX account. 3rd Party Accounts You may be required to create accounts or provide additional information in order to use 3rd party applications or to open files you have downloaded from their shops.
Set the Time or Date with Stylus 1.Tap on the up or down arrow to scroll through the numbers. 2.Return to Settings to save the changes. Set the Time or Date with Flipbar 1.Press the flipbar to move to the value you wish to change. 2.Scroll through the numbers using the flipbar and select the value. 3.Press the flipbar to move to the next value. 4.Return to Settings to save the changes.
To reset the settings, tap on the Reset Settings button. Deactivate Adobe ID This removes all Adobe ID information from the device. When the device has been deactivated, you cannot open any DRM-protected content. Formatting the SD Card Formatting the SD card means that all content stored on the card is permanently erased. You will always be asked to confirm formatting before the card is cleared. SD Card Status This section will describe information related to the SD card inserted in your device.
Chapter 7 – Connecting to a Computer The device requires no additional software or programs to transfer your personal documents. You will need only a computer with a USB port and the USB cable included with your device. The following operating systems recognize the device: Windows XP or higher Mac OS X Linux (most versions) Connecting Connecting to a computer allows you to transfer material from computer to the device.
To Connect to a Computer 1.Plug the small end of the USB cable into the USB port located on the bottom of the device. 2.Plug the larger end of the cable into the USB port on your computer. The device will connect and be recognized as a Mass Storage Device by the computer. Transferring Items to the Device Once you have successfully connected to a computer, you are ready to begin transferring content. 1.Locate the device where you normally find other USB devices on your computer. 2.
Managing Content You can organize and manage your content using your computer. If an item is deleted, moved, or renamed, all the information about that item will be lost. Bookmarks will be deleted, and the device will not remember the last read page or font size. Making a Backup Making a backup of your content is easy and recommended in the event your device is lost or sent in for repair.
Chapter 8 – Switching Devices If you have purchased a new device or received a replacement device, follow the instructions in the following two sections to transfer your purchased content to the new device. Recovering Reading Materials Always make a backup of your content before sending your device in for repair or formatting the SD card. To make a backup, follow the instructions in Chapter 7. To Recover Your Content 1.Connect your device to a computer. 2.
Device Reactivation To read DRM-protected content on your new device, you will need to reactivate your Adobe ID. To do this, you must use the same email address and password as you used to activate your previous device. 1.Choose Settings from the Home screen. 2.Choose Adobe ID Registration. 3.Fill in the same email address and password you used to activate your previous device. 4.Tap on Activate Account. 5.Open the Menu and choose Back to Home to exit Settings.
Chapter 9 – Additional Information Please read this information carefully as it contains instructions for the maintenance and the safe use of the IREX Digital Reader 800SG. Copyrights ©2009 IREX® Technologies BV. All rights reserved. Reproduction in whole or in parts is prohibited without the prior written consent of the copyright owner. Specifications are subject to change without notice. Trademarks are the property of IREX or their respective owners.
Open Source This product includes third-party open source software, which is subject to different and/or additional licenses, disclaimers and notices. For details on this software and its licenses, refer to the “Open Source Software Notice” document located in the Help section on this device. Terms of Use and Warranty Information For complete terms of use and warranty information, read the ‘Terms of Use and Warranty Information’ document found under Help on the device or visit the IREX website at www.
www.irexdigitalreader.