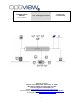
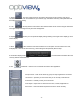
Remote Client Manual VR - Enterprise Series Professional PC-based DVR Version 2.28.06/4.37 Optiview CCTV Inc. 2052 St. John’s Bluff Road, Jacksonville, FL 32246 Main Office Tel# 866.301.7680 or 904.727.7680 Technical Support: Tel# 904.855.1121 Website: http://www.discount-security-cameras.net/ Technical Support website: http://www.optiviewpro.com/downloads.htm Tech Support Email: mailto:tech@videodvr.
Remote Client Software Features: • • • Cost Efficient – Uses IP infrastructure, so there is no need for costly dedicated cables between sites and servers and manage the data, videos, audio, and other files efficiently. Uses H.264 technology, which maximizes the use of the space on your HDD. Leverage - Centralize control of setup parameters, scheduled alerts and maintenance of those individual digital image devices like DVR, DVS, etc.
Table of Contents Page Chapter I - Initial Setup of the Remote Client Initial Setup of Remote Client ……………………………………………………….4 Basic Functions of the Main Remote Client User Interface………………………4 Initial Setup of the Remote Client Connection……………………………………..6 Modify existing server connection information……………………………………..7 Clustering Remote Client Connections……………………………………………..8 Record Set / Local Recording Plan………………………………………………....9 User Rights Setup…………………………………………………………………….
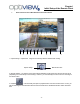
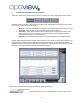
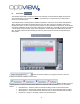
Chapter I Initial Setup of the Remote Client I. Basic Functions of the Main Remote Client User Interface 1 2 3 4 5 6 7 6 8 9 1. Capture Image – captures the image on the currently selected camera while viewing. Capture Image Manual ON / OFF 2. Manual ON/OFF – By default, remote client will automatically record images from the remote host server (depending how it was setup on record setup). However, you can manually turn ON or OFF the recording on this switch button.
- The main system setup for the remote client begins on this “Setting”. DVR server 4. Setting connection information such as IP addresses, port number, login information and many other parameters will be configured on this setting. 5. Lock - Security feature of the remote client software which can be control using the multi-level user rights setup to leverage security and user management. 6. Display screen display.
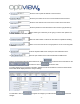
II. Initial Setup of the Remote Client Connection The System setup for the remote client connection is made up of 4 major configuration setup as shown: By default, when the “Setting” option is selected from the main remote client user interface, the Server IP menu comes out first, also as shown below. • • • • Server IP – This sets up all the basic settings to make a remote connection to the host server. Group Set – Remote sites can be cluster into group for easy connection.
2. Enter the local or public IP address of the host server. 3. Enter the port number to be use to communicate with the host server. 4. Enter the user name account to be used to connect to the host server. 5. Enter the password of the username account used for login (at item# 9). Select which type of machine you are going to connect into. Options are: 6. PC DVR, Embedded and Video Server. 7. Select the total number of camera the host device is capable of handling. 8. IP address.
III. Clustering Remote Client Connections, You can connect to multiple host servers (DVR or Video servers) and group them according to your own preference. There can be a maximum of 16 groups of connections. Each group will have a display screen partition option starting from single screen partition up to 25-partition screen display. You can setup which host site camera number will be displayed on each particular window screen and have the option to record the video feed while viewing the site. 1.
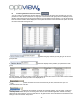
IV. Record Set, The operator will be able to choose how each of the remotely connected camera display will record on your local hard drive. You can set the time when you want them to record and how you want them to record or no recording at all. The example below is showing that the camera on window# 1 is set not to record at the local hard drive during Saturday and Sunday as indicated with the gray color bars.
3. Select and click the day and time at your own preference. The 0 thru 23 represents the time of the day and the far left column is for the days of the week. You will need first to click the recording option you prefer which is on item# 2, and then select and click on this schedule table for the day and time you prefer. When you are finished setting it up, click on the button to save the configurations. 4.
4. password. B. Enter the password for the new user account and re-enter it to confirm the Specific user access rights will be configured on this section such as: Check this user right if you want to give the user an access right to the remote 1. connection setup of the remote client software. Otherwise, uncheck this option.
To edit or delete existing user, select the user account from the list as shown here Chapter II and then click on the Delete user the buttonRemote Using Client. Application Click on the button to save changes. I. Connecting To Sites By default, this interface shows up when the remote client software is opened. To connect to the site or group of sites, select and click the group number button on the Group keypad.
Device Name of the host Server List of cameras connected to the Client PC III. PTZ Control, Control your PTZ camera and all its other associated relays remotely using this option. Controls the PTZ cameras internal relay (relay1) or the decoder relay (relay 1). It may also be used to turn on a light or control an access gate. Wiper (on/off): If you are sing the PTZ cameras with wiper control relay, this toggles the wiper on and off. Controls the zoom function of the PTZ camera. Zooms in or out the image.
1. To preset a position of the PTZ camera: a. Select a camera number that you want to configure. Press the “SP Dome” button. Press a preset number on this keypad shown below: b. Adjust the camera on your preferred settings on angle position, focus, iris and zoom using the PTZ control panel shown here: c. V. When finished setting that up, press “SET” button. Note that the pre-programmed keypad on the left as shown below will change to blue color number icon.
Allow you to adjust locally the color view settings such as Hue, Brightness, Contrast, etc. VI. Data Output Control (DO Control) Data Output Control – This feature is optional only. It is for the use of alarm devices or sensor relays tied up to the DVR system. It can be a door or gate opener, etc... It toggles the relays tied up to the Data Output ports to ON or OFF. VII.
Calendar Panel Camera Number Pad File List After the Date and camera number has been selected, you will be able to view previously recorded video files from the DVR server. Follow the same procedure as that of the DVR server in adjusting your choice of view to the specific hour and minutes of the day on the time slider. 3. There are three ways to save the video clip files on your local hard drive. a. File List b. Clip file button c. Capture Image Using the File List option: button.
After the file has been downloaded, this message box will tell you where the file is located on your local hard drive. Using the Search Clip File button, Video files are stored on the DVR’s hard drive on a file size depending on the Swap File size set at the DVR’s camera setup. After the date, camera number and the specific time of the day has been selected, click on this button to start saving the clip file on your local hard drive.
2. View Local and Remote System Log – this option allows you to view all the activities going on to a DVR system and the remote client PC. You must have the user right assigned to your user account to be able to view remote DVR system log. Remote DVR System Log Local Client System Log 3. (Remote) Device Setup – this actually allows you to make changes on the configuration settings of a remote DVR server system as long as you have the user rights assigned to your user account at the remote server.
Requirements to place a DVR on the Internet On a local network, you should be able to readily access your DVR system remotely via web browser or the remote client software by using the local IP address of the DVR system. Note: This information is provided as a courtesy only. Optiview Inc. does not provide technical support for routers, similar network devices and/or problems in configuring your local area network.