User’s Guide Optoma MirrorBoard Q300
Index Chapter 1 3. Overview Chapter 2 4. Setting-Up the MirrorBoard 5. Install the Software Drivers 6. Microsoft .NET Framework 2.0 “Windows XP only” 9. Wireless USB WinDrivers 10. USB Tablet Manager 11. Power Presenter RE 12. DisplayLink Graphics Adapter Software 13. Connect MirrorBoard to the computer for the first time 15. Calibrate the pen Chapter 3 16. Using MirrorBoard i. General Use ii. Charging iii. Display Setting 17. Using the Pen 18. Power Presenter RE 21. Touch Buttons 21.
Chapter 1 Overview Compatible Operating Systems: Windows XP, Windows Vista or Windows 7 Battery Life: 2.5 hours of continuous use Resolution: WSVGA (1024 x 600) The Optoma MirrorBoard gives you the flexibility to control digital content from anywhere in the room, whether you are projecting a lesson in a classroom or a presentation in a corporate conference room.
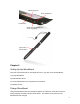
USB Charging port Power Adapter Port On/Off Button USB Port for Accessories (e.g., mouse, keyboard) Upper/Lower Rocker Switch Chapter 2 Setting-Up the MirrorBoard There are several tasks that you should perform prior to your first use of the MirrorBoard: 1) Charge MirrorBoard 2) Install Software Drivers 3) Connect MirrorBoard to the Computer for the First Time 4) Calibrate the Pen Charge MirrorBoard Charge the MirrorBoard with the included AC adapter for at least four hours prior to first use.
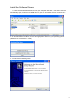
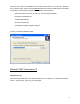
Install the Software Drivers 1. Insert the included MirrorBoard CD into your computer disk drive. If the menu does not automatically open, locate the CD-ROM drive on your PC and double click on “Autorun.exe.” 2. On the MirrorBoard CD Menu, choose the appropriate drivers for your operating system (Windows XP or Windows 7 / Vista). 3.
Once you click on Next, the installation of several drivers will commence, one at a time. Windows may request a restart. Select cancel and do not restart the computer until all drivers are installed. Accept all the default values throughout the installations. Drivers include: a) Microsoft .NET Framework 2.
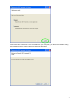
If Microsoft .NET Framework 2.0 is not installed on your computer, you will need to install it using the installation wizard.
Wireless USB WinDrivers Installation will start automatically.
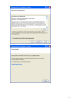
USB Tablet Manager Do not restart! If you mistakenly restart, run the installer again.
Power Presenter RE Optional installation: Power Presenter RE is a simple tool that lets you use the pen to markup or annotate any displayed document.
DisplayLink Graphics Adapter Software 12
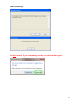
After installation of all software, the MirrorBoard Setup Wizard will request that you restart your PC. Click on Restart to comply. A gray icon will appear in the Windows system tray (lower right of the desktop). In Windows 7, you may have to click on the up arrow to show all icons. Connect MirrorBoard to the computer for the first time Plug the included wireless USB dongle into the computer. The drivers will install automatically and the gray icon will turn red. If requested, restart Windows.
Windows 7: Click the icon and choose “Advanced Configuration.” Set “Multiple displays” to “Duplicate these displays.” Click “Apply.” Please note that your computer display may adjust. The MirrorBoard automatically sets both the MirrorBoard and the computer display to a common resolution. You may see “black bars” or a lower resolution on MirrorBoard and/or the computer display. 7.
Calibrate the Pen The pen must be calibrated prior to first use. Click the Pen Pad icon and choose “Calibration”. Follow the instructions. Set other pen properties according to your preference. Your MirrorBoard is now ready for first use.
Chapter 3 Using MirrorBoard • • • • • General Use Using the Pen Power Presenter RE Touch Buttons Using the MirrorBoard with a Projector General Use On/Off Turn on the MirrorBoard by holding the green button on the top left end of the unit for one second and then releasing it. After a few seconds, the icon in the computer taskbar icon will turn green. If you get a pop up notice “For Help with wireless audio click here,” ignore the notice. The MirrorBoard does not have audio capabilities.
Windows 7: Click the icon and choose “Advanced Configuration” or right click on the Desktop and select “Screen resolution”. Set “multiple displays” to “Duplicate these displays.” Click “Apply.” Please note that your computer display may adjust. The MirrorBoard automatically sets both MirrorBoard and the computer display to a common resolution. You may see “black bars” or a lower resolution on MirrorBoard and/or the computer display.
Power Presenter RE Power Presenter RE is a simple tool to use the pen to markup or annotate any document displayed. NOTE: Power Presenter RE only works when MirrorBoard is connected to the computer. If MirrorBoard is not connected, the following error message will appear: Start Power Presenter RE by double clicking the icon on the desktop or by going through the “Start” menu (Start>All Programs>Power Presenter RE).
For additional information, refer to the Power Presenter RE Manual: Start>Program Files> Power Presenter RE> Manual 20
Touch Buttons MirrorBoard has seven touch buttons on the front panel. Activate these buttons with your fingers – Do not the pen. 1 2 3 4 5 6 7 1) ESC: Allows you to exit current function 2) Decrease display brightness 3) Increase display brightness 4) Page Down 5) Page Up 6) Zoom Out 7) Zoom In Note: Brightness controls are only active when MirrorBoard is running on AC power. When battery power is in use, the unit automatically dims to the lowest setting to conserve power.
If MirrorBoard does not show the complete desktop, set the computer’s resolution to 800 by 600. (Right click on desktop, select Properties, Settings tab). Windows 7: Make sure that your MirrorBoard is powered on and connected wirelessly to the computer. Then plug in your projector to the PC as you would normally. Right click the Desktop, and select Screen Resolution. You should see three displays shown in the window.
Next, click on Screen 2 (Projector), and in the Multiple Displays section, select "Duplicate Displays 2 and 3". Click Apply. Next, select the display that says 2|3. Check the "Make This My Main Display" box, and click Apply. Now, the displays on the MirrorBoard and the projector should be visible. Next, click on screen 1 (or the computer's main display). In the Multiple displays drop down box, select "Disconnect that display". Close all of the Display properties windows.
Chapter 4 Troubleshooting & FAQ’s MirrorBoard is showing the desktop background, but not the icons or Start Menu: MirrorBoard has to be set to “Mirror” mode to show the desktop. Select the DisplayLink icon in your system tray, and select “Mirror” from the list. Your display may flash once or twice and then MirrorBoard should display the desktop. MirrorBoard is showing only part of the desktop: Make sure MirrorBoard is in “Mirror” mode (see above). Set the resolution of your computer to 800 by 600.
Appendix Optoma Global Offices For service or support please contact your local office. USA 3178 Laurelview Ct. 888-289-6786 Fremont, CA 94538, USA 510-897-8601 www.optomausa.com services@optoma.com Canada 2420 Meadowpine Blvd., Suite #105 888-289-6786 Mississauga, ON, L5N 6S2, Canada 510-897-8601 www.optoma.ca services@optoma.com Europe 42 Caxton Way, The Watford Business Park Watford, Hertfordshire, WD18 8QZ, UK +44 (0) 1923 691 800 www.optoma.
Precautions Do not use MirrorBoard near water or moisture. To reduce the risk of fire and/or electric shock, do not expose the product to rain or moisture. Clean only with dry cloth. Only use attachments/accessories specified by the manufacturer. If the MirrorBoard becomes excessively warm or emits an unusual smell while the battery is charging, immediately disconnect the charging cable from the product and turn off MirrorBoard.