DC455 User Manual Visualizer Document Camera TS-82-925-90020
:HOFRPH 7KDQNV IRU SXUFKDVLQJ WKLV SURGXFW 3OHDVH UHDG WKH LQVWUXFWLRQV FDUHIXOO\ EHIRUH XVLQJ WKLV SURGXFW )&& &RPSOLDQFH 6WDWHPHQW &ODVV $ 7KLV GHYLFH FRPSOLHV ZLWK 3DUW RI WKH )&& 5XOHV 2SHUDWLRQ LV VXEMHFW WR WKH IROORZLQJ WZR FRQGLWLRQV WKLV GHYLFH PD\ QRW FDXVH KDUPIXO LQWHUIHUHQFH DQG WKLV GHYLFH PXVW DFFHSW DQ\ LQWHUIHU HQFH UHFHLYHG LQFOXGLQJ LQWHUIHUHQFH WKDW PD\ FDXVH XQGHVLUHG RSHUDWLRQ )HGHUDO &RPPXQLFDWLRQV &RPPLVVLRQ )&& 6WDWHPHQW 7KLV (TXLSPHQW KDV E
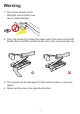
Warning 1. Do not look directly at the LED light source,which may cause retinal damage. 2. Carry the product by holding the lower part of the main unit in both hands. Never hold the product by the arm or the camera head only. 3. The camera can be damaged if it hits a desk surface or any hard object. 4. Never turn the arm in the opposite direction.
Preparing the Document Camera » Knowing the Document Camera Parts &DPHUD +HDG /(' /DPS /HQV 5RWDU\ &RQWURO 3DQHO 6' &DUG 6ORW 5HPRWH &RQWURO 6LJQDO 5HFHLYHU 6SHDNHU 5HPRWH &RQWURO 6LJQDO 5HFHLYHU $QWL WKHIW 6ORW +'0, ,QSXW 3RUW +'0, 2XWSXW 3RUW 9*$ ,QSXW 3RUW 9*$ 2XWSXW 3RUW 86% 3RUW '& 9 3RZHU 6RFNHW 0LFURSKRQH 2
» Control Panel LAMP ZOOM - ZOOM+ BRIGHT FREEZE AF HDMI OUTPUT VGA FLIP PC RECORD MENU PLAY Button Function SNAP Button Function Power on/off Pass the signal from PC Invert image 180° Show/hide brightness adjustment bar. "Freeze" the current image or "Pause" the clip while playing video Turn on/off the LED lamp and adjust the brightness.
» Remote Control Button Function Brightness hotkey Power on / off Freeze current image.
» Setting up Camera Head Roll the lens rotator to rotate image 90°. 90° 90° Illumination Lamp ,I \RX DUH LQ D GDUN HQYLURQPHQW SOHDVH WXUQ WKH /(' ODPS RQ WR PDNH EHWWHU H[SRVXUH 1. 3UHVV WKH /(' ODPS EXWWRQ RQ WKH EDVH WR WXUQ RQ RII WKH /(' ODPS $GMXVWLQJ WKH EULJKWQHVV E\ SUHVVLQJ WKH ODPS EXWWRQ 5
» Basic Operation Menu options in Preview Mode Name Icon Option Negative Description Use the Right / Left buttons to make the image brighter / darker To improve the tint of color-based subjects The function is designed especially for text-based documents to which can be enhanced white and black subjects such as characters and lines. To output a black & white camera image.To make the image easier to view,select this when shooting black & white documents etc.
Setting On / Off Beep Enable beep sound on / off the frequency standard of your local power supply.
Adjusting the brightness 3UHVV %5,*+71(66 EXWWRQ RQ WKH FRQWURO SDQHO FRQWURO RU UHPRWH 8VH RU EXWWRQV WR LQFUHDVH RU GHFUHDVH WKH EULJKQHVV OHYHO Zoom Function 1. Use the Zoom button ( / ) to zoom in or zoom out the screen. Adjusting the focus < Automatic focus Press AF button ( ) to do an one-time auto focus. This function provides a one-shot auto focus.
Inserting and Ejecting a SD / SDHC card (Not supplied) ,QVHUW D PHPRU\ FDUG 6' 6'+& 00& 00& ZLWK WKH ODEHO IDFLQJ XS XQWLO LW UHDFKHV WKH HQG RI WKH VORW :KHQ WKH FDUG LV LQVHUWHG VXFFHVVIXOO\ WKH LFRQ ZLOO DSSHDU RQ VFUHHQ DQG WKH LQWHUQDO PHPRU\ ZLOO EHFRPH LQDFFHVVLEOH 7R UHPRYH WKH FDUG SXVK WKH FDUG WR UHOHDVH LW DQG WKHQ SXOO LW RXW JHQWO\ :KHQ XVLQJ D QHZ PHPRU\ FDUG \RX DUH UHFRPPHQGHG WR IRUPDW WKH FDUG ZLWK WKH GHYLFH 'R QRW WXUQ RII WKH GHYLFH ZKLOH IRUPDWWLQJ
Making the Connections 6\VWHP 'LDJUDP VGA OUT VGA IN DC IN HD OUT HD IN 6WHS 3OXJJLQJ LQ WKH 3RZHU 2XWOHW Use power adapter to connect DC IN connector on the product to a standard 100V~240V AC power outlet. 7KH W\SH RI SRZHU DGDSWHU LV GHSHQGLQJ RQ \RXU FRXQWULHV UHJLRQV 6WHS 2XWSXW 5HVROXWLRQ DQG $VSHFW 5DWLR Various output resolutions are available depending on the output and aspect ratio setting.
6WHS &RQQHFWLQJ ZLWK &RPSRQHQWV Product Port Display PC Port Device Port Cable RGB OUTPUT RGB INPUT VGA RGB INPUT RGB OUTPUT HDMI OUT HDMI-INPUT HDMI USB HDMI IN HDMIOUTPUT Micro USB TYPE A Port Connecting the Output Display 7XUQ RQ SURMHFWRU RU DQ\ GLVSOD\ GHYLFH &RQQHFW D 9*$ &DEOH WR 9*$ 287 3RUW RU +'0, &DEOH WR +'0, 287 3RUW &RQQHFW WKH RWKHU HQG RI 9*$ &DEOH WR 9*$ ,Q 3RUW RU RWKHU HQG RI +'0, &DEOH WR +'0, ,Q 3RUW RI \RXU SURMHFWRU RU GLVSOD\ GHY
Connect via USB Press MENU ( ) button @ ! J= [ \ J Choose "Disk" to connect mass storage. Choose "PC Cam" to use as a PC-Cam. 3OHDVH QRWLFH WKDW WKH YLGHR FOLSV DUH UHFRUGHG LQ $9, IRUPDW DQG DUH FRPSLOHG DV &/,3[[[[ DYL [[[[ DUH IRXU VHULDO QXPEHUV %HIRUH YLHZLQJ WKHVH YLGHRV RQ \RXU 3& \RX PD\ QHHG WR LQVWDOO VRPH PHGLD SURJUDPV 7XUQ RQ WKH GRFXPHQW FDPHUD &RQQHFW WKH SURGXFW WR \RXU FRPSXWHU ZLWK 86% FDEOH 3UHVV 0(18 ʿ VHOHFW Ą86% &
3DVVWKURXJK )XQFWLRQ 7R GLVSOD\ FRPSXWHU LPDJH SUHVV 3$667+528*+ EXWWRQ RQ WKH FRQWURO SDQHO )RU ODSWRS WR RXWSXW GLVSOD\ PRGH XVH WKH NH\ERDUG FRPPDQG )Q WR VZWLFK EHWZHHQ WKH GLVSOD\ PRGHV )RU GLIIHUHQW FRPPDQG SOHDVH UHIHU WR \RXU ODSWRS PDQXDO 7KH VLJQDO LV RQO\ SDVV WKURXJK IURP 9*$ ,1 SRUW WR 9*$ 287 SRUW RU +'0, ,Q SRUW WR +'0, 2XW SRUW RQ GRFXPHQW FDPHUD 3OHDVH FRQQHFW DQ RXWSXW GHYLFH WR GLVSOD\ WKH LPDJH RQ FRPSXWHU DC IN HD OUT HD IN RGB )RU ODSWRS WR RXWSXW GL
» Advanced operation Highlight function 1. Use the Highlight display to draw attention to a particular section of the output image. 2. Press the Highlight button ( ) on the remote control, and use the direction buttons to move the nighinght area. Mask function 1. You can mask a section of the output image. ) on 2. Press the Mask button ( the remote control, and use the direction buttons to move the masked area.
Connect to a microscope Connect to a microscope enables you to examine microscopic objects on a big screen. 1. Adjust the microscope and focus objects. 2. Choose an appropriate microscope adapter. 3. Microscope adapter accessories are applicable to Ø28mm,Ø31mm, Ø33mm, and Ø34mm eyepieces. )RU H\HSLHFHV RI DERXW ¨ PP DQG ¨ PP RQO\ D PLFURVFRSH DGDSWRU ZLWK ¨ RU ¨ PP ODEHO VKRXOG EH LQVWDOOHG )RU D ¨ PP H\HSLHFH LQVHUW WKH ¨ PP DGDSWHU LQWR WKH PLFURVFRSH DGDSWHU )RU D ¨ PP H\HSLHFH LQVHUW
» Storing 1. Power off the product. OUTPUT 2. Unplug the AC adapter from the wall outlet. Disconnect the AC Adapter and all cables. 3.
» Troubleshooting Problem Cannot power on normally. Cause The AC adapter is not correctly connected to the wall outlet or the document camera. Cannot take pictures Out of memory. and video clips. Solution Re-connect one end of the AC adapter to the document camera and the other end to a wall outlet. Free some space from the SD / MMC card or the internal memory. Using a “protected” SD card. No image output after The document camera is not connecting. correctly connected to the external device.
Problem The LCD screen displays “MEMORY ERROR” or “CARD ERROR” message or memory card cannot be read. Cannot delete the pictures and video clips, and also cannot # memory card. Cannot view the video clips on my computer. TV screen does notdisplay after connecting the product to TV. Noises occur when viewing images on the LCD screen or on the computer. Cause The format of the memory card is not compatible with the document camera. The memory card is corrupted. Solution Format the card.