GENERAL LAYOUT EDITOR User’s Manual Version 1.
GENERAL L AYOUT EDITOR Chapter 1: Introduction ................................................... 1 System Requirements...................................................... 1 Installing the Software ..................................................... 1 Opening the Software....................................................... 5 Chapter 2: GLE Application Window ............................... 6 Main Menu........................................................................ 6 File Menu..............
Table of Contents GENERAL L AYOUT EDITOR To modify selected audio file .......................................22 Ticker List Window.......................................................... 22 To add a ticker .............................................................24 To manage tickers ........................................................24 To modify selected ticker .............................................24 Adjusting the Layer Area...................................................
1 GENERAL L AYOUT EDITOR General Layout Editor (GLE) is a Windows application program which is used to design program contents for digital signage players. GLE supports various audio, video and image file formats for functionality to meet today’s fast-pacing business technology environment. With it’s user-friendly interface, GLE makes it easy for users to utilize audio, video, image, and tickers then combine them to play simultaneously on the same screen.
Introduction 1 GENERAL L AYOUT EDITOR 2. Double click “setup.exe”. The window below appears. 3. Click Next to select installation folder.
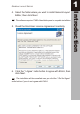
1 GENERAL L AYOUT EDITOR The software requires 17MB of harddisk space to complete installation. 5. Read the End-User License Agreement carefully. 6. Click the “ I Agree” radio button to agree with EULA, then click Next. The installation will be cancelled once you click the “I Do Not Agree” radio button if you do not agree with EULA. 3 Introduction 4. Select the folder where you want to install General Layout Editor, then click Next .
1 Introduction GENERAL L AYOUT EDITOR 7. Click Next to confirm installation. 8. Follow the setup wizard to complete installation.
1 GENERAL L AYOUT EDITOR Opening the Software To open GLE from Windows desktop, go to Start > All Programs > General Layout Editor > GLE . 5 Introduction 9. When Installation Complete window appears, click Close.
GLE Application Window 2 GENERAL L AYOUT EDITOR Chapter 2: GLE Application Window This chapter describes th e General Layout Editor interface, main menu and the toolba r . It is important to have full knowledge of these functions to maximize the features of GLE. Main Menu Toolbar Program List Window Layout Page Propert y W indow Main Menu The main menuappears at the top of the application window. It consists of the following menu items:File, Program, Object, Language, View, and Help.
2 GENERAL L AYOUT EDITOR Filemenu contains basic file operations. Command Shortcut Description New Ctrl+N Creates a new project file. Open Ctrl+O Opens an existing project file (*.sll). Save Ctrl+S Saves the current project file. Save As Saves the current project file to a new file name. Save As Templae Saves the current project file as a template. Export Exports the current project file to a playlist. Exit Closes the application program.
GLE Application Window 2 GENERAL L AYOUT EDITOR Object Menu Objectmenu allows users to add layers to the program. Command Description Ticker Adds a ticker layer to the layout. Image Adds an image layer to the layout. Video Adds a video layer to the layout. Audio Adds an audio layer to the layout. When you select an item, a checkmark appears. Move the mouse pointer to the layout page, notice that the mouse pointer appears as +.
2 GENERAL L AYOUT EDITOR Help Menu Helpmenu contains software in formation and online user manual. Toolbar The toolbar acts as shortcuts to some basic GLE functions. Icon Item Description New Click to create a new project file. Open Click to open an existing project file. Save Click to save the current project file. New Program Click to add a new program to the project file. Template Click to use an existing template.
GLE Application Window 2 GENERAL L AYOUT EDITOR Icon Item Description Image Click to add an image layer. Video Click to add a video layer. Audio Click to add an audio layer. Program List Window The program list window shows the project structure. The project file, called Setup, appears on top of the tree. All programs added in the project file are displayed below it. See also “Adding and Deleting programs” on page 31.
2 GENERA L L AYOU T EDITOR The Layout Page shows all the items designed by the user. It contain layers and displays elements. It appears as a black window when no layer is ad ded to the layout. Layout Page The layout size is 720 (width) x 480 (height). All programs in t he project use the same layout size.
Creating Contents 3 GENERAL L AYOUT EDITOR Chapter 3: Creating Contents This chapter will guide users on how to create contents for your players. To create contents, do the following steps: 1. Select a template. See “Using a Template” below. 2. Add elements to the layout. See “Adding Elements to Layers”on page 14. 3. Set layout background. See “Setting the Background” on page 25. 4. Create more programs. See “Creating More Programs”on page 29. 5. Assign properties for each program.
3 GENERA L L AYOU T EDITOR When you open the GLE application,the Template window appears. To use a template, select and click on the desired template, then click OK. To design your own layout, click . Cancel Understanding Template icons A template may contain more than one layer. Icon - Name Color Description Video Pi nk Template contains video layer. Image Bl ue Template contains image layer. Audio - Template contains audio layer. Ticker Green Template contains ticker layer.
Creating Contents 3 GENERAL L AYOUT EDITOR When you select an existing template from the Template window, the layers of the template are shown in the layout page. Below is an example of a template with video, image and ticker layers. Adding Elements to layers After selecting the template, you are now ready to add elements to the layers on your layout . An element refers to the attached file to be displayed usingthe layers on the layout.
3 GENERAL L AYOUT EDITOR You can add several video elements to one video layer in your layout. GLE supports the following video formats: AVI, WMV, MPG,ASF, MOV, FLV, and VOB . Preview of the selected video. List of the video files added . I t em / Button Vi deo Length Total Lengt h Description Shows the duration of the selected video.h Shows the total duration of all the added videos. butto n Plays the selected video on the list. butto n Stops preview of the video.
Creating Contents 3 GENERAL L AYOUT EDITOR Item / Button Description Delete button Click to delete the selected video from the list. Move up button Click to move the selected video up on the list. Move down button Click to move the selected video down on the list. Ok button Click to finalize and close the video file list window. To add videos 1. Click Add, the following window dialog appears. 2. Select the location and video file you want to add.
3 GENERAL L AYOUT EDITOR 1. Select the video from the list. 2. Click the button of desired function (play, delete, move up, move down). To modify selected video 1. Double click the video you want to modify from the list. 2. The Open window dialog appears, select the video to replace the previous one. 3. Click Open. The list shows the replaced video. Image File List Window You can add several image elements to one image layer in your layout.
Creating Contents 3 GENERAL L AYOUT EDITOR Item / Button Description Duration Type the duration (seconds) to display the image. Checkbox Check to set the same duration for all added image files. Add button Click to add an image file. Delete button Click to delete the selected image from the list. Move up button Click to move the selected image up on the list. Move down button Click to move the selected image down on the list.
3 GENERAL L AYOUT EDITOR To manage images 1. Select the image from the list. 2. Set the duration. 3. Click the button of desired function (delete, move up, move down). To modify selected image 1. Double click the image you want to modify from the list. 2. The Open window dialog appears,select the image to replace the previous one. 3. Click Open. The list shows the replaced image. 19 Creating Contents 2. Select the location and image file you want to add.
Creating Contents 3 GENERAL L AYOUT EDITOR Audio File List Window You can add several audio elements to one audio layer in your layout. GLE supports MP3 and WAV audio formats. List of the image files added. Item / Button Description Audio Length Shows the duration of the selected audio Total Length Shows the total duration of all the added audio files. Button Button Add button Delete button Move up button Plays the selected audio on the list. Stops playing the selected audio.
3 GENERAL L AYOUT EDITOR Ok button Description Click to finalize and close the audio file list window. To add audio files 1. ClickAdd, the following window dialog appears. 2. Select the location and audio file you want to add. To add more files, simply select multiple files. 3. Click Open. 4. The audio file is added to the end of the list. You can also use Windows “drag and drop” function to add more files in the file list window. To manage audio files 1. Select the audio file from the list. 2.
Creating Contents 3 GENERAL L AYOUT EDITOR To modify selected audio file 1. Double click the audio file you want to modify from the list. 2. The Open window dialog appears, select the audio file to replace the previous one. 3. Click Open. The list shows the replaced audio file. Ticker List Window The Ticker layer has a default value of Ticker 0. To modify the ticker, double click anywhere on the ticker layer to activate the Ticker list window. Displays the text of selected ticker.
3 GENERAL L AYOUT EDITOR Description Apparel Setting This section is used to change font settings. Font Click to select font from the drop down menu. Style Click to select font style from the drop down menu. Size Click to select font size from the drop down menu. Foreground Click to activate color palette and choose font color. Color Background Click to activate color palette and choose ticker background color. Color Duration Setting This section is used to specify duration settings.
Creating Contents 3 GENERAL L AYOUT EDITOR Item / Button OK Description Click to finalize and close the ticker list window. To add a ticker 1. ClickAdd, the following window appears. 2. Type the text you want to display as ticker. One line of text makes up one ticker. When you press the Enter key on your keyboard, the cursor goes to the next line. Another line of text makes up another ticker. 3. ClickOKto close the window. To add more tickers, repeat the above steps. To manage tickers 1.
3 GENERAL L AYOUT EDITOR After you finalize the layers of your layout, you may adjust the layer area by dragging the end points. See illustration below: Drag the points to adjust layer area. Setting the Background The size of your layers may vary and thus the layout space might not be all covered with layers. An appropriate background can make the design of your layout more attractive. To activate background setting window, double click on the layout space, or click from the toolbar.
Creating Contents 3 GENERAL L AYOUT EDITOR Using Fill Solid Color This function uses a solid color to fill up blank spaces on the layout. 1. From the Background Setting window, as shown below, select Fill solid color radio button. 2. Click the color to activate color palette.
3 GENERAL L AYOUT EDITOR Using Fill Image This function uses an image to fill up blank spaces on the layout. 1. From the Background Setting window, as shown below, select Fill Image radio button. 2. Click . 27 Creating Contents 3. Select desired background color. 4. Click OK to close color palette. 5. The selected color is shown. Click OK to finalize background setting and close window.
Creating Contents 3 GENERAL L AYOUT EDITOR 3. Select the image, then click Open. The selected image is displayed.
3 GENERAL L AYOUT EDITOR Previewing the Program After initial designing, you can preview the program anytime. To preview a program, do the following: 1. Select the program to preview from the program list window. 2. Click from the toolbar. 3. The preview window is activated. Preview of an image layer. The program is previewed continuously. To stop preview and close the window, click . Creating More Programs One playlist can be made up of several programs.
Creating Contents 3 GENERAL L AYOUT EDITOR 2. To use an existing template, select the template, then click OK. 3. The new program is listed on the Program. List 4. To create more programs, repeat steps 1 to 3. To manage your layout, follow the instructions in “Adding Elements to Layers” on page 14. Changing the current template You might want to change the template of the program while you are in the middle of designing it. To do this, just click from the toolbar to activate the template window.
3 GENERAL L AYOUT EDITOR 1. Move the mouse pointer to the program list window. 2. Click the left mousebutton to activate the pop up menu. 3. To delete selected program, click Del. To add a new program, click NewProgram. When there is no selected program, the Del function is disabled. Managing Program Properties The program list window shows the project structure. The project file, called Setup, appears on top of the tree. All programs added in the project file are displayed below it.
Creating Contents 3 GENERAL L AYOUT EDITOR Property Mode Description Click to select project mode from the drop down menu. Loop Loop Options are : • Schedule. To play on a scheduled time. • Loop . For continous playing.o Modifying Program Properties Program properties vary depending on the project mode. To modify the program property, select the program from the program list windo w. The picture on the right shows the properties of a program in Loop mode.
3 GENERAL L AYOUT EDITOR Propert y Descri pt i on Name Click to type the program name. Star t Time The time to start playing the program. Click to activeate Time input window. End Time Start Date The time to stop playing the program. Click to activate Time input window. The date to start playing the program. Click to activate Date window. This pr operty is available only when Repeats is Off. 33 CreatingContents The following properties are only available when the project is in Schedule mode.
Creating Contents 3 GENERAL L AYOUT EDITOR Property Description End Time The date to stop playing the program. Click to activate Date window. This property is available only When Repeats is off. Repeats Click to select repeat options: • Off. Program plays only on the specified Start Date/Time and End Date/Time. • Weekly. Program plays on the specified Start and End Time on a weekly basis. When Weekly is selected, the Repeats On window appears for user to specify the days to play the program.
3 GENERAL L AYOUT EDITOR Saving a project 1. Click from the toolbar. 2. Type the project filename when saving for the first time. 3. Click Save . Saving as another project 1. Click File > Save As from the main menu. 2. Type the new project file name. 3. Click Save .
Creating Contents 3 GENERAL L AYOUT EDITOR Creating a Template You can design a program layout and save it as a template to be used in the future. However, any elements attached to the layers are not saved. 1. Click the toolbar icon to create the layer. Toolbar Icon Stop Adding Ticker Layer Image Layer Video Layer Audio Layer Description Click to stop adding layers. The mouse pointer appears as default pointer. Click to add a ticker layer. Click to add an image layer. Click to add a video layer.
3 GENERAL L AYOUT EDITOR You can delete a user-defined template. 1. Click from the toolbar to activate the template window. 2. Select the template to delete. When a user-defined template is selected, the Delete button is enabled. 3. Click Delete to delete template. System templates can not be deleted. Thus, the Delete button is disabled when a system template is selected. Saving a Playlist File For compatibility purposes, you have to export your project file to a playlist file.
Creating Contents 3 GENERAL L AYOUT EDITOR 2. Save the playlist to a folder with your desired name. 3. Click Save. When you save the playlist file, all related files will be saved to the same folder with the same file name. Exporting Contents to USB drive 1. 2. Insert your USB drive to the computer. Using Windows’ rename function, rename your USB drive to “I207LHN”.
3 GENERA L L AYOU T EDITOR I207LHN(E:) Upgrading Contents to Players Use the USB drive to upgrade your contents to a player. For more details about upgrading contents, please refer to your player manual. The format of external USD memory must be “FAT"or “FAT32". SignShow 7POP can not support “NTFS"format. 39 Creating Contents 3. Copy all the folder contents to the USB drive using Windows'copy and paste functions.
Other Components 4 GENERAL L AYOUT EDITOR Chapter 4: Other Components GLE comes with added components for more functionality. This chapter describes the step-by-step guide on using the following applications: • SD Ghost. See “SD Ghost” below. • Configure File Editor. See “Configure File Editor” on page 43. • Content Packer. See “Content Packer” on page 42. SD Ghost SD Ghost is a utility that copies the entire content of an SD card to another. It can copy up to ten SD cards at one time.
4 GENERAL L AYOUT EDITOR From Windows desktop, click Start > All Programs > General Layout Editor > SD Ghost . SD Ghost will automatically scan for removable disks. 3. Insert the source and the destination SD cards into the card slots. 4. Select the source and destination disk drives. Click here to select source disk. Click to remove the destination disk. Click here to select destination disk. Click to add another destination disk. • Click the+ button to add more destination disks.
Other Components 4 GENERAL L AYOUT EDITOR During the copy process, do not remove the source disk. Doing so will terminate the process and the SD card content may be deleted. If there are several destination disks specified and one of them is removed, SD Ghost will still continue to copy for the remaining destination disks. 6. Click OK when done. Content Packer Content Packeris use to compress a playlist file (.xml) to a zip file. How to Use Content Packer 1. Run the application.
4 GENERAL L AYOUT EDITOR Click here to browse for the .xml file. Click here to select the destination path of the zip file. 3. Zip the file. Click Packing to start zip. Indicates packing is complete. 4. Click to close the application. Configure File Editor Configure File Editor(CFE) is use to create configuration files from your computer. When a configuration file is created, you can simply copy the file to an external USB memory and upload it to the signage player.
Other Components 4 GENERAL L AYOUT EDITOR • • OS: Windows 2000 / XP / 2003 (32-bit) or Windows Vista USB Host 1.0 or 2.0 CFE Interface Main Menu Toolbar Page Tab Click to access page. Main Menu The main menu consists of the following: Menu File Language Help Submenu Description Generate cfg Saves the data and generates a File configuration (*.cfg) file. English Selects English as the OSD language. Traditional Chinese Selects Chinese as the OSD language. About CFE Displays CFE information.
4 GENERAL L AYOUT EDITOR ClickGeneral tab to configure basic signage player settings. Setting Volume Range / Value 0-10 Description Set the volume level of the signage player. 1-10 Set the brightness level of the LED backlight. Return SW On, Off Enable or disable the 7POP return key. LED On, Off, Blinking Set the LED to On, Off or Blinking. Brightness English, Japanese, Select the signage player’s OSD Language Traditional and language.
Other Components 4 GENERAL L AYOUT EDITOR Network Page Click Network tab to configure Ethernet settings. Setting IP Assignment Description Select IP method: “DHCP” or “Static IP”. IP Address Set the IP address. The player will use this IP address when the IP Assignment is “Static IP”. Net Mask Set the net mask. The player will use this net mask when the IP Assignment is “Static IP”. Gateway Set the gateway address. The player will use this gateway when the IP Assignment is “Static IP”.
4 GENERAL L AYOUT EDITOR Click Connection tab to configure connection settings. Setting Network Mode Description Select network mode: • Active: For auto-download function. • Passive: For web page function. NTP Enable or disable NTP client. NTP Server Set the NTP server address. Time Zone Select the time zone from the list. Proxy Enable or disable proxy for http or ftp connections. Proxy Server Set the proxy server address. User Name Enter the proxy user name.
Other Components 4 GENERAL L AYOUT EDITOR Service Page Click Service tab to configure web download settings. Setting Description Download URL Set the URL to automatically download contents. It should be in the following format: “ftp://IP_ADDRESS/*.zip” User Name Enter the user name to access the content server. Password Enter the password to access the content server. Download Mode Set the FTP download mode: “Active” or “Passive”.
4 GENERAL L AYOUT EDITOR Description Enable or disable player to automatically check the ftp for updates on a daily and timely basis. You can Daily Check 1/2/3 assign up to three checks: Daily Check1, Daily Check2, and Daily Check3. Timer 1/2/3 Set the time when player checks the ftp for updates. These timers work when their corresponding daily checks are enabled. Login Enable or disable user to login to the webpage for content update. User Name Enter the user name for login.
Other Components 4 GENERAL L AYOUT EDITOR How to Use CFE 1. Run the application. To open CFE from Windows desktop, click Start > All Programs > General Layout Editor > CFE. 2. Enter the necessary settings. 3. Generate the configuration file. • Click . CFE automatically assigns “I207LN.cfg” as the filename. The filename has to be “I207LN.cfg”. The filename has to be “I207LN.cfg”. • Select the folder to save file. • ClickSave. 4. Click to close the application. 5.