Overview Thank you for purchasing this portable digital video camera, this camera features video recording at 4K. With resolution of 3840*2160 , it adopted Sony 1/3-inch image sensor,H.264 video encoding format, the video file storage usage is small while it has high image quality! You can connect your camera via Wi-Fi using your smart Phone remotely, to view the camera live screen and use your phone to record or shooting. Safety Instructions Do not drop, impact or puncture the camera.
TABLE OF CONTENTS Getting to Know Your Camera....................................................... 1 Standard Accessories...........................................................1 Charging the Battery.............................................................1 Component Introduction.......................................................3 Getting Started................................................................................. 7 Inserting an SD Card...............................................
Getting to Know Your Camera Standard Accessories 4K Ultra HD Camera Infrared remote control Battery HDMI Cable Charger User Manual USB Cable Warranty Card The above are all accessories, if there is any missing, please contact the seller for replacement.
Charging with USB Cable (Direct Charge) 1.Please Connect the USB Cable to the charging adapter when camera is running low. 2.Connect the other side to the Camera’s USB charging interface. 3.The indicator light will be red when charging; The indicator light will turn green when the charging is completed. Note: 1.When using the charger, please install the battery in the charger slot correctly. 2.For direct charge, please use the 5V/2A-2.5A charging adapter for charging. 3.
Component Introduction Rear View ② ③ ④ ① ⑤ ⑥ ⑦ ⑧ ⑨ ⑩ ⑭ ⑬ Ⅰ Ⅱ Ⅲ Ⅳ Ⅴ ⑫ ⑪
For the function description of the related parts in the above figure, please refer to the following table. No. Name Function description ① IPS Touch Panel Screen preview and video/photo playback. ② Hot shoe interface ③ State Light Mount hot shoe products. Display of mode status. ④ T/W Zoom Button In video/Photo Mode, pull left/ right to zoom in/out;In Playback Mode, pull to switch photos/videos In Menu, pull to menu selection;In Video Playback, pull to adjust the volume.
Switch ⑨ Battery compartment switch Toggle to the right to open the battery compartment. ⑩ Battery Compartment Load NP-120 Battery. I/O Interface 10PIN USB interface:Access the USB Cable to charge Access to an external microphone and charging with“one-to-two” cable switcher HDMI:External HD Cable to connect to TV. Menu Button Press to enter the Menu. DISP Button Short press to switch screen display mode Power Button Power On/Off.
Front View ① ② ⑥ ⑤ ④ ③ For the function description of the related parts in the above figure, please refer to the following table No. Name ① Lens Framing. Horn Plays back sounds. ② Function Description ③ IR night vision light ④ Infrared remote-control receiver Infrared light. Receiving remote command. ⑤ 1/4 Tripod Socket Tripod installation. ⑥ Hand strap mounting hole Install adjustable hand strap.
Getting Started Inserting an SD Card 1.Open the SD cover. 2.Insert the memory card in the direction shown until you hear“Clicks”. 3.Close the SD cover. ※Open the SD cover and press the memory card. Note: 1.When using for the first time, format the SD card On this unit. The SD card needs to be U3. 2.Do not forcefully remove the SD card while working, otherwise it may cause loss of files or machine damage.
Loading Battery 1.Push the OPEN button to the right as shown. 2.The battery compartment pops open, inserts a lithium battery. 3.Close the battery compartment. Note: 1.Do not violently open the battery compartment and remove the battery. 2.The battery needs to be loaded into the battery compartment in a correct direction.
Recording Mode ③ ① ② ⑥ ⑦ ④ ⑧ ⑤ ⑨ ① Recording mode ⑥ ② Resolution ⑦ Memory Card Menu ③ Focus ⑧ Zoom ④ Remaining video recording time ⑨ Playback ⑤ Battery Status 1.Press the power button or open the screen to turn on the camera, push the mode switch button to the video mode to enter the video mode. 2.Set the option of the function you need by the option setting menu. 3.Press the Rec button to start shooting. 4.Press the Rec button again to stop shooting.
Video setting menu Enter the menu by button or touch, you can set the resolution, white balance, exposure and other function parameters to get better video results 1.Press the power button to turn on the camera. 2.Press the menu button or touch the screen to enter the menu.
3.Touch the”Setup” icon on the screen to enter the menu. Name Function Description 4K 30fps/2K 30fps/FHD 30fps/ Resolution HD 30fps/VGA 30fps/FHD 60fps(S)/ HD 120fps(S)/ VGA 240fps(S) AWB Auto/Daylight/Cloudy/Fluorescent/ Tungsten Color Standard/Brown/Black/White/ Realistic Color Exposure +3/+2+1/0/-1/-2/-3 Date Stamp On/Off Metering Multi/Center/Spor 4.By switching the T/W zoom button or swipe screen to select the setting option freely. 5.
Function Name Function Description Time-lapse video By selecting: Off, 1s, 3s, 5s to to compress a few minutes, hours or even days of video playback in a short period of time.
distance. 1.Enter the Video mode,press”Menu button” or press button, to enter the main menu. 2.Touch “Function” to enter the option menu. 3.By switching the T/W zoom button to select the setting option freely. 4.By touching or pressing the “Photo” button to select the option, for example: Focus, enter the option menu, select the option you need, press main menu, press interface.
Photo Mode ① ⑥ ② ⑦ ③ ④ ⑤ ⑧ ⑨ ① Photo mode ⑥ Memory Card ② Resolution ⑦ Menu ③ Focus ⑧ Zoom ④ Remaining number of shoots ⑨ Playback ⑤ Battery Status 1.Press the power button or open the screen to turn on the camera, push the mode switch button to the Photo mode to enter the Photo mode. 2.Set the option of the function you need by the option setting menu.
3.Press the "Photo”button, finish the photo . Photo setting menu Enter the menu by button or touch. You can set the resolution, white balance, exposure and other function parameters to get better photo results in the menu. 1.Press the power button to turn on the camera. 2.Press the menu button or touch the icon on the screen to enter the menu.
3.Touch the”Setup” icon on the screen to enter the menu. Name Function Description Resolution 30M/24M/20M/16M/12M/10M/7MHD/5M/ 2MHD/VGA AWB Auto/Daylight/Cloudy/Fluorescent/ Tungsten Color Standard/Brown/Black/White/ Realistic Color Exposure +3/+2+1/0/-1/-2/-3 Date Stamp On/Off Metering Multi/Center/Spot Sharpness Soft/Normal/Sharp ISO Auto/100/200/400/800/1600 4.By switching the T/W zoom button or swipe screen to select the setting option freely. 5.
Function By using various features in this option menu allows you to take pictures easier and faster Name Function Description Capture Mode By selecting: Off, 2s, 5s, 10s to selfie.
distance. Anti-Shake Turn on this function can effectively reduce the picture jitter cause by strong vibration. Face Detect When this function is turned on, the face will be in priority focus when the camera detects a human face Burst Mode Take three consecutive photos Date Stamp Turn on this function to add a date watermark in the lower right corner of the photo 1.Enter the photo mode,press”Menu button” or press button, to enter the main menu. 2.Touch “Function” to enter the option menu. 3.
Setting Mode Through this setting menu, you can customize the function parameters such as language, date and frequency. Name Function Description Language 13 Languages WI-FI Turning on this function by selecting 2.4G/5G, you can connect the camera with the mobile app and remotely control the camera Sound Turn On/Off the camera button sound Far Mode On/Off Set Date Customize the date and time of the photo or video. Frequency Normally, 60HZ is suitable for US or other countries.
Format Yes/No Default Yes/No 1.Press the power button or open the screen to turn on the camera, push the mode switch button to the SET mode to enter the SET mode. 2.By switching the T/W zoom button or swipe screen to select the setting option freely. 3.By touching or pressing the “Photo“button to select the option. 4.press or to return to the main menu.
Play Back This function allows you to play recorded video or photo in the camera
Video 1.Touch the playback button in the photo or video mode to enter the main playback interface. 2.Touch the video button to enter the video playback interface. 3.Select any one of the video thumbnail to enter the preview screen. 4.Switch to the previous or next by clicking or . 5.By selecting button or “photo button” to start playback. 6.During the playback, press“T/W zoom button” to adjust the sound, press the “photo button” to pause playback, press “record button” to stop playing. 7.
4.Switch to the previous or next by clicking or 5.By tapping or pressing the “Menu” button, you can delete the current file, delete all files, lock or unlock current file or all files. Slide Show 1.Touch the playback button in the photo or video mode to enter the main playback interface 2.Touch the Photo button to enter the Slide Show interface 3.By selecting the play button or “photo “button to start play 4.
Connecting to TV When connect the HDMI to your camera’s HDMI output and your TV, the image on your screen can also be displayed on your TV screen. 1.Press the power button or open the screen to turn on the camera and enter the standby state. 2.Take out the HDM cable and connect the camera with the HDMI connector of the TV. 3.Turn the TV to the HDMI channel, the preview screen will appears on the TV.
Connecting to the Computer This function allows you to use your camera as a MSDC disk or PC Camera MSDC Mode 1.Power on the camera and enter the standby mode. 2.Connect the camera and computer with the cable. 3.The screen will display two options: “MDSC”and “PC Camera”. 4.Select the “MSDC ” by turning the Zoom button. 5.Press photo button to confirm. PC Camera 1.Power on the camera and enter the standby mode. 2.Connect the camera and computer with the cable. 3.
4.Select the “PC Camera ”by turning the Zoom button. 5.Press photo button to confirm. Note:When use the camera as a PC Camera, the camera is not able to record video. APP Using Downloading the APP For Android: Search “D Video” in Play store and download For IOS: Search “D Video” in App store and download. Or scan the QR Code to download the APP. How to Connect Wi-Fi 1.Press the power button or open the screen to turn on the camera, push the mode switch button to the SET mode to enter the “SET” mode. 2.
4.Enter the APP, touch“ Camera”. Note:The Wi-Fi function is a point-to-point wireless connection with a limited distance. The maximum distance is about 7 meters. Please use this function within the effective distance.
Back Setting Lens Preview Battery status Photo mode Resolution Record mode Resolution setting Record/Photo Button Playback Photo/Video Get Started You can remote control the camera to record, photo taking, playback and parameter setting on the APP APP Video Mode 1.Press the on the App user interface to enter the Video mode. 2.Touch the icon , “REC” will be displayed at the top Right of the interface and flashes on the live preview.
recording. 3.Touch the icon again, Stop recording. APP Photo Mode 1.Press the mode. 2.Press the "click". 3.Finished. on the App user interface to enter the Photo icon in live preview mode,the app will sound APP Setting This setting function allows you to customize the parameters of the camera, such as the resolution, audiorecording, and date Press the Setting menu.
ISO Auto/100/200/400/800/ 1600 Wi-Fi setting ID/Password Format YES/NO Default Setting YES/NO Surplus Space View the storage of camera Firmware Version Camera Version APP PlayBack Through this function, the recorded video and photos can be played online on the APP and downloaded to the Phone A.Photo 1.Press the on the App user interface to enter the Play Back mode. 2.In the main interface of the playback, select “Photo” to enter the thumbnail preview interface. 3.
Back mode. 2.In the main interface of the playback, select “Video” to enter the thumbnail preview interface. 3.Select any one of the document thumbnail to play or download the video to local. 4.By selecting the on the upper right corner to single-select/multi-select video, you can delete download it to the local album. or 5.After you press to download the photo to the local album, you can share it to the social media by clicking C. Album 1.Press on the main interface to enter the local album. 2.
or”Photo” to enter the thumbnail preview interface. 3.Select any one of the document thumbnail to play , delete or share it to the social media by clicking Technical Parameters Sensor Sony 13.0 MP CMOS Aperture F:2.0 Focal length f=4.22mm Focus range Macro: 5cm~10cm Near Focus: 25cm~100cm Far Focus: 1m~INF Lens type Digital zoom lens Zoom 64X External Storage Support SD/SDHC Card(U3), Maximum 256GB Screen Video Resolution 3.
Photo Resolution 6400x4800(30M)/5600x4200(24M) 5200x3900(20M)/4608x3456(16M) 4000x3000(12M)/3648x2736 (10M) 3648x2052(7MHD)/2592x1944 (5M) 1920x1080(2MHD)/640x480 (VGA) File format Video:MP4 Photo:JPEG ISO Auto/100/200/400/800/1600 Wi-Fi Support IR Night vision Yes Hot shoe Support external Mic/LED Light USB port USB2.
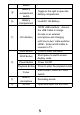
Troubleshooting Trouble Possible reason Solution Cannot power on Battery is not inserted correctly/dead Insert battery correctly/Charge Unclear Focus Out of focus range / lens dirty Shooting in focus able range/Clean the lens Unable to use memory card/unable to record Card damage / SD card does not meet requirement Replace the SD card / Format the SD Card / Use the U3 Card Fail to use it as a PC Cam USB Cable is loose / Computer system version is not compatible Replace the USB interface / Sele
NOTE: This device complies with part 15 of the FCC Rules. Operation is subject to the following two conditions: 1.This device may not cause harmful interference, and 2.this device must accept any interference received, including interference that may cause undesired operation. Any Changes or modifications not expressly approved by t he party responsible for compliance could void the user's authority to operate the equipment.