21057-01 Rev. C Professional Air Purifier AIRP Series User’s Guide Important! Read all instructions carefully, and keep for future reference.
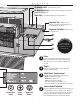
E Enjoy. Total Cleaning System N G L I S H Thank you for purchasing an Oreck Professional Air Purifier! You will enjoy years of cleaner, fresher air with the Oreck air purifier in your home. It includes six different air purification technologies to provide unique protection against airborne pollutants and allergens: Stage 1. The pre-filter removes large particles, including dust, lint, and hair. Stages 2 and 3 are part of the Truman Cell™ proprietary technology. Stage 2.
E Contents. N G L I S H Safety . . . . . . . . . . . . . . . . . . . . . . . . . . . . . . . . . . . . . . . . . . . . . . 4 General Warnings . . . . . . . . . . . . . . . . . . . . . . . . . . . . . . . . . 4 Parts . . . . . . . . . . . . . . . . . . . . . . . . . . . . . . . . . . . . . . . . . . . . . . . 5 Accessories . . . . . . . . . . . . . . . . . . . . . . . . . . . . . . . . . . . . . . 5 Replacement Parts . . . . . . . . . . . . . . . . . . . . . . . . . . . . . . . . 5 Operation . . . .
E Safety. N G L I S H General Warnings IMPORTANT SAFETY INSTRUCTIONS! When using an electrical appliance, basic precautions should always be followed, including the following: READ ALL INSTRUCTIONS BEFORE USING THIS AIR PURIFIER WARNING To reduce the risk of fire, electric shock, or injury: • Do not use outdoors or on wet surfaces. • Use only as described in this manual. • Do not use with damaged cord or plug.
E N G L I S H • Do not place open flames, including candles, directly in front of the air purifier. Doing so may result in minor or moderate injury. • Keep objects away from the front grill. It is important to consider the following when deciding on where to locate the air purifier: • Position the air purifier on a flat, solid, stable surface. • Position the air purifier where the dirty air is not drawn across your head or body while sitting or sleeping.
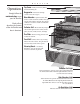
E Operation. Simply follow the numbered steps to use your Air Purifier. Each call out describes the features of the Air Purifier and how it functions. N G L I S H Top Cover - Easily removed by sliding forward and lifting off. Oxygenator - Permanent cartridge converts ozone into oxygen. Odor Absorber - Optional feature that removes odors and chemical fumes from glue, solvents and synthetic materials. The purifier continues to clean the air with or without the odor absorber.
E N G L I S H Air Direction Grill - Directs the flow of air. Air Direction Control - Slide the button in the direction that you would like the air to flow. Night Light - Conveniently lights your room if desired. Fragrance Tray - Holds the scent cartridge to provide optional fragrances to the air returned to the room. Fragrance Tray Button - Push to open the fragrance tray.
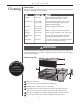
E Cleaning. N G L I S H Cleaning Times Proper care and cleaning of the air purifier is critical to performance. The following chart shows the cleaning intervals and methods. Part Cleaning Time Method Cabinet As needed Wipe with damp cloth first. If required, follow with mild non-abrasive cleaner. Collector Cell 2 to 4 weeks, or as needed Spray Oreck Assail-a-Cell cleaner or soak in warm water with mild liquid detergent. Rinse and dry thoroughly.
E N G L I S H Cleaning the Collector Cell Note: The collector cell may require more frequent cleaning if “arcing” occurs. Arcing is a sharp snapping sound that occurs when large particles of dust are collected in the collector cell. If prolonged or continuous arcing occurs the collector cell should be cleaned. 2 TI air 3 for clean S P Oreck Assail-a-Cell® cleaner is an excellent way to clean the Collector Cell.
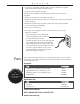
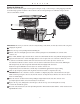
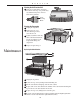
E N G L I S H Cleaning the Air Direction Grill 1 Using the cleaning brush (located on the bottom of the top cover), brush away any debris that may have collected between the grill slots. Oreck Cleaning Brush Cleaning the Oxygenator 1 Unplug the air purifier. 2 Remove the top cover odor absorber, pre-filter, and collector cell. 2 CHECK COLLECTOR CELL HOLD CHANGETO RESET ODOR ABSORBER HIGH HOLD AIR TO RESET REVITALIZER MEDIUM SILENCE PO W 3 4 Maintenance.
E Troubleshooting Service problems that appear to be major can often be solved easily. You can be your own troubleshooter by reviewing this guide. All other servicing should be done by an Oreck authorized service center. N G L I S H Problem Check What to do Unit does not turn on. • Power Cord • Plug in the power cord. • Power Button • Set power button for desired blower speed. • Front Grill • Reinsert front grill, sliding right until it locks into place.
E Warranty. N G L I S H ORECK MANUFACTURING COMPANY: (Oreck Manufacturing Company gives you the following limited warranty for this product only if it was originally purchased for residential use, not resale, from Oreck or an Oreck Authorized Retail Dealer.
E S P A Ñ O L Purificador profesional de aire Serie AIRP Guía del usuario ¡Importante! Lea todas las instrucciones cuidadosamente, y conserve esta Guía para consultas en el futuro.
E Disfrute. Sistema de limpieza total Llame. Haga clic. Visite. S P A Ñ O L ¡Gracias por comprar un Purificador Profesional de Aire Oreck! Usted disfrutará de muchos años de aire más limpio y fresco con el purificador de aire Oreck en su hogar. Incluye cinco tecnologías diferentes de purificación de aire, para proporcionar una protección exclusiva contra los contaminantes y alérgenos que se encuentran en suspensión en el aire: Etapa 1.
E Índice. S P A Ñ O L Seguridad . . . . . . . . . . . . . . . . . . . . . . . . . . . . . . . . . . . . . . . . . . 16 Advertencias generales . . . . . . . . . . . . . . . . . . . . . . . . . . . . . 16 Piezas . . . . . . . . . . . . . . . . . . . . . . . . . . . . . . . . . . . . . . . . . . . . . 17 Accesorios . . . . . . . . . . . . . . . . . . . . . . . . . . . . . . . . . . . . . . . 17 Piezas de repuesto . . . . . . . . . . . . . . . . . . . . . . . . . . . . . . . . . 17 Operación . . . . . .
E Seguridad. S P A Ñ O L Advertencias generales ¡CINSTRUCCIONES DE SEGURIDAD IMPORTANTES! Cuando se use un artefacto eléctrico deben observarse siempre las precauciones básicas, incluidas las siguientes: LEA TODAS LAS INSTRUCCIONES ANTES DE UTILIZAR ESTE PURIFICADOR DE AIRE ADVERTENCIA - Para reducir el riesgo de incendio, choque eléctrico o lesiones: • No lo use en exteriores o sobre superficies húmedas. • Úselo únicamente de la forma descrita en este manual.
E S P A Ñ O L • No coloque llamas abiertas, incluidas las velas, directamente frente al purificador de aire. Si lo hace, puede recibir lesiones menores o moderadas. • Mantenga los objetos lejos de la rejilla frontal. Al decidir dónde ubicar el purificador de aire, es importante considerar lo siguiente: • Posicione el purificador de aire sobre una superficie plana, sólida y estable. No coloque nunca la unidad sobre superficies blandas como una cama, sofá o alfombra.
E Operación. Para utilizar su Purificador de Aire, siga simplemente los pasos numerados. Cada leyenda describe las características del Purificador de Aire y el modo en que funciona. S P A Ñ O L Cubierta superior - Se extrae fácilmente deslizándola hacia adelante y levantándola. Oxigenador El cartucho permanente convierte el ozono en oxígeno. Absorbedor de olores - Característica opcional que elimina los olores y las emanaciones químicas de pegamento, solventes y materiales sintéticos.
E S P A Ñ O L Rejilla de dirección de aire - Dirige el flujo de aire. Control de dirección de aire - Deslice el botón en la dirección en la que usted desea que circule el aire. Luz de noche - Ilumina cómodamente su habitación, si lo desea. Bandeja de fragancia - Contiene el cartucho de aroma para proporcionar fragancias opcionales al aire devuelto a la habitación. Botón de bandeja de fragancia Oprímalo 11 para abrir la bandeja de fragancia.
E Limpieza. S P A Ñ O L Tiempos de limpieza El cuidado y limpieza adecuados del purificador de aire son esenciales para su funcionamiento. El cuadro que sigue a continuación indica los métodos e intervalos de limpieza. Pieza Tiempos de limpieza Método Gabinete Según necesidad Limpie primero con un paño húmedo. Si fuera necesario, continúe con un limpiador suave, no abrasivo.
E S P A Ñ O L Limpieza de la celda colectora Nota: La celda colectora puede necesitar una limpieza más frecuente si se producen ‘arcos’. El arco es un sonido agudo de chasquido, que se produce cuando la celda colectora recolecta partículas grandes de polvo. Si se producen arcos en forma prolongada o continua, debe limpiarse la celda colectora. 2 3 5 7 1 9 IMPORTANTE: No intente limpiar la celda colectora insertando un paño, cepillo u otro objeto entre sus placas.
E S P A Ñ O L Limpieza de la rejilla de dirección de aire 1 Por medio del cepillo limpiador (ubicado en la cara inferior de la cubierta superior), elimine la suciedad que pudiera haberse recolectado entre las ranuras de la rejilla. Cepillo limpiador Oreck Limpieza del oxigenador 1 Desenchufe el purificador de aire. 2 2 Extraiga la cubierta superior, el absorbedor de olores, el prefiltro y la celda colectora.
E Localización de fallas Algunos problemas de servicio que parecen ser importantes, pueden a menudo resolverse fácilmente. Consultando esta guía, usted puede ser su propio localizador de fallas. Todo otro servicio debe realizarlo un centro autorizado de servicio Oreck. S Problema La unidad no enciende. P A Ñ O L Verifique Qué hacer • Cordón de alimentación eléctrica • Enchufe el cordón de alimentación eléctrica.
E Garantía. S P A Ñ O L ORECK MANUFACTURING COMPANY: (Oreck Manufacturing Company le otorga la siguiente garantía limitada para este producto, únicamente si el mismo ha sido comprado originalmente para uso residencial, no para reventa, a Oreck o a un Distribuidor Minorista Autorizado Oreck).