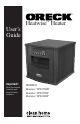
User’s Guide Important! Read this manual carefully, and keep for future reference.
Enjoy Congratulations on your purchase of the Oreck Heatwise™ Infrared Heater. The infrared heating technology utilized in the heater warms the objects in the room, from top to bottom. The heat in the room will never hover uselessly near the ceiling again! In addition to helping you keep money in your pocket, the Oreck Heatwise™ Infrared Heater goes a step beyond to also enhance the quality of comfort you experience in the heated room.
Contents Safety . . . . . . . . . . . . . . . . . . . . . . . . . . . . . . . . . . . 1 General Warnings . . . . . . . . . . . . . . . . . . . . . . . 1 Features . . . . . . . . . . . . . . . . . . . . . . . . . . . . . . . . . 3 Operation . . . . . . . . . . . . . . . . . . . . . . . . . . . . . . . . . 4 Power On/Off . . . . . . . . . . . . . . . . . . . . . . . . . 4 Setting Temperature . . . . . . . . . . . . . . . . . . . . . 4 Setting Timer . . . . . . . . . . . . . . . . . . . . . . . . . .
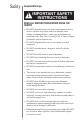
Safety General Warnings ! IMPORTANT SAFETY INSTRUCTIONS READ ALL INSTRUCTIONS BEFORE USING THE HEATER • DO NOT plug heater into any other cord connected device such as a power strip, surge protector, multiple outlet adapter, grounding adapter, outlet-type air fresheners or extension cords. Plug into a 3-prong 124V 15 amp or higher grounded circuit receptacle only. • DO NOT plug the heater into a loose fitting or broken receptacle. • DO NOT alter the heater’s design or you will void the warranty.
• Heater is hot when in use. To avoid burns, DO NOT let bare skin touch hot surfaces. If provided, use handle when moving this heater. • DO NOT operate any heater with a damaged cord or plug or after the heater malfunctions, has been dropped or damaged in any manner. • To disconnect heater, turn controls to OFF then remove plug from outlet. • Connect to properly grounded outlets only. • To prevent a possible fire, DO NOT block air intakes or exhaust in any manner.
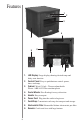
Features 1 2 3 5 4 9 8 7 4 1. 6 LED Display: Large display showing desired temp and delay start function. 2. Control Panel: Easy-to-push buttons control: power, time, and temp. 3. Cabinet: Wood: 3/4 ply - Tuscan walnut finish. Plastic: ABS 94-VO fire retardant plastic 4. Caster Wheels: Free floating for easy relocation. 5. Handle: Easy transport. 6. Power Cord: Plug into the outlet to begin use. 7. Cord Wrap: Convenient cord wrap for transport and storage. 8.
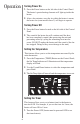
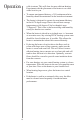
Operation Turning Power On 1. Press the Power button on the left side of the Control Panel. The heater’s quartz heating elements will light up inside the heater. 2. After a few minutes, once the air within the heater is warm, the heater fan (some models have 2) will begin to operate. Turning Power Off 1. Press the Power button located on the left side of the Control Panel. 2.
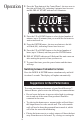
Operation 2. Press the Time button of the Control Panel - the two zeros to the right will flash (:00), indicating 0 minutes have been set and the DELAY START indicator will illuminate. DELAY START SET TEMP INFRARED-ON 3. Press the UP or DOWN button to select desired number of minutes (up to 59 minutes) that you would like the heater to wait to turn itself on. DELAY START 4. Press the ENTER button - the two zero button to the left SET TEMP will flash (00:), indicating 0 hours have been set.
Operation cold air return. This will alow for more efficient heating. Experiment with the placement of the heater to see what works best for you. • To ensure maximum efficiency, a 30% minimum relative humidity should be maintained in the heated environment. • The heater is designed to operate for maximum efficiency in the 68-74 degree range. Due to the soft heat concept, temperatures at 68 degrees F feel as though it were 72 degrees F.
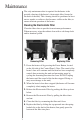
Maintenance The only maintenance that is required for the heater is the periodic cleaning of the heater’s electrostatic filter (located at the back of the unit). This cleaning should be performed at least once a month, or earlier as dust becomes visible on the filter, to ensure efficient operation of the heater. Cleaning the Electrostatic Filter Clean the filter often to provide for maximum performance. When necessary, wipe the cabinet clean with a soft damp cloth and/or furniture polish.
Maintenance Storage When the heater is not being used for an extended period of time, observe the following steps to preserve the life and performance of the unit: • Unplug heater (Do not unplug heater while heater is running). • Gently wrap the power cord into the cord storage compartment in the back of your heater. This will help prevent undue wear and tear on the cord. • Cover the heater to prevent dust from accumulating on or in heater. • Store heater in a dry, low dust environment.
Troubleshooting Service problems that appear to be major can often be solved easily. You can be your own troubleshooter by reviewing this guide. All other servicing should be done by an Oreck authorized service center. Problem The heater’s airflow has been reduced Solution • Make sure the electrostatic filter is clean. • Check front grill and look behind rear air intake for any objects that could obstruct air-flow.
Warranty ORECK MANUFACTURING COMPANY: (Oreck Manufacturing Company gives you the following limited warranty for this product only if it was originally purchased for residential use, not for resale, from Oreck or an Oreck Authorized Retail Dealer.) Oreck will repair or replace, free of charge, to the original purchaser, any part that is found to be defective in material or workmanship within three (3) years following the date of purchase for all residential models.
11
12
© 2009 Oreck Holdings, LLC. All rights reserved.